Pages

Tuesday, 30 March 2021

Journaling is keeping me sane ......

Hello again ........ Happy Tuesday!

Just taking a quick break from cleaning the craft room, so I thought I would share some recent pages from my art journals.

I've been catching up with some online workshops again, getting messy with paints and inks and learning some fun techniques.
The following pages are from Tracy Scott workshops, done via Facebook.  I know I keep saying this but, if you haven't tried one of these yet you need to sign up! 
The workshops are done as Facebook Lives but, you don't need to watch live.  If you'd rather play along and work at your own speed then the videos are always going to be there on replay so you can watch, and rewind as much as you like.

The first two were monthly journaling classes ......  Fresh as a Daisy (which I think was March)


Done in one of my large Dylusions journals, so the flowers are very big and bold ..... love it!


And this one, which I finished yesterday (it's only taken me about a month!!) was from back in February ...... Autumn Leaves


Another large Dylusions journal, across two pages this time.

The tree is hand drawn and painted ..... I surprised myself there!  
And then the leaves have all been cut from a sheet of hand made collage deli paper (another first!) and attached over the top ...... really pleased with this one!


But, I think my favourite workshop done recently has to be the gorgeous Geisha ........ (still can't believe I drew this!!)


This was a three day workshop and worth every minute!  Tracy makes the whole process so easy by breaking it all down into simple to follow step by steps.  
OK, the finished one is not exactly the same as my practice sheet but, she's still beautiful!


Now she is big ...... I used my Dina Wakley Large Media journal for this one ..... it's about 10 x 14.25 inches, so lots of space to work on.  I got a bit carried away and did another double page spread, with a little inspiration from a JOFY project.  


The fan was part of the workshop with Tracy, and is attached with Velcro so it can be removed ..... clever eh!


Thanks for popping by ..... enjoy the rest of your day.
It's the last day of March tomorrow ...... a quarter of the year done already!  A new month means new blog challenges so I'll be back again later in the week.

Cheerio until then ........

Monday, 29 March 2021

Along the Edge for AAA Cards ........

Happy Monday ......

I hope you all had a nice weekend and that you're looking forward to the Easter break coming up ..... a nice long weekend.  Who am I kidding ........ every weekend is a long weekend at the moment.  In fact, during this lockdown I'm never entirely sure what day of the week it is ..... I thought it was Tuesday today!  We'll blame that on the clocks going forward shall we ....... hahaha!

I'm playing along with the latest CAS challenge at AAA Cards ....... 


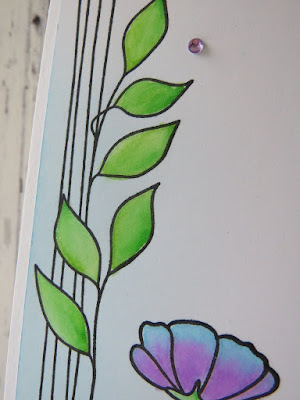
My spring cleaning phase continues ...... in the craft room this time.  I took on the task of sorting through all of my rubber stamps (again!!) and came across a Simon Says stamp set that I thought was perfect for this challenge theme .....


I opted not to use the twist and kept to just rubber stamping.


I simply stamped the images in black ink, and then used a water brush and ZIG markers to add the colour ......


I kept the sentiment simple, and finished off with a few sparkly gems ......


As it's the first time I've used this pretty stamp set I'm also linking up to the NBUS Challenge #24


I'm ashamed to say that I came across quite a few pretty stamp sets that have yet to see an ink pad ...... I must do something about that soon!

Thanks for popping by ..... enjoy the rest of your day and have a great week!
It was vaccine day for hubby and I today ...... whoo hoo!  Our first dose all done, we were in and out in no time, and I didn't feel a thing!


Cheerio until next time ........


Products used:
Stamps: Stronger Together (Simon Says Stamp)
Inks: Versafine Clair - Nocturne; 
Other: ZIG Clean Color Brush Markers; Small self adhesive gems

Thursday, 18 March 2021

Got there in the end ..........

Happy Thursday .......

I hope you're enjoying your week.  I've been catching up with all the boring stuff like ....... housework (boring!), paperwork (even more boring!!), washing and ironing (why are there so many clothes ..... we haven't been anywhere!!! I'm sure I've washed the whole of Lauren's wardrobe this week!)  I've even started cleaning out the kitchen cupboards ..... what's that all about!?

I am playing along with a couple of Blog Challenges today though.  
First up ........ I've got another Christmas card for this month's CAS Christmas Challenge.

The challenge is to use Kraft, Red and White ......


I've used a Julie Hickey stamp set, heat embossed with white powder and then coloured using a red Distress Re-inker ...... using the ink straight from the bottle, with a fine paintbrush.  I love the depth of colour from the re-inker .........


I coloured in the leaves using a white pencil and then I stamped the pretty poinsettia again, onto a separate piece of kraft card, heat embossed and coloured it in the same way, and then fussy cut before attaching it using a foam pad to add a touch of dimension. 


I stamped my sentiment top and bottom ......


And finished with a few white paint splatters .......


It's their 3rd birthday this month at CAS Christmas so ........ Happy Birthday to you!

This next challenge caught my eye on Facebook.  It showed up on my timeline via a FB friend and I thought I'd join in.


It's been a while since I made anything this small ...... and you'd be surprised at how long it took me (and how many attempts!!!) In the end I went with this one, I think it was the third attempt ....... you don't get much more Clean and Simple!


It's a little 6x4 inch card and the stamp I used is from a lovely set by Tracy Easson.  I think it's called Just a Girl and her Forever Friend

I stamped the tiny image with black ink, directly onto my card blank. 


I was going to leave it at that and go with the optional twist of Black & White but, I felt it needed more. It was just a little too CAS even for me!  So ..... I added in the colour using an old Stampin Up! stamp and Distress inks ....... now I'm happy!

CAS, even something so small, can turn out to be the hardest cards to make.  This was my first attempt .... same stamped image, but I felt it need more.   By the time I'd added more  it was bigger than the required one inch!


Second try ....... something different this time but ..... broke the rules again!  By the time I'd added the word Art and the splatters,  it was bigger than one inch on the front ..... arggghhhh!!


I got there in the end though, just in time too as the challenge ends on the 20th!

Thanks for popping by ...... enjoy the rest of your day.

Cheerio until next time ......


Products used:
CAS Christmas

Stamps: Christmas Joy (Julie Hickey Designs)
Inks: Versamark ink; Versafine ink - Satin Red; Distress Re-Inker - Festive Berries
Others: White Embossing Powder (WOW!); White Polychromos Pencil (Faber Castel); White Fresco Finish Chalk paint (splatters) (PaperArtsy)

AAA Card Challenge
Card 1
Stamps: Just a Girl & her Forever Friend (Tracy Easson Illustrations); Playful Backgrounds (Stampin Up!)
Inks: Versafine Clair - Nocturne; Distress Ink - Picked Raspberry, Salty Ocean

Card 2 
Stamps: Just a Girl & her Forever Friend (Tracy Easson Illustrations); Sarah's Choice (IndigoBlu)
Inks: 
Versafine Clair - Nocturne; Distress Inks - Mustard Seed, Festive Berries

Card 3
Stamps: Hey, Chick (Stampin Up!)
Inks: Versafine Clair - Nocturne
Other: Small Circle Die

Monday, 15 March 2021

Come and join the birthday celebrations ........

Happy Monday ........

Just a quick reminder about this month's CAS Mix Up Challenge.  There's still plenty of time to play along, and don't forget we're celebrating this month.  It's our 5th Birthday! so why not join in the fun ..... there's some special prizes up for grabs.


Bonnie (Stamping with Klass) is our host this month and she would like us to do Print Making using Die Cuts.


I must admit I hadn't really tried this before but ....... what a fun technique!  Such a clever and different way of using our dies.

For this card I took a simple daisy die (not sure what brand ..... I think it may be from a Stampin Up! set but please don't hold me to that!)

 
I cut the daisies from watercolour card and then used Distress Inks to add the colour ...... I simply swiped the ink pad directly over the die cut daisy, repeating until I had a nice depth of colour

I then sprayed the inked die cuts with water, flipped them over, and laid them onto another piece of watercolour card to print my daisies ........


Some of the ink from the die cuts transferred onto the card creating pretty, pastel images of the daisies. To define the flowers a little more I roughly drew around the petals using a black fine liner pen ....... I like how this gives the flowers a hand drawn look


I added some highlights and detail with a white gel pen ......


 and finished with some ink splatters, a few dots of glitter glue here and there, and a simple sentiment.


And ...... I also have three, pretty coloured, die cut daisies left over to use on another card ...... bonus!

Our challenge runs until March 24th so you have plenty of time to play along and join in the birthday fun.  I look forward to seeing you in the gallery!

Thanks for popping by ..... enjoy the rest of your day.
Speaking of birthdays, we had another one over the weekend ......... Remi, our little motorhome was one year old on Saturday!


It's twelve months since we brought him home to the island ........ and unfortunately he's spent quite a few of those months just sat on the drive (sigh!)  
Hopefully, at some point this year, we'll be able to get out and about again, and who knows maybe even go a little little further afield with him.   Although, our current 21 day lockdown has been extended today, only by a week, (fingers crossed!) so the Easter weekend is looking like a possibility for our first trip of 2021! 

Cheerio until next time .........


Products used:
Stamps: Happy Snippets (Penny Black) for the sentiment   
Dies: Daisy Die (not sure of the brand ..... may be Stampin Up!)
Inks: Distress Inks - Kitsch Flamingo, Mustard Seed, Spiced Marmalade; Versafine Clair - Nocturne
Other:  Black Fine Liner Gel Pen; White Uniball Signo Gel pen; Stickles Glitter Glue

Sunday, 14 March 2021

Challenge #13 at Perfectly CAS ........

Happy Sunday evening ......

I do hope you've enjoyed your weekend.  It's been Mother's Day here (another one in lockdown) so I hope all you lovely Mum's out there have had a fabulous day. 

It's time to get the next Perfectly CAS Challenge underway ...... you know, the one where you use one third of your card space.  
If you find the Clean and Simple (CAS) style hard to create, then using a third, or less, of your card space makes it really easy to leave all that white space.  Less is definitely more for this challenge!

It's challenge #13 and the theme is a nice easy one ....... Birthday!


You don't get much more Clean and Simple than this ....... and it's one layer too!!


I do love these stamp designs from Anita Jeram for the Colorado Craft Co., they're all sooo cute, especially the bunnies!

I stamped the bunny in the centre of my card, using a grey ink instead of black as I wanted a softer, more hand drawn look ........


I then used Faber Castel Polychromos colouring pencils to colour him in.  


I need to practice more using these. I love them but, I can sometimes be a bit heavy handed with them.  They do blend beautifully, and as you can see, the card I used has a little bit of texture to it and the colouring pencils have brought this out which I like, especially on the bunnies fur.

I stamped a sentiment from the same stamp set underneath, keeping everything in that centre third column of my card


And I finished with just a touch of shading underneath the bunny, just to ground him.

Now it's your turn.  Check out the Perfectly CAS Blog for more inspiration from the rest of the Design Team and then join in the fun.  See you in gallery!

Thanks for popping by ..... enjoy the rest of your day.
I'm off to put my feet up and enjoy a nice glass of something chilled ...... I've earned it!  
Cheers! ............ Happy Mother's Day xx


Products used:
Stamps:  Birthday Wishing (Anita Jeram stamps Colorado Craft Co)
Inks: Ranger Dye Ink - Cool Graphite; Versafine Clair - Nocturne
Others: Faber Castel Polychromos colouring pencils 

Saturday, 13 March 2021

More art journaling fun ........

Happy weekend .......

How are you?  I hope you've had a good week.  
I've spent most of mine in the craft room since everything that was in the diary has been cancelled due to our lockdown!  We just need the weather to brighten up a little now then we can get out and spend time in the garden.

It has given me chance to catch up, and finish off a few online workshops though.  I'm really enjoying playing in my art journal at the moment, thanks to the  inspiration and amazing tuition from the lovely Tracy Scott.

I've been trying a little bit of Pattern Play using one of her latest stamp sets ........ which I then turned into a double page by adding a technique from Tracy's Index Card Art workshop  


Speaking of Index Card Art, this might just be my new addiction .......


All these were made on a 5 day workshop with Tracy back at the beginning of February.  Little pieces of artwork done on index cards ..... they are so much fun to do, and like I said, quite addictive! (Can you see the one where the idea for the journal page came from? ...... top of the picture in the centre)

Here are a few more I've done since ......


The top one on this photo was inspired by another Tracy Scott workshop, and the bottom one is Eileen Godwin inspired .... from another fabulous workshop I did, back in January I think.

If you like the idea of these little pieces of artwork then lookout for Tracy's Index Card Art II  ...... another 5 day workshop coming up in April.  
If you love paints and inks, stamps and stencils, and enjoy working with colour and lots of different techniques then it will be right up your street.  You can find all the details on Tracy's Creative Cafe Facebook page.

I've also been putting the finishing touches to these today ....... Lace Cut Pages


How cool are these ..... and all the cut out work is done for you, you just need to decorate them.  
They come as a plain white booklet ....... this one is #3, and it's a beautiful mandala.  You get one solid, double page sheet, and one that is cut out ..... just add paint, use stamps and stencils and lots of doodling.  I love them.
This is the solid page behind .........


This is the same booklet, just decorated differently .......


So many possibilities!

I still have one workshop piece to share with you, but I'll save that for another day.

Thanks for popping by ...... have a lovely weekend,  and to all you fabulous Mum's out there, Happy Mother's Day.  I hope you have a lovely day tomorrow.

Cheerio until next time .......