Happy Monday ......
And Hello from the very beautiful Bourton-on-the-Water.
The sun isn't shining quite as much as in the picture, but we're still having fun. The cottage is just as we remembered it ..... it's so nice to be back!
As you can see it doesn't take long for the Walmsley family to settle in .... and if it rains .... we just go inside!
We have had some sun and as always, we made the most of it .....
An afternoon by the river ....... watching the world go by, what could be better!
Anyway ..... enough of our Cotswolds shenanigans ..... here's something I didn't get time to blog before we came away.
Thursday last week was the regular craft workshop over in Ballaugh and everyone had fun trying out the Bleeding Art Tissue technique.
Now I've only ever tried this on canvas so it was fun to try it on good old cardstock ...... standard card and watercolour card ..... and these were my results
The card on the left is watercolour card, and I simply arranged some tissue shapes onto my piece of card, brushed over them with water and left them to dry.
They don't take long to dry .... you can use a heat tool to speed things up but in my opinion it's better left to dry naturally.
Once it's dry, remove the tissue shapes and you're left with a fabulous background, see how the colour has transferred from the tissue onto the card. You'll never get two backgrounds the same, and depending on how much water you use and the type of cardstock, the results will be different.
I simply stamped over the top using one of my favourite stamps (blush from Penny Black) and a black Versafine ink
And then finished off by adding a touch of acetate smooshing with some Distress ink, a simple sentiment ....
and a touch of glitter glue to the centers of the flowers
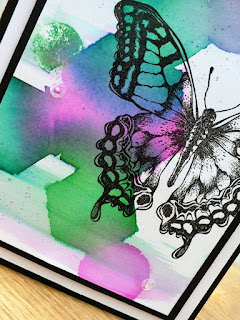
This was the same technique on a piece of regular white cardstock
More tissue shapes, brushed over with water .......
I overlapped the tissue shapes this time ..... see how the colours blend into each other ..... pretty or what!
I stamped my favourite Tim Holtz butterfly .... again keeping things simple in the plain black ink, letting the background do the work.
I wasn't too keen on all the white space so I simply took a wet paintbrush and brushed over the top of the colour ..... giving this sort of a colour wash to the background
A couple of sequins and a simple sentiment add the finishing touches
This is such a fun technique to do ...... why not give it a go.
Thanks for popping by ..... have a great week. We're here until Friday so still loads of time for relaxing.
Cheerio until next time


Great technique !
ReplyDeletegreat colors to !
And have fun !!!!
I just came across some of this in my stash thanks so much for the inspiration!
ReplyDeleteGreat results with the Bleeding Art Tissue Linda. I was lucky enough to receive a package of it from Kathy Kirby, but my results did not turn out like yours. I think I removed the tissue too soon. I might have another go, leaving the tissue on the paper until it dries on it's own. Thanks for that tip.
ReplyDeleteLooks like a beautiful place to vacation. Always fun to spend time away with the family. Enjoy! xx