Happy Tuesday to you ......
Finally .... 5 minutes to sit down and catch up. How is everyone?
We had another fabulous workshop over the weekend ....... 8 lovely crafty ladies around the table, all playing with simple, fun masking techniques, Distress Inks and we even used the MISTI to create gorgeous CAS cards ...... they all say they NEED one now!! (ooops! sorry girls)
You don't need anything fancy though to do the masking ...... just low tack tape, copier paper or even Post It Notes.
Here are a few samples I made to get them started .......
A simple panel across the card, masked using the low tack tape then colour added to the panel using Distress Inks
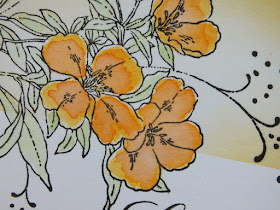
I then stamped the floral image using a black Versafine ink, and used the same Distress Inks to add colour to the flowers ..... so easy
Here's another version (one of the favourites from the day) ......
The panel doesn't always have to be across your card .... why not go top to bottom for a change
Mask the panel with the Low Tack tape ..... add in a circle mask to create the moon and then ink with shades of blue and purple Distress
I spritzed with a little water before removing the masks and then added in a little yellow ink to the moon
The gorgeous fairy is from Lavinia and I finished off with a sentiment and a touch of sparkle.
This is where the MISTI came in.
I don't know about you but I sometimes struggle to get a perfect image with silhouette stamps. No matter how much ink you apply, or how much pressure you use, there's still paler bits here and there. I know you can use a black ink to paint over them, or use a black pen to fill in but .... it's never quite right. Not with the MISTI ..... if it's not right the first time ink up the image and stamp it again ....... and again ....... and again .... until you're happy with it. The stamp is not going to move, it will always stamp in exactly the same place ...... perfect every time. What did I ever do without it!
Anyway ...... you don't have to use silhouette stamps ....
Use pretty floral images ....... or butterflies
And why not create a panel with the ink on the outside edges .....
Create the layered look by inking, spritzing and then stamping onto the panel before removing the masks, with something like a script stamp
The perfect backdrop for one of my favourite images ....
But I must say .... this little guy stole the show. Yes .... they were making Christmas cards .....
Use your dies to cut shapes to use as masks ....... from acetate, masking sheets or simply good old copier paper.
These are a couple of cards I made last year but they loved them .....
It's surprising what you can do with a bit of low tack tape and a piece of copier paper!
The move went well last week. Lauren and the little man are all settled into their new home ..... we do miss them (sigh!) ..... it's so quiet! Just hubby and I here now. Saying that we have seen them nearly everyday since they left ..... we're still on school holidays so Alex is here while his mum's at work.
Of course we now have empty rooms ...... so it's time for a change. We've already moved our lounge up a floor ......
Well .... it's a bigger room .... with a nicer view over the square
There's still the bookcases at one end to change around ...... Lauren's library is still here (I thought we had a lot of books!!) but I can live with that. It does mean of course ..... the downstairs lounge is now empty ........ hmmm ..... are you thinking what I'm thinking?
You guessed it ..... the old craft room is on the move.
Yep ..... I'm bringing the whole lot downstairs. It does mean I'm going to have to tidy everything away but hey .... at least my desk will get a good clean!
Thanks for popping by .... enjoy the rest of your day.
Cheerio until next time


First of all ... fantastic masking techniques and samples for your craft group. I bet all the ladies has a wonderful time and went home happy!
ReplyDeleteSecond, your lounge is lovely ... looks like a very comfy place to relax.
It's hard being empty nesters, but having a larger craft room that's closer to the action certainly helps with the transition! :) And larger room means ... yep, you have space from some new toys. :) x
Loved all the cards today and the techniques. Such fabulous cards and truly amazing x
ReplyDeleteFabulous array of cards, Linda! I like the reverse masking technique. And the circle one. And, of course the Christmas mouse. Well, all of them ;)
ReplyDeleteLove your lounge, and what a lovely view. Lucky you, getting a new craft too out of all the moving (except for having to tidy up!).
Oh wow Linda, what a feast for the eyes! Your cards are all gorgeous, I love every one of them, although it is hard not to see the House Mouse as a favourite! Your lounge looks beautiful too. Hugs, Anne xx
ReplyDeleteWhat a fantastic post, so many great, stunning cards!! I really love them all!!
ReplyDeleteHave fun!!
Maria
This gallery of cards is so amazing, such perfection! And enjoy your new craftroom, Linda!:-)
ReplyDeleteHi Linda, A gorgeous array of samples for your class - no wonder the ladies enjoyed it.
ReplyDeleteSounds like you've been having a busy time and more to come with the new craft room move.
Have a great weekend.
Avril xx
Lovely cards, Linda! I hope that you will enjoy your new craft space! Sounds exciting. :)
ReplyDelete