Welcome to November ....... and dare I say it ......... the run up to Christmas!!
I hope you're all well. Did you have a lovely Halloween? It was very quiet here, we didn't even bother with Trick or Treat!!
It's still a little quiet on here too .... sorry! I'm not quite sure what I'm doing with my time but, I don't seem to have had much spare recently. And, with not having to do the Blog Challenges each month my cardmaking has taken a back seat for now.
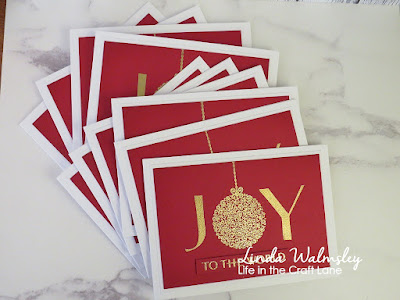
I have made a start on some Christmas cards though, which is not bad going for me. As you all know I'm usually on the last minute, still making them in December!! This year though, I thought I'd try and get them out of the way early so, I've spent the last two crafty get togethers with the girls in a festive mood. I prepped everything during the week and then on the day all I had to do was put everything together ...... easy! And look, a whole batch done .........
I used the beautiful new Big & Bold Joy Ornaments from the Colorado Craft Company. A gorgeous stamp set with pretty detailed baubles, two sentiments, and the letters to create the word JOY
I simply stamped onto red cardstock, and then heat embossed in gold ......
I did the letters with plain gold embossing powder and the bauble in the centre using a sparkly gold
I stamped and embossed the rest of my sentiment onto a seperate strip of red card, and attached this underneath with foam pads ..... simple to do, but a very classic look I think.
I also had a play with my version of a technique I saw on Katrina Werner's blog a while ago ..... using Distress Re-Inkers to create a sort of ombre effect background ...... what do you think?
I really like the effect, and again it's another great way to create a whole batch of fabulous Christmas cards in no time at all. Just paint your background cards, leave overnight to dry (that's what I did anyway) and then use large Christmas sentiments to add your greetings.
I used Festive Berries Distress Re-inker and Hot Pressed Watercolour cardstock (the smooth stuff!)
I mixed the re-inker with some water, and used a paintbrush to add the colour across the card, starting at the top working my way down the card adding more water as I went along to get the ombre effect. I repeated the process a few times until I got the colour, and the blend, that I was happy with and then left the card to air dry.
Once it was completely dry, I used an anti-static bag over the whole piece and then stamped and heat embossed my sentiment in gold
Another stamp set from the Colorado Craft Company ....... Quick Holiday Cards Savvy Sentiments .... I do like a large sentiment stamp!
To finish off I sprinkled on a little Chunky White Embossing Enamel and heat set this from underneath
Well, that's another one for the festive box!
This technique was so much fun to do, I might just give it a try using some different colours! Gets me using those Distress Re-inkers too!
Thanks for popping by ..... enjoy the rest of your day.
We're off out for tea this evening, first time in a while. No special occasion, I just didn't feel like cooking!
Cheerio until next time .......


These cards are so effective, I love the ombre effect it works really well. I have been using re-inkers to do backgrounds recently too, but on glossy paper. I love the effect. Thanks for the inspiration xx
ReplyDeleteLove them! Very elegant designs and perfect for batch making.
ReplyDeleteThank you Linda for the Inspiration...I have had the Big and Bold Joy set for several months..it is time to ink it up!!! I also Love the ombre technique on your 2nd card and have wanted to try the technique with reinkers...again, TFS your beauties. Love and Hugs..Nancy
ReplyDeleteI LOVE the gold embossing on the red, Linda! So elegant!
ReplyDeleteYour JOY cards are beautiful and elegant, Linda. LOVE the classic red and gold. CAS design really shows off that gorgeous bauble! What a cool background for your second card. The ombre background is fabulous! xx
ReplyDelete