Showing posts with label Julie Hickey stamps. Show all posts

Monday, 15 August 2022

The CAS Mix Up challenge ..........

Happy Monday! .........

Welcome to a new week .... and a busy one at that!

Time for a quick reminder about this months CAS Mix Up Challenge.
It's a Mixed Media challenge this month which means you need to include some stamping on your card,  you must follow the challenge theme which for August is ........ Emboss Resist, and you must also include one other Mixed Media element ......... you can find a list of ideas for that on the CAS Mix Up Blog
 

The theme this month was chosen by our host Nancy, and is a really fun technique to try.
If you're not familiar with it and haven't tried this before, then check out the links on the CAS mix Up Blog post ..... there's a few different ways you can do this.
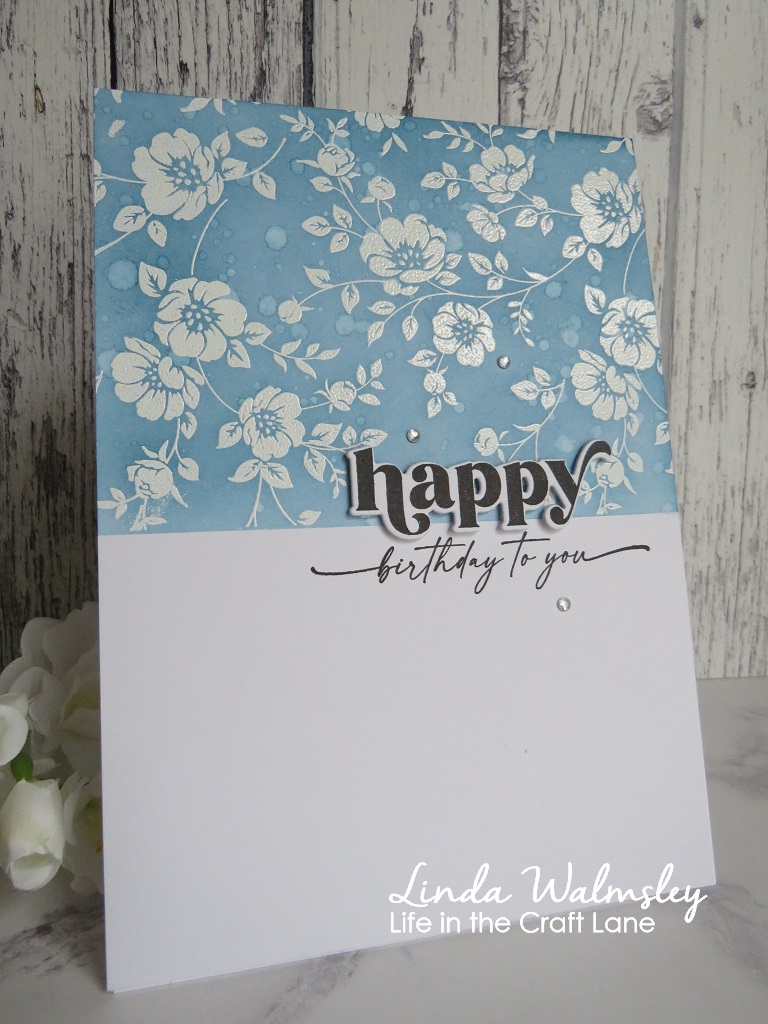

For this card I started by masking off the bottom section of my card front.  I then stamped the pretty floral design across the top using Versafine ink.  I then sprinkled on some white embossing powder and heat set. 


With the bottom part of my card still covered,  I blended Uncharted Mariner Distress Ink over the top of the heat embossing ....... I think this is my new favourite shade of blue!

Once I was happy with the colour, I gently buffed over the top of the embossing with a paper towel to remove any excess the ink from the design.  The embossing powder had resisted the Distress ink so the white  came through nice and bright again.


For a little bit of added interest I splattered the card with a little bit of clean water.  I let it sit for a few seconds to react with the Distress Ink then I mopped up the excess with a paper towel, leaving this pretty speckled look ...... I never get tired of doing this.  It's such a simple technique that works so well, every time.

I added part of my sentiment stamped and die cut on the top, finishing it off with some stamping underneath and a few little gemstones for a touch of added sparkle!


Here's another one I did using the same Emboss Resist technique, only this time I used watercolour paints over the top 


I heat embossed the flower first, then blended the watercolour paints over the top
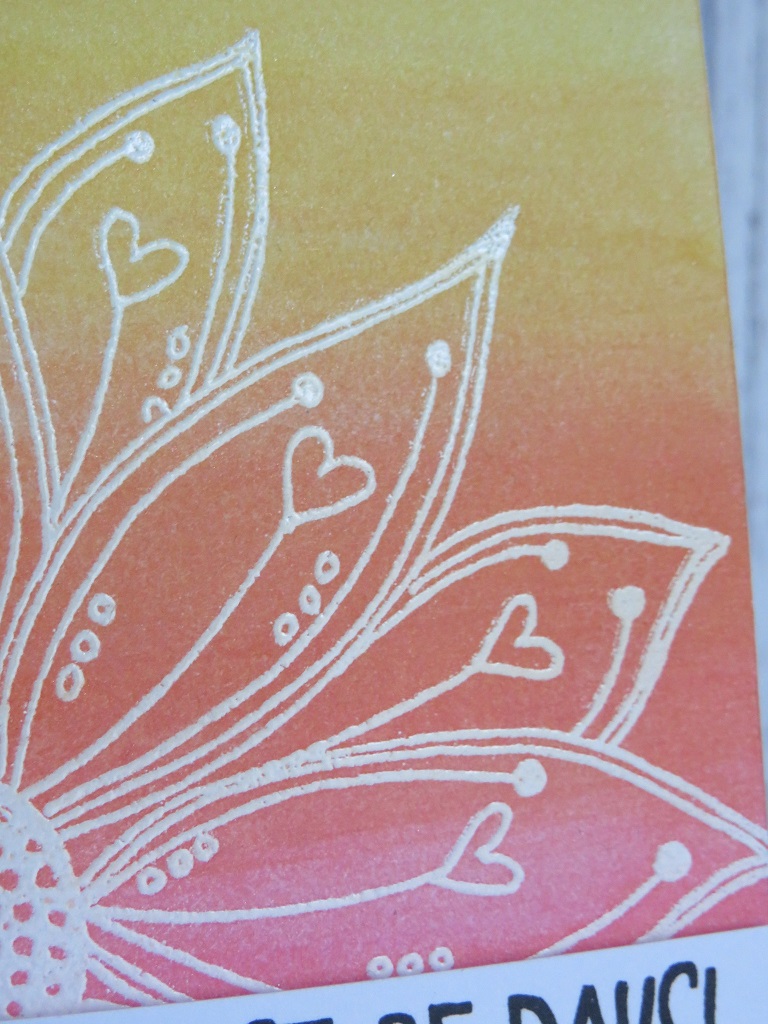

The embossing did take on a little bit of the colour from the paints so it's not quite as white as I would have liked but, it still looks pretty


To keep it CAS I added a sentiment strip over the bottom edge and a few pretty gemstones


I do hope you give this technique a go. 

Happy stamping! 

Well the weather forecast here for yesterday was spot on ........ the heatwave definitely broke last night!  
At around 4am we had the most spectacular thunderstorm that lasted for the best part of an hour ..... and Lauren slept through it all!  Alex on the other hand ended up in our room!  
The lightening woke me up first before the huge crash of thunder, right over the top of us ..... boy was it loud, and scary!!  
And the rain ........ the gutters on the house just couldn't handle the amount of water coming down and there was literally a waterfall coming off the roof!  
We did get up to check around the house ..... and the van!  Thankfully no damage was done, apart from a couple of mains switches had tripped off, which meant some of the house was in darkness but, other than that everything was OK ..... thank goodness.  And things are a little cooler today which is great, I've still lots to do before we go away.
  
We're off in the van again on Wednesday, for our longest trip so far.  We're away for 17 nights this time,  starting with a music festival ...... should be fun!   
It's not just a pleasure trip though, it's business too.  Turns out that hubby needs to work for some of the time, including a day, or possibly more, in London.  Fingers crossed it stays nice and cool for that!

Thanks for popping by ..... enjoy the rest of your day.

Cheerio until next time .........   


Supplies
Card 1
Stamps: Vines & Roses (Tim Holtz - CMS298); Opposites Attract (The Greetery) for the sentiment
Inks: Versamark ink; Distress Ink - Uncharted Mariner; Versafine Clair - Nocturne
Other: White Embossing Powder (WOW!); Oppostie Attracts Die (The Greetery); Self- adhesvie gemstones

Card 2
Stamps: Be Happy stamp set (Julie Hickey Designs)
Inks: Versamark ink; Versafine Clair - Nocturne
Other: White Embossing Powder (WOW!); Altenew Watercolour Paints; Self-adhesive gemstones

Wednesday, 1 September 2021

Autumn colours for CAS Mix Up .......

Happy Wednesday .......

Welcome to September!
  
We're back on the island, home from our UK trip ...... and we had a great time.  
It was our first off island adventure in the motorhome, and we had a ball!  We stayed on a large campsite, a pub stop-over, and a cute little what they call a 'certified location' ...... a small campsite for just a handful of vans, and the good thing is, hubby and I are still speaking ........ which is a bonus!
Anyhow ...... more about all that some other time.

Autumn is definitely on it's way.  The temperature is starting to drop, there's a chill in the air in the evenings and the leaves on the trees are all starting to change and fall.  I must admit it is my favourite time of the year.
 
This month's challenge for CAS Mix Up has the perfect theme.  
Leslie is our Host for September and it's a Watercolour challenge this month, with the theme ...... Autumn Colours  


I do love the Autumnal shades ........ perfect for watercolouring


I stamped the pretty floral spray across a piece of white cardstock, and heat then embossed in gold ..... this looks so pretty when the light catches it


Next, I blended Autumn shades of Distress Inks across the top half of my base card, and then splattered the inks with water,  to lift some of the colour and add a bit more interest to the background ...... a really simple technique with different results everytime


I used Altenew Watercolour Paints to colour in the floral spray, using similar shades to the Distress inks I used for the background.

I then fussy cut around the top edge of the flowers, leaving a tiny white border so that they would stand out against the inky background.


A simple sentiment was all it needed to finish along with a few sparkly gems


I can't wait to see all the gorgeous Autumn shades in the gallery this month ..... it's going to look amazing!

Check out the CAS Mix Up Blog for some beautiful Autumn Colour designs from the rest of the DT and, pop and say Hello to our lovely Guest Designer too.   Ros (Mikey's Mom) is joining us for the Autumn Colour challenge.

Thanks for popping by ..... enjoy the rest of your day.

Time for me to start unpacking the van I think.  I need to get it ready for our next adventure!

Cheerio until next time .......


Products used:
Stamps: Floral Happiness (Julie Hickey Designs)
Inks: Versamark ink; Distress Inks - Fossilised Amber, Wild Honey, Peeled Paint, Aged Mahogany; Versafine Clair - Nocturne (for the sentiment)
Other: Gold Detail Embossing Powder (WOW!); Altenew Watercolour Paints; Self adhesive gem stones

Thursday, 1 April 2021

It's the 1st of April, time for a new CAS Mix Up challenge .......

Happy Thursday .........

Pinch and a punch for the first of the month ......... welcome to April!

A new month means new Blog Challenges and, this month it's my turn to host over at the CAS Mix Up Challenge.  
It's a Mixed Media month, and I've chosen the theme ........ Paper Piecing


I do love a bit of paper piecing.  If you're not really a fan of spending time colouring in all your stamped images then this is a great way, it's quick too, of adding that colour.  
Just think of all those bits of patterned papers that we all hoard, just in case we need them, this is a great way to use up all those.  Or, what about the backgrounds we've made using various ink and paint techniques that didn't quite turn out as we planned, well don't throw them away ....... these are perfect for paper piecing.

Flowers work really well with this technique ..... small or large, but you can paper piece anything, butterflies, birds, pieces of clothing, you name it!  My only tip would be, look for images that are easy to cut out, and don't worry about all the little surrounding details like stems, or antennae,  you don't need to fussy cut those!

If you're not familiar with paper piecing, then check out the links on the CAS Blog post to some really useful videos showing ways of using this technique.

These cute little daisies are just perfect for paper piecing .....


I stamped the image onto a piece of white card stock, and then splattered the background with Distress inks using colours that matched the paper I used for the actual flower heads


I coloured in the stems and added my sentiment ......


I then used an old gelli plate print for the flowers ....... simply stamped the daisy heads and heat embossed with a clear powder, and then fussy cut them


I  attached the flower heads with some glue onto my stamped image ...... voila!  all coloured, with some nice shading going on there too!  
You could also use foam pads to layer your flowers and add a touch of dimension as I've done in the example below ........


Using a black ink, I stamped the whole image onto the front of my card.  I then stamped just the centre of it, twice onto a gelli print and heat embossed those with a gold powder


I fussy cut the flowers, attaching the first layer onto the stamped image with glue, and then used foam pads to attached the large flower in the centre to add some depth


I think the pop of colour looks really cool in the centre of the black and white, and I love the texture and the pattern from the gelli print, which as a whole print wasn't very interesting at all!

I finished off with a sentiment made up of plain stamping and some more gold heat embossing to bring everything together.


You'll find more paper piecing inspiration from the rest of Design Team over on the CAS Mix Up Blog.  We also have a fabulous Guest Designer ...... the lovely Bonnie (Papercrafter at large) is joining in the fun so please pop by and say hello.

I hope you have fun with this month's challenge, I'm really looking forward to seeing all your paper pieced designs in the gallery.

Happy stamping!

Thanks for popping by .... enjoy the rest of your day and have a lovely Easter.

Cheerio until next time ...... 


Products used:
Card one .....
Stamps: Sweet Daisy (Julie Hickey Designs)
Inks: Versafine Clair - Nocturne; Distress Inks - Mustard Seed, Spiced Marmalade (to do the splatter)
Other: ZIG Clean Color Brush Marker - green; gelli plate print from my stash

Card two .....
Stamps: Hello Lovely (Concord & 9th)
Inks: Versafine Clair - Nocturne; Versamark; 
Other: Gold Embossing Powder (WOW!); gelli plate print from my stash

Thursday, 18 March 2021

Got there in the end ..........

Happy Thursday .......

I hope you're enjoying your week.  I've been catching up with all the boring stuff like ....... housework (boring!), paperwork (even more boring!!), washing and ironing (why are there so many clothes ..... we haven't been anywhere!!! I'm sure I've washed the whole of Lauren's wardrobe this week!)  I've even started cleaning out the kitchen cupboards ..... what's that all about!?

I am playing along with a couple of Blog Challenges today though.  
First up ........ I've got another Christmas card for this month's CAS Christmas Challenge.

The challenge is to use Kraft, Red and White ......


I've used a Julie Hickey stamp set, heat embossed with white powder and then coloured using a red Distress Re-inker ...... using the ink straight from the bottle, with a fine paintbrush.  I love the depth of colour from the re-inker .........


I coloured in the leaves using a white pencil and then I stamped the pretty poinsettia again, onto a separate piece of kraft card, heat embossed and coloured it in the same way, and then fussy cut before attaching it using a foam pad to add a touch of dimension. 


I stamped my sentiment top and bottom ......


And finished with a few white paint splatters .......


It's their 3rd birthday this month at CAS Christmas so ........ Happy Birthday to you!

This next challenge caught my eye on Facebook.  It showed up on my timeline via a FB friend and I thought I'd join in.


It's been a while since I made anything this small ...... and you'd be surprised at how long it took me (and how many attempts!!!) In the end I went with this one, I think it was the third attempt ....... you don't get much more Clean and Simple!


It's a little 6x4 inch card and the stamp I used is from a lovely set by Tracy Easson.  I think it's called Just a Girl and her Forever Friend

I stamped the tiny image with black ink, directly onto my card blank. 


I was going to leave it at that and go with the optional twist of Black & White but, I felt it needed more. It was just a little too CAS even for me!  So ..... I added in the colour using an old Stampin Up! stamp and Distress inks ....... now I'm happy!

CAS, even something so small, can turn out to be the hardest cards to make.  This was my first attempt .... same stamped image, but I felt it need more.   By the time I'd added more  it was bigger than the required one inch!


Second try ....... something different this time but ..... broke the rules again!  By the time I'd added the word Art and the splatters,  it was bigger than one inch on the front ..... arggghhhh!!


I got there in the end though, just in time too as the challenge ends on the 20th!

Thanks for popping by ...... enjoy the rest of your day.

Cheerio until next time ......


Products used:
CAS Christmas

Stamps: Christmas Joy (Julie Hickey Designs)
Inks: Versamark ink; Versafine ink - Satin Red; Distress Re-Inker - Festive Berries
Others: White Embossing Powder (WOW!); White Polychromos Pencil (Faber Castel); White Fresco Finish Chalk paint (splatters) (PaperArtsy)

AAA Card Challenge
Card 1
Stamps: Just a Girl & her Forever Friend (Tracy Easson Illustrations); Playful Backgrounds (Stampin Up!)
Inks: Versafine Clair - Nocturne; Distress Ink - Picked Raspberry, Salty Ocean

Card 2 
Stamps: Just a Girl & her Forever Friend (Tracy Easson Illustrations); Sarah's Choice (IndigoBlu)
Inks: 
Versafine Clair - Nocturne; Distress Inks - Mustard Seed, Festive Berries

Card 3
Stamps: Hey, Chick (Stampin Up!)
Inks: Versafine Clair - Nocturne
Other: Small Circle Die

Saturday, 4 April 2020

CAS Stencil Challenge ......

Happy Saturday to you ........

I hope you're having a good day.

It's time for another Blog Challenge.   Are stencils your thing?  Fancy doing something a little bit different with them?  How about joining in the fun on the CAS Stencil Challenge. 
We've got a great prompt for you this month .........


Cathy's  our Host for the April challenge,  and she wants us to use ........ Gilding Flakes

Possibly not the first thing you think of when using your stencils but ..... they do work so well.
If you're not familiar with using Gilding Flakes then check out the CAS Stencil Blog.  On there you'll find lots of inspiration from the Design Team, and our fab Guest Designer this month ...... Mac (The Sweetest of Peas).  There's also some links on there to some fab videos to give you some ideas on using gilding flakes.


I've used Gilding Flakes to add a touch of shimmer and shine to the background, using one of my favourite stencils ..... I do love this honeycomb design.

I started by using the stencil with Distress Ink directly onto my card.
I then took a piece of Cut n Dry foam and applied a light touch of glue, over the ink, through parts of the stencil ....... remember if you're using any kind of glue through your stencils clean them thoroughly asap after use.


I placed my Gilding Flakes onto the sticky surface, rubbed over the top with the flat of my hand to make sure I'd covered everything and then gently rubbed over the flakes using a sponge to take away the excess and bring out all the detail of the stencil again.

I stamped the pretty sunflower onto a seperate piece of cardstock and heat embossed the image with a clear powder.
I coloured it using Distress Inks, and fussy cut.


 I stamped the bee and my sentiment onto the card ......


The sunflower was added using foam pads to give a bit of dimension, a bit of colour onto the bee, and I finished off with a touch of shimmer on his wings ......


I'd forgotten how much fun Gilding Flakes can be ..... enjoy!

Thanks for popping by ..... enjoy the rest of your weekend.
I've got another night off from cooking this evening ....... we're having a little treat (again!)
A lot of the restaurants on the island have had to rethink ways of keeping their business going during this crazy time.  A lot of them, our favourite little place (Wine Down) included, have been offering take aways and delivery service for food, and wine.
Wine Down have also been doing their special menus ..... week before last was Greek week, which was delicious.  Last night we had a special Lebanese menu, which was amazing!  And when we saw the menu for this evening we couldn't resist so, we've ordered in again!
We've got Beef Wellington tonight.  It's all arrived, beautifully prepared, with full instructions on how to cook it and all I have to do is put the oven on and open the wine ....... sounds good to me.

Stay safe everyone ......... cheerio until next time


Products used:
Stencil: Texture Honeycomb stencil (MemoryBox)
Stamps: Sunflower Bee (Julie Hickey Designs; Bee Happy Clear Stamps (Uniko)
Inks: Distress Ink - Wild Honey, Scattered Straw, Tea Dye; Versafine Clair - Nocturne;
Other: Clear Embossing Powder (WOW!); Chariot of Fire Gilding Flakes, Flitter Glue, Scoochy Sponge (IndigoBlu); Yellow Watercolour pencil; Wink of Stella pen

Wednesday, 14 November 2018

I'm keeping up with this year's 12 Tags ......

Good morning!  Happy Wednesday ......

It's the middle of what is proving to be a very busy week.  So much to do and only a couple of days left to do it in!
In between spending time with the family, we're trying to fit in as much as we can whilst we're over in the UK ...... we don't get here as often as we would like.

I've time for a quick blog post though.  This morning I've got my tag number 9 for this years 12 Tags of Christmas with Loll & Friends (I'm amazed I've managed to keep up!)


It's another CAS(ish) design, using one of the new festive stamp sets from the lovely Julie Hickey. It's called A Winter Scene, and I just love these cute little houses .....


They were stamped directly onto my tag and heat embossed using a gold EP.  I then embossed one of the stamps again, this time onto a separate piece of white card.
I coloured the houses using ZIG Markers and then fussy cut around the top edge of the ones on the separate piece of card.
Shades of blue Distress Inks have then been blended across the top of the tag, and splattered with a little water over the top to create a snowy looking backdrop before finishing off with some chunky white embossing powder.


A simple sentiment stamped in gold ink on the fussy cut layer, and a touch of sparkle from some crystal glitter .....


This was then layered over the top of the houses which had been stamped directly on the tag, cut down to size to fit the tag, and then attached using foam pads to create a little dimension .....


I really must start thinking of gifts to put all of these festive tags on.

Thanks for popping by .... enjoy the rest of your day.
I will be popping back later on though!

Cheerio until next time ........