Showing posts with label Rubber Stamping. Show all posts

Thursday, 7 December 2023

It's that time of year again .......

Happy Thursday ........

How are you?  Full of the festive spirit yet?  
We're getting there.  This bug is still hanging on by a thread but, it will not beat me!!
Lists have been made (lots of lists!)  The shopping has started (note to self ..... I need to buy wrapping paper). 
I think I've eaten my body weight in mince pies (the diet starts in January ..... again!). I've tried the odd Christmas cocktail (or two ...... hic!) And,  I'm still making Christmas cards!


I guess he had to come out at some point now didn't he ...... my favourite little snowman.  I'm not even sure he's still available to buy.  He's an old wooden stamp from Inkadinkadoo, and every year I have to use him on at least one card ....... he always makes me smile 😊

I stamped the snowman onto a piece of white cardstock.  Masked around the edges to create a frame, and then slowly blended shades of blue Distress Inks inside to create my night sky


Once I was happy with the colour, I splattered the ink with a little bit of clean water and let it sit for a few seconds.
I mopped up the excess with a paper towel and then added a few dots of white Enamel Accents here and there, sprinkled with a touch of fine crystal glitter, to give it a snowy look


The snowman was coloured using brush markers ..... he's so cute!


And I finished off with a heat embossed sentiment and a touch more 'snow'


Speaking of snow, I've loved seeing all the pictures on Facebook of the snow across in the UK at the moment.  We might have even been in some of it had we gone on our trip ........ brrrrr!
If you're snowed in at the moment, stay safe and warm.

Thanks for popping by, enjoy the rest of your day.

Cheerio until next time ........


Monday, 1 August 2022

Emboss Resist for CAS Mix Up!

Happy Monday! .....

Well, July was a bit of a whirlwind month ......... welcome to August!

A new month, means we have a new CAS Mix Up Challenge.  
It's Mixed Media month, and the lovely Nancy is our host.  The theme she's chosen for August is ......
Emboss Resist ......... one of my favourite techniques.

If you're not familiar with this, or you need some inspiration, then check out the CAS Mix Up Blog.  On there you'll find lots of ideas from the Design team and links to some really great videos on different ways of doing this really fun technique.


Emboss Resist will work with lots of different mediums ....... ink pads, spray inks, pigment powders such as Brushos, paints, watercolour markers, but one of my favourite things to use is Distress Inks.  Because they react so well with water, the embossing resists the ink colour really easily.  
There's so many different ways of using Distress inks too ..... straight from the ink pad, blended with brushes for example or, as I've done for my inspiration piece ....... acetate smooshing!
 
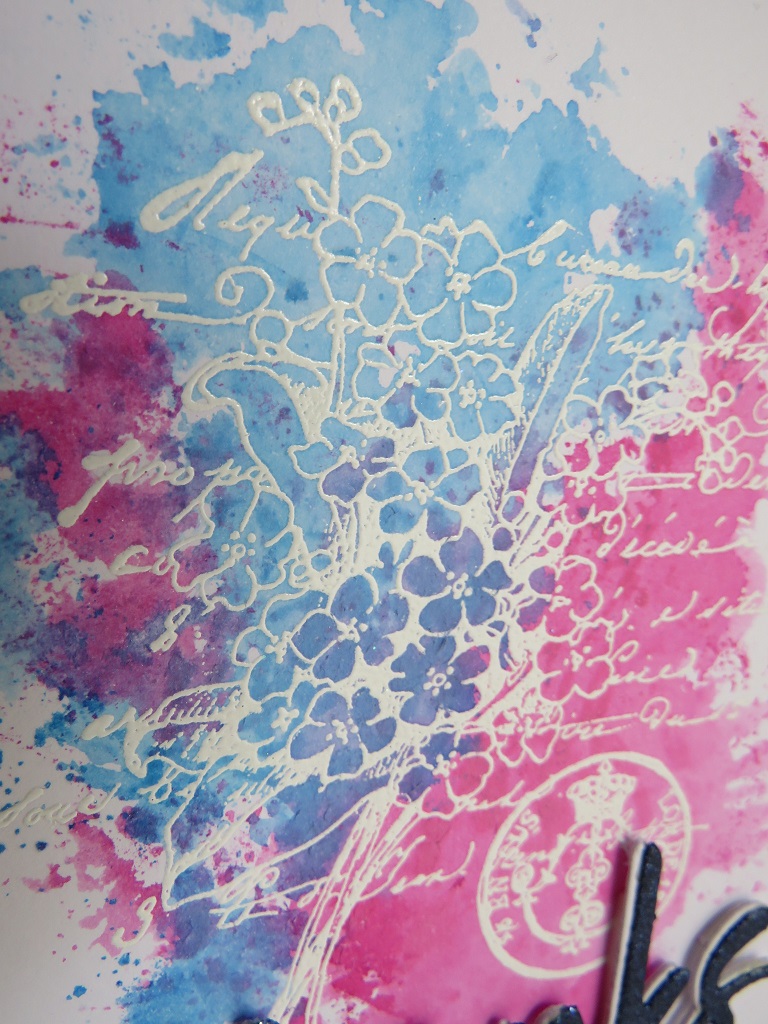
I stamped the pretty floral bouquet onto a piece of white cardstock using Versamark ink, and then heat embossed in white.
 

Hmmm ........ white embossing on white cardstock?  Not an easy thing to see but, with the emboss resist technique all will be revealed in the end! 

I then swiped my Distress ink pads onto a craft sheet ...... Picked Raspberry and Salty Ocean .......
and spritzed the ink with a little water.
I used a piece of acetate to pick up the colour and then laid it onto my cardstock, over the top of the embossed image, pressing lightly with my fingertips to move the ink around a little, making sure that the whole of the embossed image was covered


I repeated this for both colours of ink, building up the depth of colour gradually. 
You can see I wasn't careful about keeping clean edges, I wanted more of the random, splattered look.  
I also overlapped the two colours to give some shading here and there 


Once I was happy with the colour, I moppped up any excess ink with a paper towel and then gently buffed over the embossed image to remove any residue left from the inks.  
Because the embossing resisted the Distress Ink, the original stamped image showed through nice and clear.

To finish off, I die cut the sentiment three times, from white cardstock.  I layered them together, heat embossing the top layer with a navy embossing powder and off setting this slightly to give that white shadow


So, my elements used for this challenge are ..... 1. the theme ...... Emboss Resist  2.  Rubber stamping and 3. Acetate Smooshing, or it could be die cutting,  I suppose.

The challenge is open until the 24th of the month, so lots of time to play along.
Check out the CAS Mix Up Blog for more Emboss Resist inspiration from the Design Team and also, pop by say hello to our fabulous Guest Designer this month ....... Brenda (Inkspired to Stamp) is joining us for this challenge. 

Happy stamping!

Thanks for popping by ..... enjoy the rest of your day and have a great week!

July was a busy month for me but, August looks even busier.
We're off out this evening for a birthday dinner ..... our favourite restaurant is 4 today!
Then I've got my big brother and family coming over for a few days on Wednesday, so we'll be off out again then.   
When he goes home I have a crafty day with the girls planned, we haven't had a get together in such a long time.  There's also lots going on with Alex and his pals (school holidays are so much fun!)  And then, we're off again in the van on the 17th, and we don't get back until 3rd September!!!  So, that's August done ......... like I said, a busy month!  I'd better get a move on!

Cheerio until next time .......


Supplies
Stamps: scented message wood mounted rubber stamp (Penny Black)
Inks: Distress Inks - Picked Raspberry, Salty Ocean; Versamark ink
Other: Bright White,  Pea Coat embossing powders (WOW!); thanks thin metal die from my stash (not sure of the brand)

Wednesday, 16 February 2022

A Christmas card for a windy Wednesday ........

Happy Wednesday .........

Everyone OK? ........ I do hope so.  
We're hurtling towards the weekend again ...... at least the diary is clear for this one!  

I'm playing along with the CAS Christmas Challenge today ........  I'm still trying to make a start on filling up the festive card box!


The challenge this month is to create Winter Scenes ........ 


I just love die cuts for quick and easy cards.  This is from an old Stampin Up! die set which I think is called Hometown Greetings (not sure if its still available though)
I simply die cut the houses from white cardstock, and then added colour to just the tree using Distress Ink and a ZIG marker


Using Distress Inks, I then inked the top half of another piece of white cardstock.   To create the look of  a wintry sky I splattered the ink with clean water, let it sit for a few seconds to active the Distress Ink, then mopped up the water with a paper towel, removing some of the ink with it leaving this splattered look behind ........ giving the look of falling snow


A stamped sentiment underneath, and a touch of glitter on the tree finishes off my card.


It's it bit wintry outside today.  We're just about to batten down the hatches again as we've got back to back storms coming in over the next few days.  No ferries again today, as storm Dudley is beginning to blow a hoolie out there ...... it's freezing cold with the wind but the sun is shining ..... for now!!
  
This poor chap has managed to find a sheltered spot in the garden.   He comes in quite often and just wanders across the lawn.  He's being a bit careful today though, the wind is ruffling his feathers just a little bit!


Thanks for popping by ...... enjoy the rest of your day.
If the weather's bad where you are, stay safe.

Cheerio until next time ......


Supplies:
Dies: Hometown Greetings (Stampin Up!)
Stamps: Christmas Time 3 (Tim Holtz Stampers Anonymous);  A Winter's Scene (Julie Hickey)
Inks: Distress Inks - Stormy Sky, Faded Jeans, Chipped Sapphire (for the sky) & Peeled Paint for the tree; Versafine Clair - Nocturne; Delicata - Golden Glitz
Others: Brown ZIG Marker (for the tree trunk); Fine Crystal glitter

Saturday, 1 January 2022

Happy New Year!!! .........

Happy New Year's Day! ......

Well here we are again, the start of another brand new year ...... it's 2022!!!  

I hope you all had a lovely Christmas, and that you enjoyed some New Year celebrations. It was pretty quiet here ....... good food, nice wine and a bottle, or two, of bubbly to see out the old and ring in the new.

So, it's the first of January ......... and after our festive break, the CAS Mix Up Challenge is back ...... whoo hoo!!


We're starting this year off with a Watercolour Challenge, hosted by Jenny.

The theme is ......... Loose Watercolouring
Now, if you're like me, you might be thinking ........ what is loose watercolouring?  Well, if you are,  check out the CAS Mix Up Blog where you can find an introduction to this technique from Jenny, lots of ideas and inspiration from the Design Team and, links to some great videos showing different ways of using this fun technique.

It's all about making watercolouring easy ......... here's my take on the challenge


I used a pretty new stamp set which arrived in my craft room just before Christmas ...... Blooming Branch from Pinkfresh Studio.  It's such a pretty stamp, and there's some nice words in the set too. I can see me using this one a lot.

I stamped the image onto a piece of white cardstock, using a black Versafine Clair ink pad.  You can see in the picture above, I also stamped part of the image on the inside of my card (something I'm trying to do with all of my cards this year ...... complete the insides too!!)

For the watercolouring I used a mix of ZIG Clean Colour Brush Markers (leaves and centres of the flowers) and a Picked Raspberry Distress re-inker (for the flowers) 


To create the loose, sort of sketchy look to the colouring I painted the images with clean water first, one flower/leaf at a time.  I then put a drop of re-inker, and scribbled a little ink from the pens onto a craft sheet and then used a waterbrush to pick up the ink and drop it onto the wet petals and leaves, allowing the colour to move with the water.  To create the shading, I let the first layer of ink dry then repeated the technique again ....... easy!


I love the imperfect, sort of arty look ...... it also means that you don't have to be that careful, it doens't matter if the colour comes out of the lines!

I stamped my sentiments in gold, and then a few ink splatters onto the background using the same colours I did for the main image


I'm so looking forward to seeing the gallery for this challenge.

We have a fabulous Guest Designer this month too ....... Karen (Ransdom Reflections) is joining in the fun, so be sure to pop by and say hello!

Thanks for stopping by ......... enjoy the rest of your New Year's Day, and here's to a fun filled, crafty 2022!

Cheerio until next time ........


Supplies:
Stamps: Blooming Branch (Pinkfresh Studio)
Inks: Versafine Clair - Nocturne; Picked Raspberry Distress Ink Re-inker; Delicata - Golden Glitz
Other: ZIG Clean Colour Brush Markers; Waterbrush; Ink-Me cardstock (Hunkydory)

Thursday, 4 February 2021

My journal's almost full ...........

Happy Thursday .......
How are you? ...... I hope you're enjoying your week.
It's done nothing but rain here ...... all week!  Perfect weather for staying warm and cosy in the craft room.  Even though we're out of lockdown I have absolutely no desire to go anywhere!

I mentioned in the previous post that I'd spent last week taking part in an online workshop with the lovely Tracy Scott.
Oh my goodness ..... what a fabulous fun week it was.  We were creating layered backgrounds, and I did all mine in one of my large Dylusions journal (which is nearly full now ..... I'm so excited!!)

Here's a few pictures of my end results .......
Day 1 ..... lots of paint, stenciling and stamping


Day 2 ........  loving using the bright colours


We even managed a bonus page ......


Day three ..... rainbow colours 


Day four ...... I loved how this turned out, there's so many layers on here.  Collage papers, paint.  Stencils, stamps and mark making.  Pen work, splatters, you name it, it's on here.


And finally Day five ...... wasn't sure about these pages when I started but, I stuck with it and I'm happy how they've turned out.  


I do love Tracy's use of colour, and her journaling style. Check out her Creative Cafe page on Facebook there's loads on there, and maybe try one or two of her workshops.

It's STILL raining out there ....... not only do we have the hot tub at the back, we now have a lake, and it's getting bigger


The flamingos are hubby's idea ..... nothing to do with me!! (I don't really go for plastic garden ornaments ..... if that's what you can call them!!)  
This is what happens when he's bored and looks on Amazon!
At least they match the fabulous new Distress colour from Tim Holtz ...... now these I am looking forward to receiving!


Thanks for popping by ..... enjoy the rest of your day.

Cheerio until next time .....


Thursday, 15 August 2019

A midweek get together .......

Happy Thursday .......

The weekend is in sight ...... and the sun is shining, although it's not supposed to last. 
We were hoping to have a BBQ on Sunday, but if the forecast is right it's not going to happen!
Oh well!

I had a lovely day yesterday though ..... surrounded by my craft stash, and in the company of good friends.  And, there was cake of course!

It was workshop day.  Not usually held midweek, we all kept thinking it was Saturday ..... confused or what!!
We did complete two more pages on our calendars though ....... they're all coming along nicely.

There was a bit of everything yesterday ...... rubber stamping and heat embossing, watercolouring using ZIG Markers.


Pretty floral images in soft pastel shades ...... the embossing helps to keep the watercolour in place for a nice crisp finish


Not to worry though, if you do go over the edge ....... just add a little more water and make it part of the background, for a more softer look


And used the acetate smooshing technique to add colour onto the backgrounds ....... always fun to do, and very effective.


We used large sentiment stamps ...... they make great focal points and they were perfect for these quick and easy calendar pages


Smooshed Distress Inks again for the backgrounds, a little bolder this time though, with a touch of metallic gold in there.  The hardest part of these pages was, choosing which colours to use .....


We did a bit of Ink splattering, and a touch of doodling around the sentiments using a glue pen and glitter .....


Black fine liners, gold gel pens, enamel accents or crystal glaze ....... I even added a touch more colour to the little banners on the bottom using the Distress inks again


I think we're going Autumnal for the next lot of pages.  Rich, warm shades ........ with trees and leaves perhaps.  Hmmm ...... better get my thinking cap on!

Thanks for popping by ...... enjoy the rest of your day.

Cheerio until next time ......


Products used:
Stamps: Hello Lovely (Concord & 9th); Sentiment stamps from Inkylicious; Be the Reason - Lil'inker stamps
Inks: Versafine; Distress Inks -  Stormy Sky, Shaded Lilac, Picked Rapsberry, Mustard Seed, Spiced Marmalade,Peacock Feathers, Twisted Citron,Wilted Violet; Versafine Clair - Nocturne; Delicata Golden Glitz
Others:  A4 Calendar (PaperMill Direct); ZIG Clean Color Brush Markers; Acetate for smooshing, Gold & white gel pens, Stardust Glitter pen, Fine crystal glitter, Enamel Accents, Crystal Glaze

Wednesday, 17 April 2019

Calendar Girls .......

Happy Wednesday .......

And Happy World Malbec Day for all you red wine lovers!!


We're off out this evening for a special dinner to celebrate (any excuse!)  Our favourite little restaurant is hosting a five course tasting menu, all paired with the perfect Malbec wines ...... there's even a Malbec ice cream ....... we had a cheeky tasting on Monday and it's delicious!!

Enough about food and wine ........ Last Saturday was out first crafty get together of the year, it was so nice to see everyone and we had a lovely day.  We made a start on creating calendars for next year.  A little bit early but, we're planning to do about three pages each month, and then decorate the covers so it's a work in progress.

Inspired by the very talented Eileen Godwin, we'll be using different inks, different techniques with stamps and stencils and just generally having fun.

We're using the Create-a-Calendar from PaperMill Direct ...... the quality is amazing and the pages take the inks really well. 

Here's a quick look at how mine are coming along ...... I have one calendar that I use to plan the pages and then another one to re-create on the day, with the ladies.  When I say re-create I don't mean copy exactly.  Each page is slightly different, the inks don't always go on the same, and I might use different stamps etc.

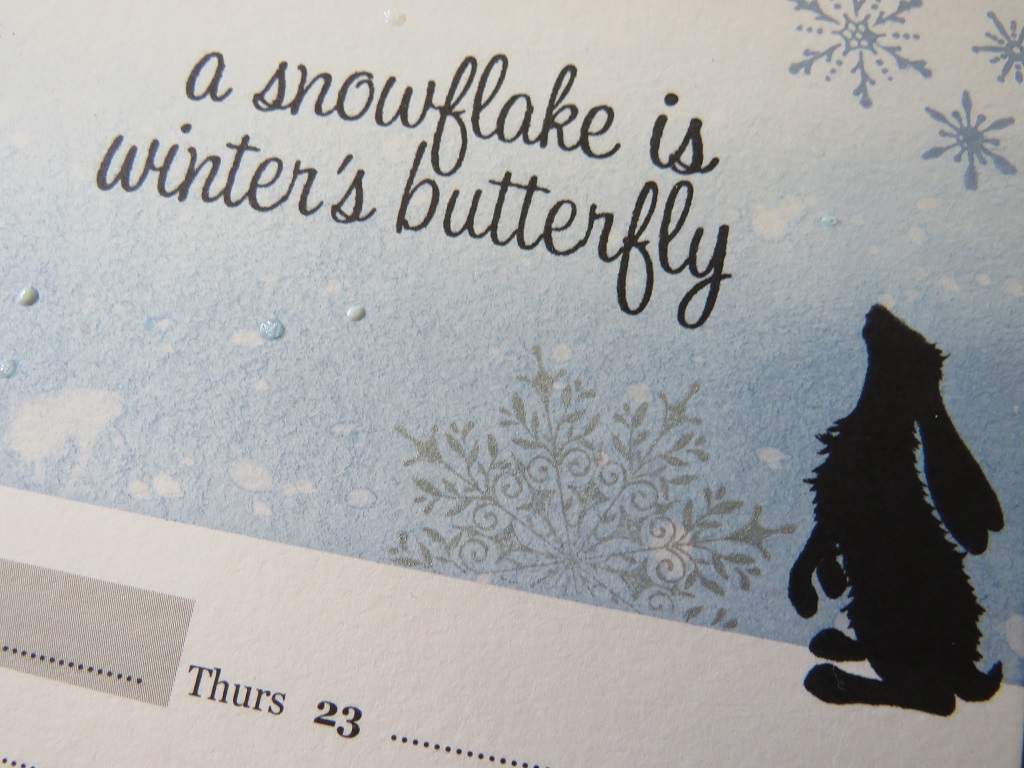
Pretty snowflakes for the start of the year .....
The one on the left was my sample .... the one on the right is the one I did on the day ..... see hwat I mean about them being different, I've used exactly the same inks but I've been more heavy handed on the second version


Simple ink blending using Distress Inks ....... three shades of blue applied with a brush, working from the top down to the centre, and the bottom up leaving some white(ish) space in the middle


A few splatters of water then some rubber stamping, finishing with some heat embossing on the large snowflake.
And I decided to add some words to this page ..... a simple sentiment stamped in black and a cute little silhouette which I'm going to continue through the calender if I can .....


More ink blending for the second page ..... Memento inks this time


This was one of Eileens designs ...... again see how the second version is so different from the first.  I've used more ink on the background and splattered it with water ......


I changed the colours of the foliage slightly too .....


Finally, inspired by Eileen again we tried the Gesso Resist technique with stencils


This was so much fun ...... and my two pages ended up completely different. Same techniques, gesso through the stencil,  ink applied over the top and then carefully wiped away from the gesso. 
I changed my ink colours slightly, and I only did a small area of stenciling on the second one .....


Love the look of these coloured inks for the foliage ...... but I also like the black


We all followed the same techniques but didn't always do the same months so each of the calendars will be completely different when they're finished ....... we are going to try and do another three pages next month!

Thanks for popping by ..... enjoy the rest of your day.
It's beautiful here, the sun is shining and it's finally warming up out there.  Let's hope it lasts for the Easter weekend.

Cheerio until next time ......


Products used:
January
Stamps: Snowflakes - Tim Holtz, Hero Arts, Stampn Up!; Sentiment - Hero Arts; Bunny - Lavinia
Inks: Distress Inks - Stormy Sky, Faded Jeans, Chipped Sapphire; Distress Oxide Ink - Stormy Sky for the small snowflakes;Silver ink (Deliata); Versafine Clair - Twilight, Nocturne
Other: A4 Create-a-Calendar(PaperMill Direct); Nuvo Drops - white; Stickles Crystal Glitter Glue; Low-tack stencil tape

February/March
Stamps: ELB30 from PaperArtsy; Cat and the mouse are both from Lavinia
Inks: Memento - Nautical Blue, Potter's Clay;  Versafine Clair - Twilight, Chianti, Nocturne; Archival - Orange Blossom, Red Geranium; Dandelion
Other: Low tack stencil tape

March/May
Stamps: Leaf Sprig - Stampendous; Wildflower, Hare - Lavinia
Inks: Memento - Pear Tart, Morocco; Versafine Clair - Nocturne; Archival Rose Madder, Leaf Green
Other: Heavy White Gesso, Stencils - JOFY; Funky Fossil, White Posca pen