Showing posts with label Uniko New Release May 2018. Show all posts

Saturday, 12 May 2018

It's a busy day today ......

Happy weekend folks ......

And if you're a Uniko Stamps fan ..... Happy New Release Day!!!
Yes!  all the brand new products that we've been teasing you with all week are now available to buy ..... yeah!!
You can find them all on the Uniko website or ...... if you're off to Port Sunlight today for the Happy Stampers Festival and you want to get your hands on them straight away, then you'll find them all on the Uniko stand at the show.

This is actually a scheduled post as I'm currently on the boat, on my way to Port Sunlight ..... I hope!
Fingers crossed the weather's good ...... I don't like it when it's bumpy!!
We should be well into our journey by the time this goes live ....... a little group of six craftaholics, that have all been up since the crack of dawn, armed with shopping lists galore and money to spend.  Probably full of coffee and a bacon sandwich at this time, discussing who's buying what, who we want to see first,  and what time to stop for lunch!  It's going to be a great day ..... we've been looking forward to this for months!

But .... even though I'm off on a jolly, the show must go on as they say.  As it's Release Day, me and the rest of the Design Team have been busy creating more inspiration for you using the brand new stamps, stencils and dies.

So grab a cuppa ..... there's a lot to look at.  Here we go .....
All the way back to the beginning of the week with the gorgeous Nature's Treasures II stencil and that fab little stamp set ..... Simply Said Blocks II


How perfectly do they go together!  I love this new stencil, the leaves are so pretty .....


I've simply stenciled with two shades of green Distress ink, using both sizes of leaves and added one of the Simply Said II sentiments ...... easy!


A few sequins and some dots of glitter glue add a touch of sparkle.

Next up the cute Bee Happy stamp set and the Honeycomb stencil


You don't always have to use the whole of the stencil.  Here I've just added part of the design to the bottom of my card.


Distress inks again to add the colour.  A fancy die cut edge to the top part, and a few of those cute buzzy bees .....


A simple sentiment keeps the CAS design


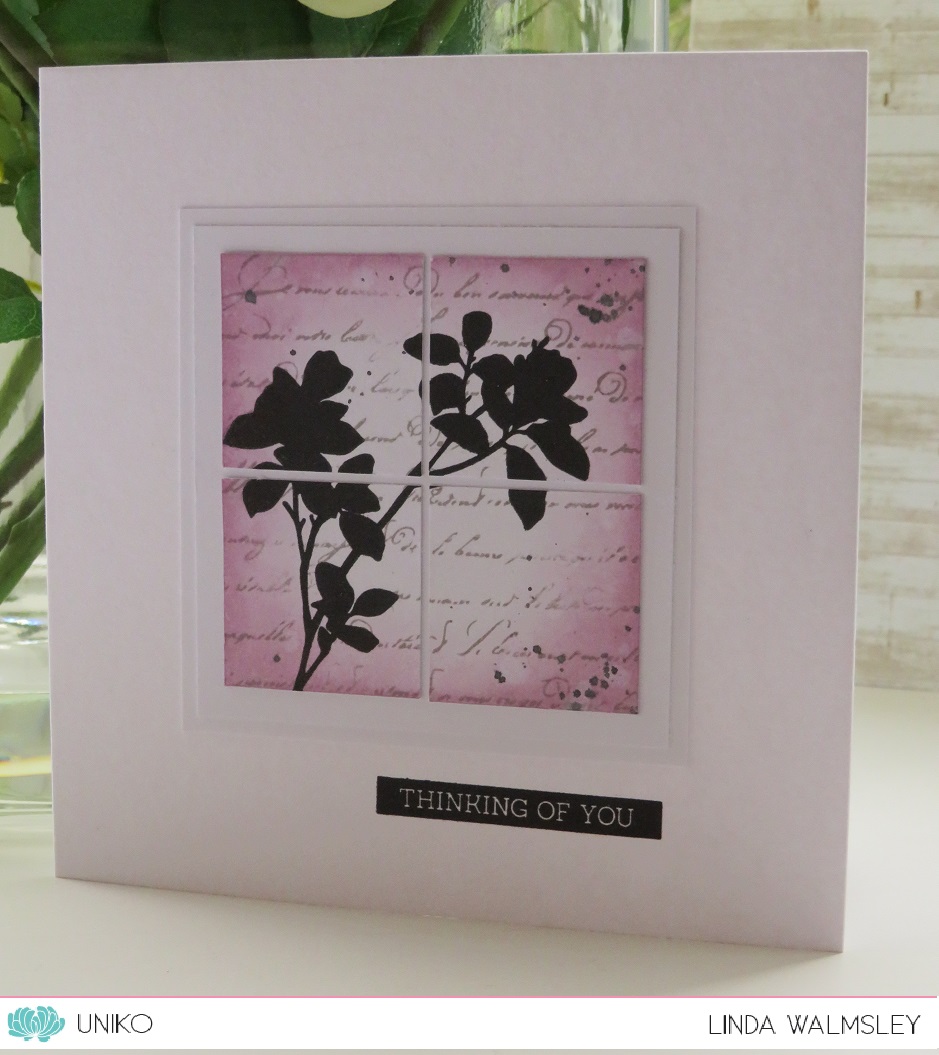
Now for two of my favourite favourites (I know I shouldn't really say that but ....... these are gorgeous!) ........  Just Because and the Large French Script


Again, they work so beautifully together.
I stamped the script onto a square piece of card using a grey Versafine ink, and then brushed around the edges with Spun Sugar, and I think it was Victorian Velvet Distress inks.


Using the MISTI, I stamped the pretty silhouette image over the top


A few drops of water onto the Distress ink, and a few black ink splatters here and there adds a bit more interest to the background.


I then cut the square into four and mounted it onto a couple of layers of white cardstock before attaching it to the front of a 6x6 card.  And look ..... there's one of those fab sentiments again ..... told you this was a really useful set!

Still with me? ...... great.  
Next up two gorgeous stencil designs ....... Party Confetti and the pretty Stylised Flower


Another card using only part of the stencil .......


And Simply Said II again .... don't they look fab stamped in a coloured ink ......


Of course a party wouldn't be the same without a balloon or two!


Not only have I not used all of the stencil on the next card ..... I haven't used the whole die either


I've die cut my aperture off the edge of the card and placed the stenciled design underneath


A  few ink splatters, some sequins, and a bit of coordinating thread ..... held in place by one of the sentiment from the original Simply Said Blocks


On to the Designer Dies now ...... these match previously released Uniko stamp sets ........ Originally Organic Additions ...... 


A pretty, CAS design using one of the stamps and then I created an aperture using one of the matching dies


Part of the sentiment is stamped on the inside of my card ......


And I used one of the cute little blooms to embellish the heart wreath ...... there's matching dies for the all flowers


Here's a look at the card closed ......


Finally ...... (congratulations by the way if you're still with me) ..... we have the Explosion! Dies
I think these are fab!


I used the Explosion Additions stamps on the background and added some ink splatters .....


Stamped and heat embossed the WOW! then used the matching die to cut it out ........


And attached it to the card using a piece of folded acetate ..... this acts a bit like a spring and allows the word to move.


Phew!  Well .... that's it.  The brand new Uniko release ..... what's on your shopping list?

If you're still deciding which to go for, check out the rest of the DT Blogs for more great inspiration

 Izzy
Jane 
Linda (that's me!)

And don't forget to stop by the Uniko Blog too ..... you might find a few surprises!

Thanks for popping by ...... hope you have a fabulous weekend.
If you're popping along to Port Sunlight have a great day ..... spend lots, get loads of lovely new stash and I'll see you there!

Cheerio until next time .......

Tuesday, 8 May 2018

More brand new products coming soon from Uniko Studio .....

Happy Tuesday to you ......

Ooops ...... sorry, I'm a little late today with the Uniko Studio new release introductions.  Family life got in the way of me spending any time in the craft room yesterday, so I had a few things to finish off this morning.

We're all back on track now I think ...... the Bank Holiday hasn't helped at all though, there's still too much to do before the weekend!!!

I've got a quick look at two new Uniko stencil designs for you ........ Party Confetti

and a pretty Stylised Floral.


Remember the Confetti Background Block stamp from the last release, well now there's a fab stencil ........ another way to create this fun party design


I masked off the edges around a square piece of card, slightly smaller than 6x6 inches,  and then used Distress Oxides inks in various colours, through the stencil to create a pretty rainbow effect


I used one of the stamps from the Birthday Sentiments set from the last release to stamp part of my greeting across the center of the stenciled card.


I then used the Happy from Simply Said Blocks, and Wishes which is part of one of the sentiments from the new Simply Said Blocks II, I stamped them in two of the colours from the background, fussy cut them and attached them with foam pads

A touch of glitter here and there adds a little sparkle


The new Stylised Flowers is such a pretty design, it was a shame not to used the whole thing .... so I did


The full stencil fits beautifully on a 6x6 inch square card.

I simply blended Distress Inks through the stencil ..... nothing fancy, no special technique


I did use one of the tiny stamps from the new Bee Happy set to fill in the centers of the flowers ...... I think little stamps like this are so useful.

A simple sentiment added to the bottom .....


And I couldn't resist adding in a couple of those cute little busy bees


Well .... that's Day 4 of Introductions done ..... and we're not finished yet! Check out the Uniko Blog for a full New Release Schedule.  You'll also find links on there to the rest of the Design Team and our lovely Guest Designer,  we've all been busy playing working with these brand new products.

Thanks for popping by .... enjoy the rest of your day.

I hope you all had a good Bank Holiday weekend.  At least the weather was kind to us .... we had a lovely BBQ again yesterday and then hubby and I sat out and watched the sun go down


Unfortunately though we're back to the mist and the rain today and it's not looking good for the rest of the week.  I'm keeping my fingers crossed the weathermen have got it wrong ..... I'm on the boat on Saturday ..... I don't want it bumpy!!!
Yes there's only 4 more sleeps until Port Sunlight ....... are you going?

Cheerio until next time .....

Monday, 7 May 2018

Introducing ...... Just Because and Large French Script Background

Happy Bank Holiday Monday .......

Welcome to Day 3 of the Introductions for the brand Uniko Release coming very soon!  I shouldn't say this but ....... today we've got two of my favourite stamps from the new release ......  the very pretty Just Because 

How lovely is that silhouette stamp ...... perfect for so many occasions, and a great little selection of words to go with it.

And then, we have the gorgeous, everybody needs this stamp in their collection ...... Large French Script Background

I can see me using this a lot ..... it's a great size for creating backgrounds, but also perfect for using just part of the design to add layers and texture to so many projects ..... love it!

I've used both of the stamps together here ........ a perfect partnership!


I used a piece of acetate to smoosh some Distress Ink onto a piece of white card.  I did this a couple of times, drying with a heat tool in between, to give the look of layers


I then stamped over the top using the new French Script  .......


In the picture it looks like the image didn't stamp completely ..... don't worry this was the look I was aiming for.  The stamp does give a beautiful complete image.
I inked up the stamp using a grey ink, then before stamping it onto my card I actually used my finger and wiped away some of the the ink in places, so that I would get this old, faded look.

Using a black ink and my MISTI, I stamped the pretty silhouette from Just Because down one side of the card.
I think it's always a good idea to use a MISTI ...... or any of the stamping platforms if you have one, for stamping silhouette images.  You can repeat stamp as many times as you like until you get that perfect coverage.  It's actually the main reason I bought my MISTI ...... I was fed up of not getting a crisp image when I stamped silhouette images first time, and ended up having to fill in with black ink, or a marker.  With the MISTI there's none of that .... just keep inking up the stamp again and stamp over the top.  It's great when your ink pad isn't quite as inky as it used to be ..... just stamp the image a few times and build up the colour until you're happy with it.

You can see I used the image a couple of times, and stamped each one off the edge of the card.


A simple sentiment finishes it all off


Silhouette images don't always have to be stamped in black ....... how pretty does this look in green


CAS teamed up this time with the Simply Said Blocks II
Stamped directly onto a card blank with a few ink splatters in the background ........


Some of the words from the same stamp set .......


Along with a sentiment from Simply Said II ... stamped and fussy cut. What colour would you choose?

Thanks for popping by again ..... have a fabulous day. 
Check out the Uniko Blog for links to the rest of the Design Team to see what they've been creating with this fab new release.

Cheerio until next time ......