Showing posts with label Sweet Poppy Stencils. Show all posts

Monday, 17 August 2026

More Stenciling for CAS Mix Up ........

Happy Monday ........

I hope you had a lovely weekend.  We had family and friends round for a BBQ which was nice, and hubby did all the cooking, well most of it, which was even better!

I've got a little reminder for this month's CAS Mix Up Challenge for you today.  There's still 2 weeks left to get your entries in if you want to play along.

It's a Stencil challenge this month, and the added prompt is ........ Stenciling over Patterned Paper 


Patterned paper is not something that I use a lot of really, but this challenge has been fun.
I've rummaged through my bits boxes and found a few paper pieces and here are the results.

First up ...... a touch of pink


The paper is from the Mixed Media Compendium Paper Pad from Funky Fossil.  I love all the different shades of pink, and the grungy look with the little touches of blue on there.


I've used an old Sweet Poppy stencil over the top. I think it was called Cornflowers, but I couldn't find it on the website so I assume its been retired ..... sorry!

I used black Versafine Clair ink and applied it through the stencil using a sponge, building up the depth of colour gradually.

I added my sentiment using a die cut, coloured blue to bring out the blue already in the paper, and then heat embossed the word friend underneath.


To finish off the card I added a doodled frame around the edge using a black fine liner pen.

Next up, another piece of patterend paper from the same paper pad, just a different colour.  This has more of an Autumnal feel I think


Another Sweet Poppy Stencil used over the top (one of my all time favourites this one) ..... Wildflowers
(this must be retired too as it's not on the website)

I used Distress Oxide Inks this time, a mix of Unchartered Mariner and Villianous Potion.  I used a sponge to apply the inks again, and built up the depth of colour gradually.  
Applying the ink gradually means that you get a cleaner image, not as much risk of the ink bleeding under the stencil.  Takes a bit more time but, I think its worth it.


The sentiment was simply stamped in black and then die cut.


One type of paper I do like to use is book pages, I love text.  And, it makes a great background for stenciling over.
If you do use book pages, just be careful.  Give it a quick glance over first, to make sure there's nothing 'naughty' on there!
In fact, JOFY gave a great tip during one of her recent workshops ........ she likes to use foreign language books, they're not as easy to read, which I thought was a great idea.  Guess what I'm looking for next!!
Not sure where this page came from, but I think it's ok .......


This is a real CAS card.  A circle cut from an old book page, pretty flowers stenciled over the top, then I attached it onto a larger die cut circle (black card), and added a white die cut frame over the top.


A simple sentiment stamped underneath to finish it off.  I used my MISTI for the sentiment and shaped it to follow the edge of the circle.

If you are playing along with this months challenge, please remember to follow the simple guidelines, and keep your cards CAS (Clean and Simple).


Thanks for popping by, enjoy the rest of your week.
It's going to be a quiet one here, well as quiet as it can be.  The Manx Grand Prix started yesterday so it's motorbikes again.  The weather's not playing nice though.  We had rain yesterday (Sunday), so the racing had to be called off ....... not good!

Cheerio until next time .......



Products used

Card 1
Inks ...... Versafine Clair - Nocturne; Versamark Embossing ink, Tumbled Glass DOX (for the die cut)
Stencils ....... Cornflowers - Sweet Poppy (retired I think)
Others ...... Patterned paper; WOW Gold Superfine Embossing Powder, Small 'hello' cutting die, Black Fine Liner pen

Card 2
Inks ...... DOX Unchartered Mariner; Villianous Potion, Versafine Clair - Nocturne
Stencils ....... Sweet Poppy - Wildflowers
Stamps ....... Opposites Attract stamps and matching dies;
Others ...... Patterned paper; 

Card 3
Inks ....... DOX  - Picked Raspberry, Spiced Marmalade, Rustic Wilderness; Versafine Clair - Nocturne
Stencil .......  Imagination Crafts - Butterflyy & Daisy
Other ..... Old Book page; Circle Dies; Stitched Circle Frame Die; Sentiment from my stash

Tuesday, 15 November 2022

Oh Christmas Tree, Oh Christmas Tree ........

Happy Tuesday ..........

I've been at it again, batch making Christmas cards that is ...... well there are only 40 days to go before the big day!!!!!

Now you know me, I do love a nice Christmas tree and yes, it is almost time to get those baubles out and start decorating! (Carol, if you're reading this, there will be a Christmas tree up for our crafty get together next weekend ........ fingers crossed!) 

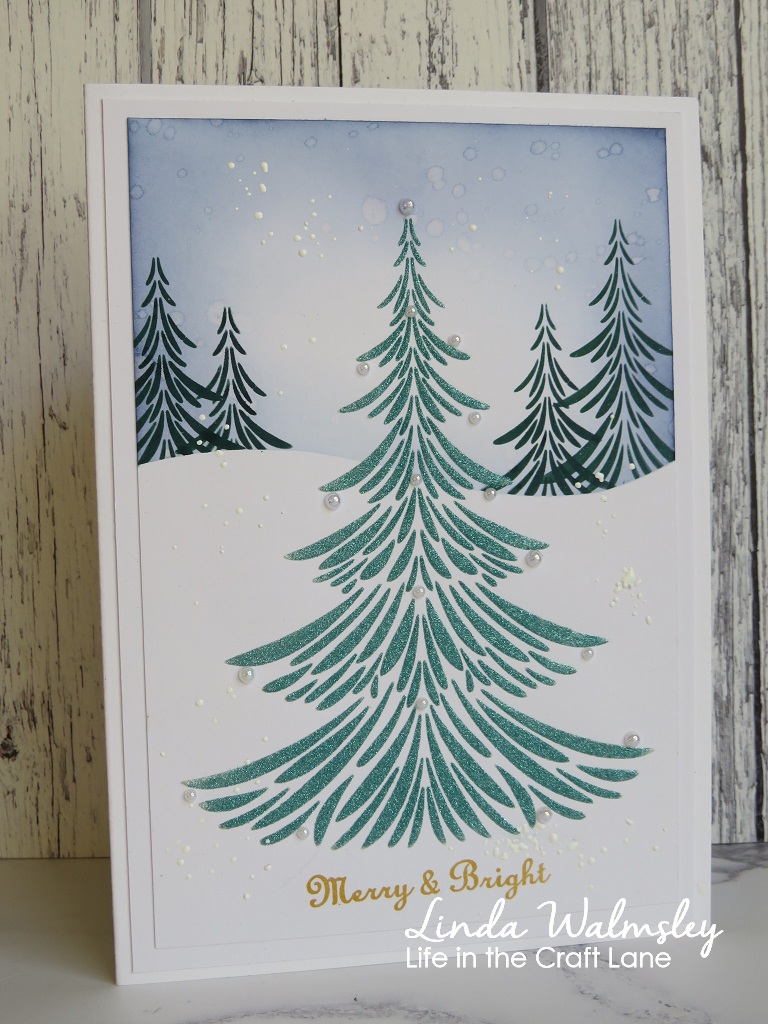
Anyway ......... speaking of Christmas trees, here's a beauty.  One of the latest stencil designs from Sweet Poppy ...... the gorgeous new Fir Tree


It is a large stencil but, as I always say, you don't have to make large cards.  These are 7x5 inches (my go to card size), and I think it looks great.

This was the sample I did for the TV show last month ...... I love it!  So CAS, I just had to make more. 


I used the Sweet Poppy Stencil Medium in the Pearlescent White through the stencil and then sprinkled over with Fine Crystal glitters whilst the paste was wet, and left them to dry naturally.


A few little sparkly gems added here and there, and a star on the top ......


All finished off with embossed sentiments.


Here are a few more ideas done last month for the TV show, using this fab stencil .......


Here's the tree full size ..... it's so pretty!
I used the stencil medium again, this time sprinkled with green glitter and then I fussy cut the tree once it was dry, and used fom pads to attach it to my card


A few gold and silver ink splatters on the background, dots of glitter glue for the baubles to decorate the tree, and a tub for it to sit in on the bottom ..... very festive!


Same stencil ..... used this time to create a little winter scene.


Just by using a little bit of masking you can alter the size of the tree, and create a little forest scene in the background .........


 adding the full size tree in the centre


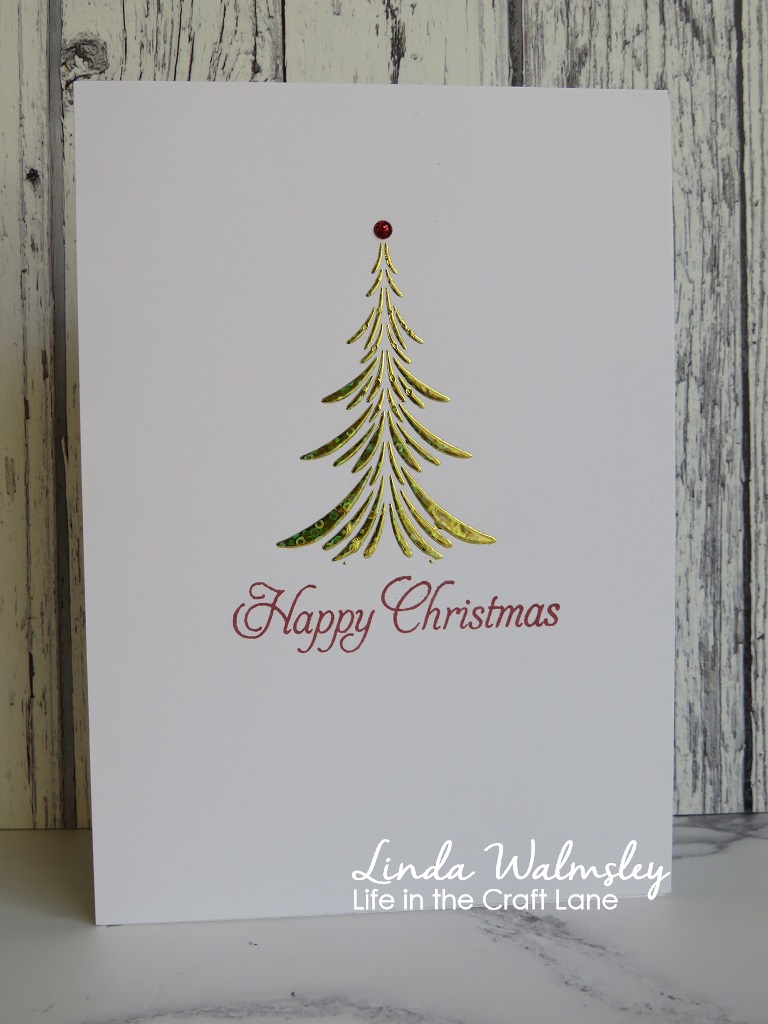
Large trees not your thing? ....... then just mask off the bottom of the stencil ....... make the tree a size to suit you


This looks so cute ....... and it's one layer, so perfect for posting!

I simply used a bit of masking tape to cover the bottom the part of the stencil, before using the stencil medium.  I left it overnight to dry completely, then I used foil over the stenciled design and ran it through a laminator.  
Quick tip - if you're using foil on your stenciled designs, before you apply the foil, carefully dust around the edges of your design with an anti-static bag, being a bit careful not to get the dust on the stencil medium.  This avoids the foil sticking where you don't want it.    If  this does happen though, you can remove the foil by gently using a sand eraser (check them out on Amazon, they're not expensive)


A simple gem on the top of the tree, and a sentiment stamped underneath ...... done!


I love it when it's time to put the Christmas tree up, and it's almost here ...... whoo hoo!! 
A few new baubles have already been bought, and I'm already thinking of where to put the trees.  
I am a little nervous though ...... this year we have a little one who is now very mobile, and is into everything.  Christmas is going to be fun this year! 


Thanks for popping by ..... enjoy the rest of your day.

Cheerio until next time .......

Wednesday, 19 October 2022

Simply Sweet Poppy Stencils Facebook Challenge ......

Happy Wednesday .......

He we are, in the middle of another week ..... and its wet and windy here again.  Winter is coming!

Hubby has been in the office for the past couple of days this week ..... it's weird not having him at home.  The house is very quiet when there's only me here!  I do get stuff done though when I'm on my own.

There's just a little over a week left of this month's Simply Sweet Poppy Stencils Facebook Challenge if you fancy playing along. 
There's a fabulous £40 voucher to spend on the Sweet Poppy Stencils website up for grabs.   Just follow the simple rules which you can find below,  and you never know, you could be our next winner.

The theme for October is ........ Fantastic Foliage, and Sweet Poppy have some gorgeous stencils perfect for this challenge.  Think trees, or leaves, grasses and greenery, and of course all those wreath designs ..... how about some quick and easy Christmas cards!


I used the Holly Wreath Stencil for this card, and a Brilliance Pearlescent ink (Thyme)  
Nice and simple, and perfect for sending through the post .......... I've mat and layered this a little bit but, you could leave it as a one layer design. 

I stamped the pretty ribbon first, from the Sweet Poppy stamp set Victorian Bauble ...... black ink and then coloured it using a red Distress Ink Re-inker (Barn Door) and a fine paintbrush


I then sponged the pearlescent ink through the stencil, building up the depth of colour gradually.  Less is definitley more when stenciling with inks, especially juicy inks ...... too much ink on your sponge could cause the ink to bleed under your stencil whuich means you won't get a crisp finish to your stenciled image.  Taking a bit of time to build up the colour is well worth the effort.


Once the ink was dry I then used a red glitter glue to add some berries and a quickie glue pen and fine crystal glitter on the rest of the dots.


A festive sentiment stamped in the middle finishes it off nicely


I did look on the Sweet Poppy website for the link to this Holly Wreath stencil but I couldn't find it.  I'm not sure if that means it's been discontinued, or it's just out of stock.

One design that is on the website though is this pretty Holly Wreath ........
A simple, elegant design which, for these two cards I've used the stencil twice, slightly offsetting the second layer, to give the wreath a fuller look.


I've taken the design off the edge of my card and used gold and silver metallic inks


Adding a touch of glitter to some white enamel dots, for a little more interest.

Or, do you prefer more traditional Christmas colours .......


The first layer of the wreath was done using a green ink.  Then I offset the stencil slightly over the top and this time I used white stencil paste through the design, and sprinkled with green glitter whilst the paste was still wet.


A few festive red berries here and there, and a stamped sentiment in the middle ....... same stencil, different look!


The challenge is open until the 29th of October and here's the simple rules you need to follow .....


Happy stenciling!

Thanks for popping by ....... enjoy the rest of your day.

Cheerio until next time .......

Sunday, 25 September 2022

Back with a little sparkle for the Simply Sweet Poppy Stencils Challenge ........

Hello again ...... I'm back!

Happy Sunday!  I hope you're enjoying your weekend.

Well, it's been a while ....... can you believe it's almost 6 weeks since I blogged!  And almost as long since I've been in my craft room.  
I don't think I've ever taken a break for so long before.  It's actually been really nice ......  no pressure, and no deadlines to work to.  I didn't even pick up a craft magazine.  I did take a small craft bag with me in the motorhome but, I can't say I did much with that either.  

But, I need to get back in the craft room at some point so, this weekend I've had a good old sort out and a tidy up, re-arranged my desks and now I'm raring to go ..... ish!
I've lots of new goodies to play with, DT work to be getting on with, and of course there's all those festive makes to get started on ........ only 13 weeks until Christmas,  oh my! the tree will be going up next!

Anyhow ........ the end of September is approaching fast, so that means there's only a few days left to play along with this month's Simply Sweet Poppy Stencils Facebook Challenge.
The theme this month is ........ Sparkle is My Favourite Colour
Who doesn't love a touch of sparkle, and the good thing is, it really can be any colour you like! Christmas cards just wouldn't be the same without some sparkle and shine now would they.


Not sure the sparkle comes across in this picture ...... glitter is a real nightmare to photograph!

I inked through the gorgeous Sweet Poppy Snowflake Bauble Trio stencil using Distress Inks ....... Stormy Sky, Chipped Sapphire and Dusty Concord


Then I used a Quickie Glue Pen over the top of each snowflake, and sprinkled with fine crystal glitter.
Like I said, hard to photograph but so pretty when the light catches in real life. 
Using the clear crystal glitter allows the colour of the inks underneath to show through but, you could use coloured glitters on top if you wanted too for a more intense colour.


I added a few ink splatters on to the background using the same colours of Distress, and then heat embossed my sentiment on the bottom.  


Another quick and easy design, this time using the pretty Snowflake Aperture Circle stencil, again with Distress Inks (Stormy Sky & Chipped Sapphire) 


The aperture stencils are so useful, perfect for creating detailed frames on your cards 


(sshh ..... don't tell anyone ..... have you spotted the sneaky peek of a brand new design coming soon? You are going to love this new stencil!)

I inked the snowflake circle with my Distress inks then, cut a simple mask from a piece of copier paper to create the hillside for my winter scene in the centre.  
With the mask still in place I used the gorgeous, brand new Fir Tree stencil  to create the forest in the background, and then I used Versamark ink through the design and heat embossed the centre tree over the top


To finish off I used fine crystal glitter to hightlight the snowflakes in the circle and added a little touch to the tree

Sparkle isn't just for Christmas cards though, a touch of glitter makes any card extra special ......


I used Distress Ink Reinkers to colour the background, applied with a paintbrush and lots of water onto watercolour card  (Forest Moss, Carved Pumkin, Spiced Marmalade & Scattered Straw)


Once it was all dry I used the Blissful stencil over the top with Black ink (Versafine Clair - Nocturne)
and then used a fine tip glue pen and glitter to highlight along the tree branches


A few spatters of gold ink onto the background and a simple sentiment on the bottom ...... job done!


I think I'm ready for Autumn now ...... the sumer has been amazing but, it's time for cosy nights in, hot chocolate and snuggly woolies!

The challenge is open until the 29th of the month so you need to be quick if you want to be in with a chance of winning this months prize.
Check out the rules below and ........ Happy stenciling!


The last few weeks have flown by ........ We had our longest trip in the motorhome including a music festival (more about all that later).  There's been the usual family gatherings, with a few birthday celebrations along the way, including Arthur, who was one ...... now that year's gone fast!  And, as I'm writing this blog post I've heard that he's taken his first proper steps this morning ....... yeah!!!  


It was also Alex's birthday, he was 12.  He's also started secondary school which is scary ...... doesn't seem five minutes since he was taking his first steps!!


We've also had Arthur's baptism,  and I've had Covid ..... again!!

Let's hope October is a little quieter!

Thanks for popping by ....... enjoy the rest of your weekend.

Cheerio until next time ........