Thursday, 10 March 2016

More from Sweet Poppy ......

Happy Thursday ......

A bit late in the day again ..... sorry.  No excuse, other than hubby took the day off work so nothing got done today.  The weather was glorious so we took full advantage of it and I was treated to lunch out down on the quay, in one of my favourite little places ..... the Little Fish Cafe.  Their Kerala Fish Curry is deee-licious!!! And their homemade raspberry lemonade is perfect when sitting in the sun.

Anyway, enough of all that ..... as promised here are the rest of my Sweet Poppy samples ..... you might want to grab a cuppa (or something stronger ...... well it is after nine) there's quite a few photos on this post!

Let's start with the beautiful Black Daisy .....  how pretty is this


And can I just say I have a new favourite colour of glitter.  Recently I haven't been using much glitter on my creations, except for Christmas cards that is, but I've fallen in love with the Sweet Poppy Periwinkle shade ..... it's so pretty, and twinkles beautifully in the light .....  the photo above doesn't do it justice at all.

I coloured a square of white card using Distress Inks (shades of blue and lilac) and then splashed a little water over the top to give a nice speckled look


I then used the Black Daisy stencil and the Distress Inks again to add the flowers across the background ....... I wanted to create some depth to my finished design.

Using the same stencil, this time with the Glossy White Embossing Paste I added the daisies again over the top and whilst the paste was still wet I sprinkled that gorgeous glitter over the image and left it to dry ..... so pretty!!


If you look at the main picture, you can see that I've used the stencil twice to add the flowers and I've actually used both sides to get the reverse of the daisy ...... simple but effective.

To finish off I mat and layered my square and added a sentiment around all four sides ...... stamped and embossed using a white detail powder


Next up same stencil, different look


I went with the black paste this time ....... so striking against the pretty Brusho background that I found in my bit box (left over from another project probably ..... I don't like to throw pieces of card away!)


I used the stencil again on a larger piece of card to give a little more interest to the finished project


And I simply stamped my greeting over the top


I added a few sequins to the front to add a bit of sparkle


And I couldn't resist using the pretty flower on the inside of my card too .....


So pretty and delicate ....


On to the Elephants ...... how cute are these guys!!!!


Another piece of home decor .....  a pretty wall hanging.

I wanted some nice bright colours in the background so I used my Distress Inks again, directly from the pad to my cardstock  ....... I think the colours were Mustard Seed, Wild Honey, Spiced Marmalade, Abandoned Coral and Picked Raspberry.
I spritzed the whole thing with water to get the speckled look again to the background .......


I then used the stencil with the Glossy Black Paste and left it to dry
Look at all the detail in the design ...... and the little baby ellie is just soooo cute!!!


The leaves around the outsides are from another stencil from the Sweet Poppy range .... the Leaf Flowers (another of my favourites)
I simply used the leaves from the design around the edges, and sprinkled each one with Black Glitter while the paste was wet.

This was then mounted onto a larger panel that also had the leaf design on the corners .... diagonal facing corners (something I like to do) and just a touch of Distress Ink to soften the edges


The whole thing was then mounted onto a piece of chipboard that had been painted with Black Gesso and I added some string to hang it with.  I thought the sentiment was the perfect finishing touch


That's so true.

Last but not least ...... the ellies again, this time using only the baby one ...... so sweet!


So simple to do.  I coloured the background as before ..... used the stencil first with the white paste and sprinkled with the white (Crystalina) glitter.  Then I turned the stencil over and used it again this time with the black paste and sprinkled with the black glitters.
Obviously this takes a little time to do .... you have to wait for the first lot of paste to dry before attempting to do the second one but, it doesn't take that long ...... a little patience is all you need.


I added the leaves again across the top ......


And finished with a suitable greeting


Phew!  Are you still with me ...... well done if you are.
Hope you like these ..... I thoroughly enjoyed creating them.

Thanks for popping by ...... enjoy the rest of your day.  Time for a little something chilled I think ..... cheers!

Cheerio until next time ......

Linda
xx

Wednesday, 9 March 2016

My first lot of samples for Sweet Poppy Stencils .........

Happy Wednesday (what's left of it)

It's a bit of a late one from me ..... it's been a busy day. What with all the usual day to day stuff, DT projects to get done and then I had to pick the little man up from school.  It's been a lovely day though ..... blue skies and sunshine, at last .... yeah!!!

I've got the house to myself this evening ..... well me and the little man, but he's away in the land of nod!  Hubby's out .... gone to watch the football at the pub with Chris ...... Chelsea vs PSG ..... and looking at the score .... it's not going to end well!  

Did any of you see the lovely Lucy from Sweet Poppy Stencils on the TV yesterday?  If you did you may have seen some of my samples made using those gorgeous new stencils.  If you didn't ....... and would like to see some of what I created then read on .......

This was the first lot of work I've done for Sweet Poppy so I was a little bit nervous at seeing my stuff on Create & Craft again. You all seemed to love the new designs ..... everything was selling quickly.
My favourite I think was the beautiful Black Orchid ..... such a fabulous design ..... a nice size too.  I kept things really simple ..... classic black and white for a pretty piece of home decor


Both of the canvas have been painted with black gesso ....... I love the matt finish.
The Black Orchid was then stenciled onto the smaller canvas using the Glossy White Stencil Paste, and then I added some Crystalina Satin Fine Glitter over the top whilst the paste was still wet


To  add a little more interest to the design, I used the stencil again, this time onto the large canvas, just across diagonal facing corners with the Glossy Black Stencil Paste.  I love the shiny black on the matt background ..... I think it looks so elegant.
(sorry about the photo quality .....  the lighting was not good when I took these.  Trust me the canvas is black!)

Once everything was dry I then mounted the small canvas onto the large one
(NOTE ... if you're doing this, put some holes into the large canvas, underneath where the smaller one is going to sit, and thread some string or something to hang the canvas with BEFORE mounting the smaller one!)

I finished off by adding a simple stamped word to the bottom of the small canvas


Using the same stencil, but a completely different design ...... a pretty layered tag


You know I love my tags and when I saw this layered design I just had to give it a go.
I came across it on the Ranger Blog ......  a lady called Debbie Tlach was doing a demo using the brand new Distress Crayons (my first set have just arrived in the old craft room .... can't wait to have a play!! - notice I said 'first' set ..... no doubt there will be more!)
Anyhow .... this was my take on her fabulous design

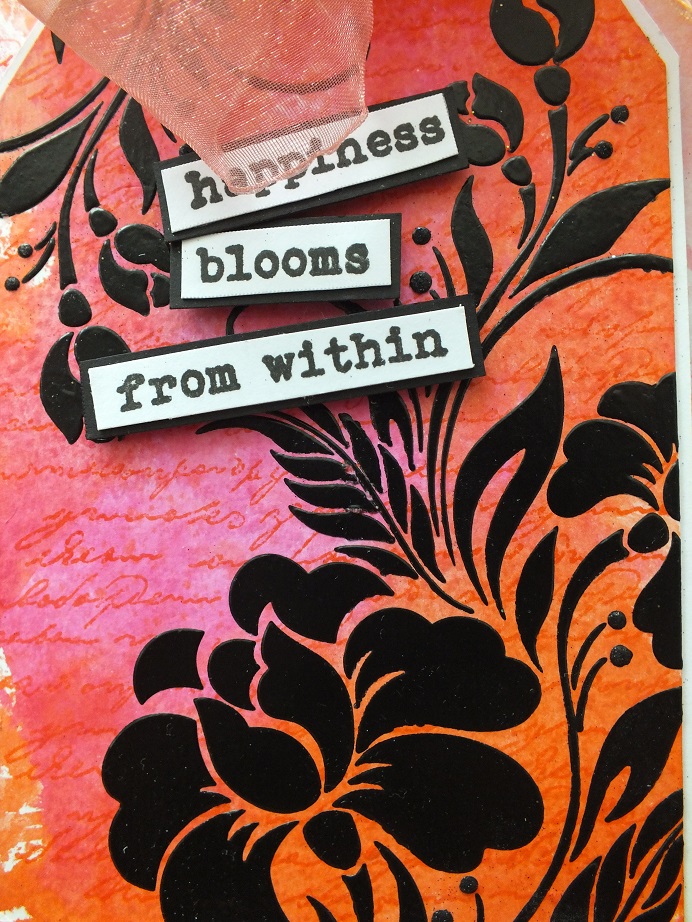
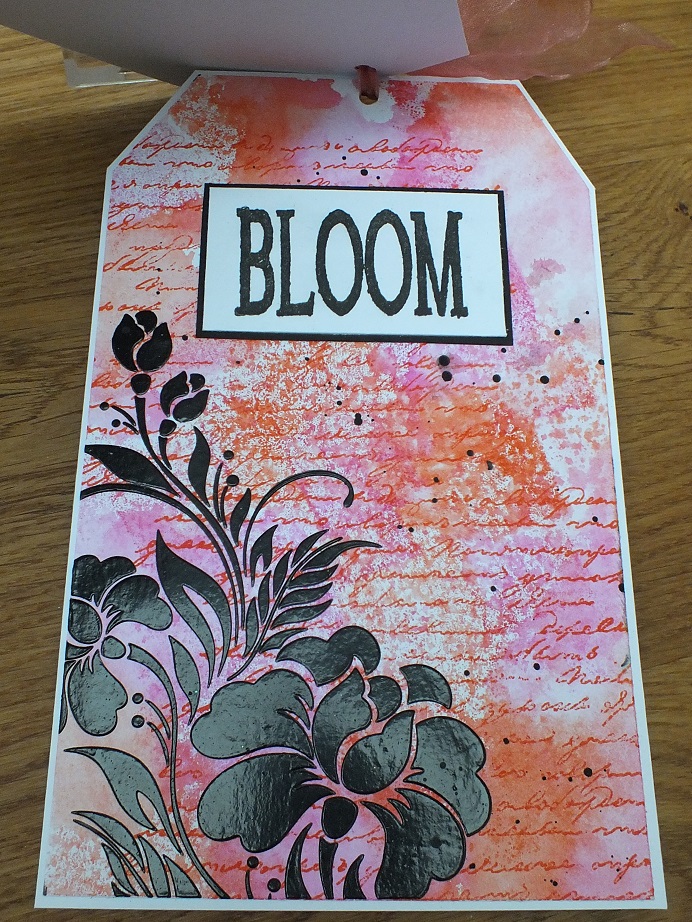
I simply coloured a large tag using my Distress Inks ...... swiped the inks onto my craft mat, spritzed with water and then smooshed my tag across the colour. I did this until the tag was covered and I was happy with the depth of colour


You can see I also stamped onto the background using a script stamp and one of the colours of Distress used for the background
I then stenciled the Black Orchid using the Glossy Black Stencil Paste again and left it to dry before adding my words to the front.

I cut a larger tag and using the same colours of Distress I smooshed the inks onto the card only this time not as intense.
I used the same script stamp in the background and added that gorgeous Black Orchid again .....


There's also a little hidden message on there too ......


Another of the new stencils was the pretty Honeysuckle Circle


Again this was so simple but I love how it turned out.

I simply stenciled the design onto a piece of white cardstock using the Glossy White Paste and let it dry.
I then sprinkled over the design with Brushos (I think it was Rose Red and Yellow) and spritzed with water to active the colour, mopping up any excess with a piece of kitchen roll.
See how the paste has held on to some of the colour ........


Using a fine tip glue pen I then went over the design and sprinkled the fine Crystalina Glitter over the top ..... you can still see the colour through the glitter, it just gives it a pretty delicate look


Just look at all the detail in these stencils  ....... they are definitely the best metal stencils on the market (in my opinion anyway!)

I added a stamped greeting onto the front and mat and layered with co-ordinating cardstock ..... easy!


I'll leave you with another very classic, CAS design ..... I really don't think this needs much more


 Elegant black and white, with just a touch of gold on there ......


Finished with some simple words .....


Thanks for popping by ..... enjoy the rest of your day.
I believe the football has finished ..... and like I said it didn't end well.  My boys are out of the Champions League .... sigh!!!

I'll be back tomorrow with the rest of my Sweet Poppy show samples

Cheerio until then

Linda
xx 

Sunday, 6 March 2016

Water ..... Water .... everywhere

Happy Sunday,

And a Happy Mother's Day to all you mum's in the UK.

I've had a lovely weekend ...... what with my birthday yesterday and Mother's Day today it's been a fabulous two days.  I've been wined and dined (twice!) Lauren cooked a fabulous meal with all my favourites ...... scallops, fillet steak and lobster ..... yum! (a girl could get used to this!!)  And then this morning I had these waiting for me .......


Thank you to everyone for your birthday wishes and all the beautiful cards .... they truly made my day! And thanks to my family for making this weekend so special ...... love you all!! xx

But ..... it's time to get some work done now ..... the gin and tonic will have to wait a little while longer!

It's actually tomorrow (Monday) in the Happy Little Stampers part of the world and that means it's time to launch our Mixed Media Challenge for March.

This month it's all about using WATER on your projects.


You know me .... I love splashing water around, especially with my Distress Inks, they react so well with water and depending on which techniques you use you get some really cool effects.

One thing I like to do is colour my backgrounds with Distress inks and then spritz or flick clean water over the top, let it sit for a while and then mop up the excess water, which also removes some of the ink leaving a fabulous speckled effect behind.  I did a little bit of this on today's inspiration piece for you .......


See how the background has this subtle mottled look to it ..... that's the splashed water.  Water also makes the colours blend together really well too.

I simply cut 4 squares of white card and then used a blue and a green Distress ink direct to the card from the ink pad.  Once I was happy with the depth of colour I then spritzed over the top with clean water, let it sit for a while then mopped up the excess with a paper towel


I also flicked some larger drops of water onto the card to get a more defined splattered look in places.

Once this was dry I stamped the butterflies (HLS Butterfly Birthday) onto each square and embossed them using a clear powder.
Using more clean water, and a paint brush I painted over each of the butterflies and used a paper towel to dab away some of the Distress Ink, leaving behind this pretty bleached look ......


How cool is that!!

I finished off with a few splatters of white acrylic paint here and there ......


And stamped and embossed my sentiment on the bottom ...... Bold Birthday Sentiments for the 'Happy' and Everyday Sentiments for the 'Birthday'


There's more of those pretty butterflies inside the card .....


This time stamped, and coloured using the same blue and green inks as on the front only this time mixing the inks with a little water and painting with them


Now it's over to you.  Pop over to the HLS Blog for full challenge details.  You'll also find lots of fabulous inspiration pieces from the rest of the DT and our lovely Guest Designer this month ..... Autumn (from Sew Paper Paint)
There's also links to some fab video tutorials on using water with various products to get different results ........ pencils, paints, gelatos, pigment powders the list goes on.

As always the challenge is sponsored by the Happy Little Stampers store


I'm really looking forward to seeing all your entries this month ........Happy stamping folks!

Thanks for popping by ..... enjoy the rest of your day.
I'm off now to finish my weekend with a gin & tonic ...... ice and a slice, and an evening in front of the TV catching up with the latest season of The Walking Dead .....

Cheerio until next time ......


xx

Friday, 4 March 2016

Ready for this months Festive Challenge ......

Hello .... me again .....

It's time to launch another challenge for the month of March ...... and this time it's a Christmas one. Time to get all festive for the Happy Little Stampers Christmas challenge ..... Ho! Ho! Ho!

This month we'd like to see .......
SHAPED CARDS


Hmmm ..... I don't really do shaped cards, I'm much more of a traditional straight edge sort of gal!!! But hey ..... I'm always up for a challenge!

When I say I don't do 'shaped cards' I don't like anything too fancy.  In the past I've made easel cards, I suppose they could be classed as shaped.  I do like to make tag shaped cards and another of my favourites is this cute little circle card,  made using the Spellbinders Nestabilities Circle dies and the matching Scalloped Circles ....... what do you think ..... cute or what?


It's fairly simple to create .... just a bit of matting and layering and can be used for any occasion depending on how you decorate it.  For this one I simply inked the centre circle using Distress Inks, spritzed with a little water and then stamped some pretty snowflakes over the top and embossed them with a white detail powder


A few dots of glitter here and there add a little extra sparkle.

Now for the card ....... fold a piece of white cardstock (not too thick a card, remember the die has to cut through two layers)  Take the largest die from the Large Circles Nestabilities and place it over your folded card making sure that one part of the circle is actually OVER the fold ....... so that it doesn't cut


Run it through your die-cutting machine and you'll end up with this ......


Next cut the layers for the outside ....... another large circle (to ink and stamp your design on) and a matching scalloped circle.  Layer these up and attach to the front of the card.

Cut two slightly smaller circles to layer and fit on the inside of your card


Because my actual card blank was cut from thinner cardstock than I usually use, these extra layers give the finished card more stability.

For a little more embellishment I added some sparkly snowflakes, punched from glitter card


And finished off with a festive greeting and a couple of pearls in the centre of some of the snowflakes


As I said, this design can be used for any occasion .... here's a blast from the past, a pretty floral design .....


Not exactly festive ..... but it could be. Use poinsettias or holly maybe ..... just a thought!
What shape will you create?  I'm looking forward to seeing this months entries.

It's Friday evening ..... and my birthday celebrations are about to start.  I know it's not until tomorrow (Saturday) but, we've been invited out for a few drinks so it's a good excuse.  We're off out for cocktails down at the Bath & Bottle.  Should I stick with my usual Bellini (so nice) or try something new seeing as it's my birthday ...... hmmm ..... a Hemingway Daiquiri maybe (sounds nice) or a Dark and Stormy ..... bit like the weather here!!!

Thanks for popping by ..... enjoy the rest of your day and have a great weekend ..... looks like I'm going to ..... Cheers!
(picture from the B&B)
Till next time ......


xx