Showing posts with label CAS Mix Challenge. Show all posts

Saturday, 18 July 2026

A clever trick for creating Eclipse cards ......

Happy weekend!

I hope you're all well, and enjoying this gorgeous summer weather.  
It's been a lazy couple of weeks for me since my last post.  I'm still not fully mobile after my fall but, things are improving, slowly, day by day ...... just keep taking the meds! 

It's nice to see so many of you are as pleased as I am that the CAS Mix Up Challenge is back.  
There's still plenty of time to play along if you haven't done so already.

It's a Mixed Media Challenge for July, and the prompt is ..... Eclipse


I love this technique, and here's a really clever little trick that I came across on Facebook, from Jenn's Crafty Makes


I just had to give this a go.  Not only is it a quick and easy way of doing the Eclipse technique, it's also a great way of using up some of those off cuts of cardstock we all end up with.
You do need a stamping platform though, it really makes this so easy.

I started by stamping the large floral image onto a piece of white card using my MISTI.  
Once you've done this, just set the stamping platform to one side.  DON'T MOVE THE STAMP and DON'T MOVE THE CARD YOU'VE STAMPED ON TO.

Then, you need to cut some strips of white cardstock.  You can decide on how many you need to cover your image.  I went for nine strips in total, about 0.5cm wide and 11cm long, long enough to cover the stamped image.   
I actually layered two strips together, to give a bit of dimension, you could do three if you like.


Next, carefully attach the white strips onto your stamped image, trying not to move your card.  
If you do happen to move it, just make sure you put it back in the right place before the next stage.

You can see I slightly offset the strips just to give a bit more interest.

Make sure your card is in position, ink your stamp and then stamp over the top of the strips of card 
How easy is that ......... I love it!

A simple sentiment underneath and a bit of mat and layering and the card is done.


If you want to add a pop of colour, use a die cut sentiment .......


I used the same stamped image but this time, I trimmed the strips down a little.  I started in the middle with the longest one and then trimmed one each side a little shorter as I covered the image, it just gives a slightly different look


If you're not into stamping but you like the eclipse idea, then why not use some patterned paper and a simple sentiment die.


This is simply a sheet of paper from the Spellbinders 6x6 Beautifully Imperfect collection ...... I love this daisy!

I die cut my sentiment from the paper, and twice from black cardstock.
I then inlaid one of the black die cuts back into the paper, layered the second one on top, and finished with the paper one.


I added the stamped 'birthday' part of my sentiment ...... remember that you must include some stamping on your project for the Mixed Media Challenge.  And I finished off with a few gold splatters.


Thanks for popping by, enjoy the rest of your weekend.
We've got the family coming round tomorrow for a BBQ, and to watch the World Cup Final.  Not the teams we would have liked to be in the final but, it is what it is.  
Come on Spain!!!  is all I'm saying.

Cheerio until next time.



Products used ......
Cards1 and 2
Stamps ........ Floral image from 'My Condolences' Unity Stamps; Happy Birthday from Happy Birthday Sentiments - Pink Fresh Studio                                                                                            
Inks ......... Versafine Clair -Nocturne (my go to black ink); Delicata Golden Glitz ink; Picked Raspberry Distress Oxide ink
Dies ........  Winnie & Walter 'happy' die'
Other ....... MISTI stamping platform

Card 3
Inks ......... Versafine Clair -Nocturne
Dies ........  Winnie & Walter happy die
Designer Paper ...... Beautifully Imperfect 6x6 patterned papers - Spellbinders
Other ....... Winsor & Newton Drawing Ink - Gold (for the splatter)

Monday, 1 November 2021

Stencil Monoprinting for CAS Mix Up ......

Happy Monday ......

Welcome to November! I hope you had a lovely weekend.  

Well Halloween has been and gone, our summertime here has officially come to an end (the clocks went back an hour at the weekend), there's only seven more Mondays until Christmas (really!!!), and ........ this is the last CAS Mix Up Challenge of 2021!!!
Don't worry we'll be back in 2022.


Loll is our host for the last challenge of the year, and it's the turn of Stencils this month.  
The theme is  ...... Stencil Monoprint, a real fun, and different, way of using your stencils.
If you've never tried this technique before, check out the CAS Mix Up Blog, where you'll find links to video tutorials, and a whole host of examples from the Design Team. 

Monoprinting is a real fun way of using stencils, it's all about applying ink onto your stencil instead of through it, spritzing with a little water and then using the stencil to print the design onto your card.   
It's also a great way of using up any leftover ink on your stencils when they have been used in the traditional way.

It's a great technique for creating quick cards too ........


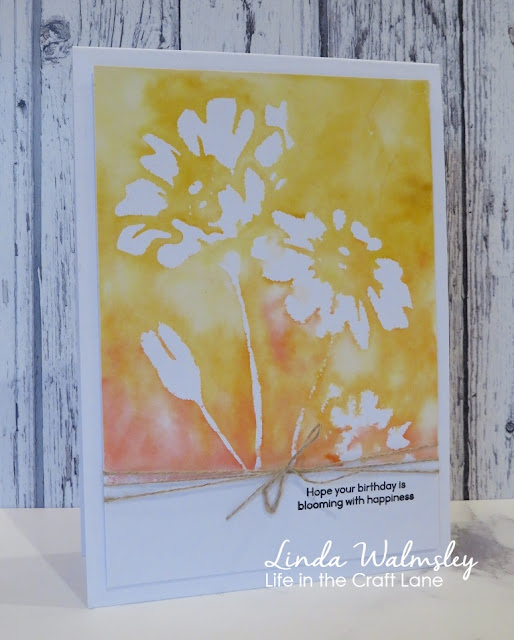
I used Distress Inks for my card, simply swiped the ink pads over the back of the stencil, spritz with water, and then placed the stencil, ink side down, onto a piece of white cardstock .......... watercolour card is perfect, mixed media cardstock works well, and the one I've used is ..... Ink Me card by Hunkydory (I use this for everything!)
Just play around with what you have and see the different results. 

I like to place a piece of copier paper, or a paper towel over the top of the stencil and apply a little pressure with my hand, just to move the ink around a little and get a good coverage  ...... you could use a brayer instead of your hand if you find it easier.


Carefully lift up the stencil to reveal the design.  
Using this technique gives you a negative image of your stencil design.  Instead of colouring the stencil image, you've coloured the background  ...... cool or what!

Before I placed my stencil onto the white card, I'd masked off a strip across the bottom to give me some white space.
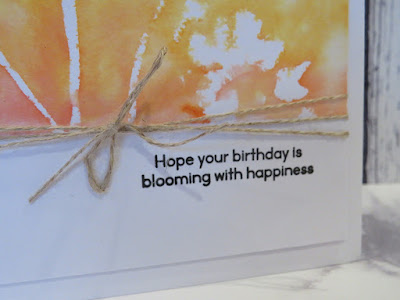
I tied some natural twine around the card to hide the edge of the print, and stamped my sentiment underneath ........ easy!


We have a fabulous Guest Designer this month ...... Steph (My Paper Corner) is joining in the fun so be sure to pop by and say Hello.

Thanks for popping by ....... enjoy the rest of your day.
I can't wait to see your stencil monoprints in the gallery.

Cheerio until next time ........


Products used:
Stencil: ARTplorations floral stencil (STAMPlorations)
Stamps: Sunflower Garden stamp set (Simon Says)
Inks: Distres Inks - Fossilized Amber, Spiced Marmalade, Abandoned Coral; Versafine Clair - Nocturne
Other: Natural Twine

Saturday, 10 April 2021

I do love a rainbow .......

Happy weekend .......

I couldn't resist playing along with this months CAS Christmas Challenge, they have such a fun theme going on for April ........


I do love a rainbow but, I must confess I've never thought about using all those colours on a Christmas card .......... but hey! don't they look fab.


This is definitely Merry & Bright!  And it was so easy to do.

I cut myself a simple mask from a piece of copy paper to cover the bottom half of my card.  With this in place I then used various colours of Distress Ink, and the tall triangle aperture stencil from Sweet Poppy, to create the line of rainbow trees.


The stencil is quite a large aperture as a whole, I only used the top part and varied the height slightly as I went along the card ......


I stamped my sentiment underneath in a gold ink .......


and added some sparkle with a touch of fine crystal glitter along the tree line.  

A tiny star on top of one of the trees finishes off the card ......


What a fun theme .... I love it!

I've also got a little more inspiration for April's CAS Mix Up challenge.  I'm hosting this month, and the theme I've chosen is ........  Paper Piecing


This is such a fun technique, especially if you're not a fan of colouring in.  
OK a bit of fussy cutting is required, and I know that's not everyone's favourite thing to do but, if you keep your images simple then cutting them out isn't going to take that long.  And just think of all those bits of patterned papers you can use up!


I like to use old book pages to paper piece, I think the text gives a little more interest to your designs.

I brushed some colour onto my background using Distress Ink ..... I smooshed the colour onto a craft mat first, spritzed with water and then used a paint brush.


To give a bit more interest I added another layer of ink, this time using a piece of acetate to pick up droplets of ink from my craft sheet and then smooshed them onto my card.

I then stamped the single poppy onto the inked background, coloured the stem with a ZIG Marker and paper pieced the head of the flower .....


I used two sentiment stamps to complete the card .... one heat embossed in gold,the other simply stamped in black


Both challenges are open until the 24th of the month so if you fancy playing along with either, or both, of them there's still lots of time.

Thanks for popping by ...... enjoy the rest of your day and have a lovely weekend.

Remember the yacht I told you about sitting in Douglas Bay well, it's still there.  Lauren and I were out and about yesterday ...... we had a little trip to the garden centre now that they're open again, so we decided to drive along the prom and take a look at this boat.
OMG!  it's BIG!!!!
We managed to park somewhere quiet and take a few photos .......


It's really hard to appreciate the size of it as there's nothing else in the bay to compare it to, but trust me, it's huge!  I bet when those sails are up it looks amazing.

It did look nice in the sunshine though .......


It's the Grand National at Aintree this weekend.  I'm not normally a horse racing person but, there's something about the National.   
One of the runners is owned by a guy on the island so it would be rude not to have a flutter now wouldn't it. Trouble is, I can't win an argument never mind a bet on a horse race ..... wish me luck!

Cheerio until next time ......... 


Products used:
CAS Christmas
Stamps: sentiment was from Uniko but I think its now retired 
Inks: Distress Inks - Festive Berries, Spiced Marmalade, Mustard Seed, Mowed Lawn, Tumbled Glass, Picked Raspberry, Wilted Violet, Broken China, Cracked Pistachio, Kitsch Flamingo; Delicata - Golden Glitz
Other: Tall Aperture Stencil (Sweet Poppy); Fine Crystal Glitter; Quickie Glue Pen

CAS Mix Up
Stamps: Happy Watercolor (Stampin Up!) for the flower; Sentiment Collection, Heartfelt (Penny Black)
Inks: Distress Ink - Festive Berries; Versafine Clair - Nocturne; Versamark
Other: ZIG Clean Color Brush Marker (for the stem); Gold embossing Powder (WOW!)