Showing posts with label Maria's workshop. Show all posts

Wednesday, 18 May 2016

Finishing touches .......

Happy Wednesday ......

Another week is flying by.
Things are starting to get busy over here with preparations for this years Isle of Man TT ..... only 10 days to go before it all gets underway with the start of Practice Week .... whoo hoo!! And when it all comes to a close we're off to the Cotswolds again for our little family week away .... can't wait!

Things are busy in the old craft room too ...... DT stuff to do, workshop to prep, an SU party to organise at mine ready for when the new catalogue launches, and a few bits and bobs to do just for me ..... because I can!!

I've just finished off adding the final touches to my project from one of the workshops I went on whilst I was across in the UK.  Here's what we got up to with the lovely Maria Simms ...... based on a workshop done by a talented lady named Debbie Rock (I think all the workshops have been done now so I'm safe in showing this  ....... I hope I am anyway!)


We had great fun getting all inky and covered in paint, creating the centre panel on the actual day of the workshop.  And then I've since mounted mine onto the larger canvas, and added more background detail with a stencil and some texture paste.

There's a bit of everything on here ..... stenciling (my favourite Brick Wall), texture paste (love it!!), paint, mica sprays, and lots of embellishments.


There's lace, paper flowers, lots of metal trinkets.  Die cuts, beads and I even added an old piece of chain on there


Everything was held in place with gel medium and dried off with the help of a heat tool.  The gel medium lets you create layers with the embellishments giving lots of depth and texture to your projects


Once we were happy with the layout everything was painted over in either black or white (as you've probably guessed .....I went with black)
Next came the fun part .... lots of spray inks and mica sprays to give the colour and sheen to the finished panel. More mica was brushed over in parts to give more depth of colour


And then I finished everything off with a touch of Treasure Gold Gilding Wax, just here and there to give more shine
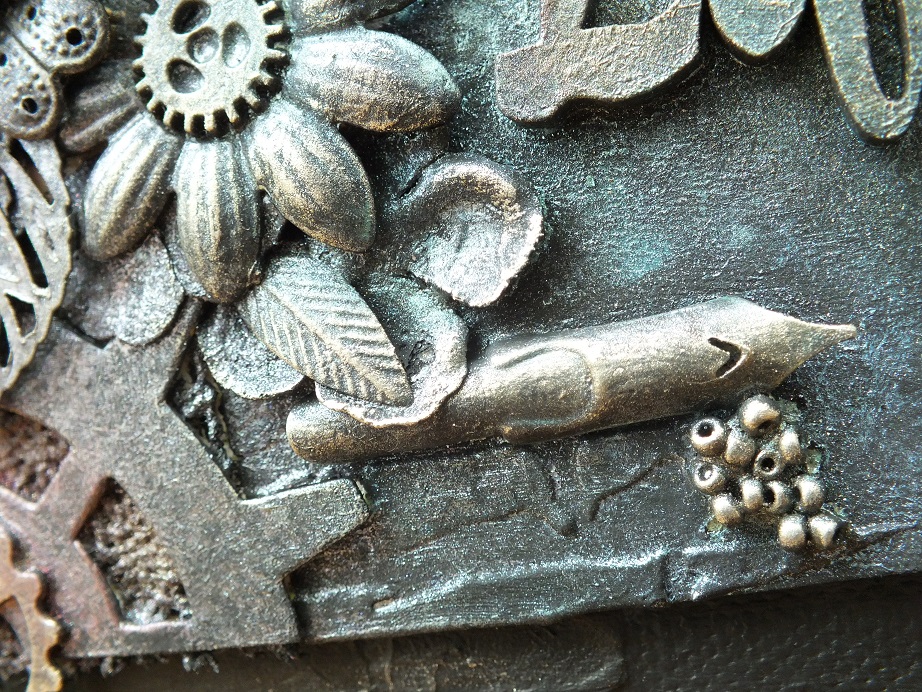

Not sure the colours come across well in the photos ...... they're much more intense in real life.
I used a pink shade and touch of purple down the left hand side blending into turquoise and blue shades with just a touch of green on the right.  Then to highlight in places, I spritzed over with Perfect Pearls in the Heirloom Gold shade and finished with White Fire Treasure Gold.  Really pleased with how this turned out ....... very Finnabair-esque I think.


I wanted to mount it onto something bigger so, I used the brick wall stencil again onto a 12x12 canvas board to add some background detail and texture.  Painted the whole thing black and then added just a smidge of the White Fire Treasure Gold here and there, to bring out some of the detail of the brick wall


Thanks to Maria for another fabulous workshop and thanks to Debbie Rock for the inspiration.

Thanks for popping by .... enjoy the rest of your day.
I've got to tidy the old craft room .... again!!! and then a little bit of reading to do later.
A friend and I popped to the book/art shop over in Port Erin yesterday, and along with stocking up on some watercolour card, a new canvas and some new paintbrushes, I found this on the shelf ...... (I only went in for a look!!!)


I do like a nice G&T as you all know ....... and I'm gathering quite the collection now


 so I thought I'd try and learn a little more about Mother's Ruin


Cheerio until next time ......


Friday, 31 August 2012

A little bit of Clarity

Evening everyone,
Here it is, the final post for today (who said Thank goodness?!! - I heard you.  Only joking).

I've been going on about what I've been doing since getting back from my recent trip, but I haven't said much about what I got up to whilst I was across in the UK.
Well, where do I begin ........ it was craft, craft and more craft - with very little sleep in between.  I'm still buzzing from it all though, and I've been home since Monday.

The Indigo Blu Secret Retreat was my first stop, but more about that later - I need to finish off my projects before I can share them with you.  I will just say though, we had a FANTASTIC time.  I've already put my name down for the next one.  Haven't got the exact dates but I'm going, whenever it  is!  Maybe some of you will be there too.

On the Saturday I was booked on a workshop with the lovely Maria Simms, amongst other things, she's the North West's Queen of Clarity Stamps.  What she can't do with a Barbara Gray stamp and a brayer, well, it's just not worth doing!
As this workshop was a Clarity one I was so excited. Though I must admit that my brayer hasn't seen the light of day for months (years possibly), and as it's the one craft tool that puts the fear of God in me, I was also a little nervous.  Especially when I was on a workshop with an expert!!

We did have fun though, it was a lovely bunch of ladies, some of which had also been on the Indigo Blu retreat so you can imagine what it was like when we all got together again. 
We did two lovely, very different, projects using the same Clarity stamp - Butterfly Montage
First up we did a card in the morning.  This is where the brayer came in,  to create a resist background.  Not sure if it comes across in the picture though, but believe me it's there.
Yes, I did use my brayer, with Maria stood behind me - nervous or what!  Thank goodness for my Splodgeaway mat.  If you're not familiar with these check them out here on their website - fabulous product.  You may have seen Maria on Create and Craft with them. They're great when using a brayer too - no lines! And they just wipe clean with a bit of water. 

The colours we used on the workshop were a bit different for me, Lettuce and Willow Adirondak and Mustard Seed Distress Ink, but they worked. Always nice to try something different.

After lunch Maria really worked us hard and we made a beautiful box card, with matching gift box, sleeve and tag.
We used the same stamp and the same inks and masks but ended up with a completely different look. I love the steampunk look to the frame.  As you can imagine, all the masks had to come home with me.  Well, it would have been rude not to have them.

Here you can see the stamp in full, isn't it pretty.  We actually stamped it a few times and cut layers of it to decoupage, finishing with the butterfly embossed in gold onto acetate.
I was really pleased with my results.  Maria always comes up with such beautiful designs. it's a pleasure doing one of her workshops. I'm just sorry I can't get to do more. 

Well that was one of my days away.  Like I've said, we didn't get an awful lot of sleep and every day was packed with something.  We never stopped.  We did workshops, and shopping - lots of shopping (you've seen the stuff I brought back with me).  I went back to where I used to work - Inspirations in Preston - it was nice to see everyone again, and I also managed to pop into a lovely little craft shop I used to go to called The Stampers Gallery in Tarleton, near to where Lauren lives.  I even managed a visit to the hairdressers while I was over there.
When I finally met up with Stephen again properly (Saturday evening) I was shattered.

We got to spend a couple of lovely days with Lauren and Alex.  He's growing up so fast.  I can't believe he's 2 next month - where did that time go?!!
what a cutie pie
strike a pose ....
chillin with Grandad
We spent a glorious afternoon at the Owl and Bird Sanctuary at Trebaron Garden Centre in Whitestake near Preston.  Alex has this thing about birds, but he couldn't quite understand why these were all in cages.  He kept pointing to the sky as if to say 'they should be up there'.
They had some pretty big birds in there though, and it was feeding time - not nice (yuck!)  The birds were pretty spectacular though

........... even if some of them were a little shy.

Well, if you've read to the end of this post you've probably had enough of me by now. 
Would you believe I'm off on another workshop tomorrow, Christmas themed this time.  I'd better go and put my tool kit back together, then I'm afraid the ironing is calling me.  Back to nomal now eh!!

Thanks for sticking with me today.  Hope you enjoyed it.

Have a great weekend and I'll be back again soon.

Linda
x

Tuesday, 3 July 2012

Weekend Workshop

Hello again,
It's been a busy old morning with one thing and another.  I was doing quite well catching up with the washing pile and the housework, but then this months Craft Stamper magazine dropped through the letterbox. 
What a great read it is this month, and the free stamp is a gorgeous butterfly, designed by Indigo Blu.  Grab yourself a copy and check out the designs Kay has done for the magazine, using the free stamp - they're stunning!

Before I go back to being the 'housewife', I want to show you the cards we made on Saturday at the workshop with Maria Simms.  I had a lovely (busy) day crafting with some familiar faces, and some new ones.
If any of you get the chance to go to one of Maria's workshops, do it!  We all had such a fab day, and you learn so much.  She does work you hard though, we never stopped.   At one point we were 'speed' crafting just to fit everything in.  It was well worth it though, see what you think.

These were the stamps that we worked with, from Crafty Individuals.  Check out their website here to see more of their great designs, along with other great products.
I have to say, they've somehow found their way home with me, along with a load of other stuff.  Well I couldn't not shop now could I!? and the stamps are really nice.......

This is the first card we made .....
I told you they were stunning designs.  This is so pretty and full of different techniques, so it did take a while to do.  We started by making the background to go behind the birds, using the 'faux silk' technique.  I'd never actually tried this, but it was fun.  Maria took us through it step by step.
You use card, tissue paper and PVA glue.
Scrunch up your tissue paper and open it out again, colour it with a little ink, we used Spun Sugar and Tumbled Glass DI.  Add more creases if you like by scrunching again, be careful at this point as your tissue will be a bit wet.  Cover a piece of plain card with PVA glue, just a thin covering all over.  Lay the tissue paper over the top of the glue and press down, don't worry about it being perfect - you want some creases in it.  Add a little more glue over the top to make sure it's stuck down fully.  Do this gently so as not to lift the tissue paper back off the card.  Once you're happy with it, set aside to dry. Once it's dry, trim and ink around the edges.  You can also stamp on top of it once it's dry.
My first attempt didn't turn out too badly.
'faux silk' look

Next was stamping the birds onto heat-resistant acetate - always a challenge for me.!   We coloured the birds on the underneath side, so we didn't have to be too precise, using Cosmic Shimmer Coloured Pearl PVA (something else I hadn't done before).  They looked so pretty when they were done.
The main background was done with a mask which we embossed through the Grand Calibur, and while the mask was still in place, spritzed through it with Cosmic Shimmer Mists.
Time to put everything together - you can just about tell in the photo the acetate is slightly domed over the bacground piece and a die-cut birdcage has been added along with a sentiment cut from the background stamp.  Extra acetate leaves and some stamped flowers were added and everything was finished off with gems and a bakers twine bow - fabulous design!  I'm afraid I won't be giving this one away, it's for me!

Next we did a bit of 'speed' crafting before lunch.  Talk about fast!

This may have been quick to do, but it's still a beautiful card.  Same stamps, same colours of ink with the addition of Milled Lavender for the background.  This time the outline of the die cut birdcage was used as a stencil to ink through which gives a really nice look.  The text background was stamped over the top then the birds stamped in black.

A bit of matting and layering, some beautiful organza ribbon, a few small gems and a heart shaped 'Dazzler' to finish off - Gorgeous!

Card No. 3
This isn't exactly the same as Maria's as I finished it off at home yesterday.  We just ran out of time on the day.  Well, we did have a Cricut workshop to fit in on Saturday too - I told you it was a busy day!
Again, same stamps (shows how versatile the set is), same colours of ink, different look.
For the background on this one I used a new template from Splodge Away.  I believe these and the Splodge Away Blending Mat are appearing on Create and Craft (Channel 671 on Sky) on Thursday at noon, with Maria and Tom from Splodge Away, put it in your diary.  You can check out their Blog here, or Maria's Blog (http://inkymits.blogspot.com/ )  for more information.
I've been using one of the mats for a while now and I love it.  It makes all the stuff you do with inks so much easier.  Blending, distressing, you can even use alcohol inks on it too and it'll just wipe clean.

Well, what do you think?  It was a great workshop, I really enjoyed it.  I'm just sorry I can't get to more.

I think I've gone on long enough for now, so I'll leave the Cricut project for another day.  Plus the other half has just come home from work early, he's managed to spill coffee down his shirt!
Better get back to the house work!

Enjoy the rest of Tuesday.

Bye for now

Linda