Showing posts with label Sweet Poppy Rubber stamps. Show all posts

Wednesday, 19 October 2022

Simply Sweet Poppy Stencils Facebook Challenge ......

Happy Wednesday .......

He we are, in the middle of another week ..... and its wet and windy here again.  Winter is coming!

Hubby has been in the office for the past couple of days this week ..... it's weird not having him at home.  The house is very quiet when there's only me here!  I do get stuff done though when I'm on my own.

There's just a little over a week left of this month's Simply Sweet Poppy Stencils Facebook Challenge if you fancy playing along. 
There's a fabulous £40 voucher to spend on the Sweet Poppy Stencils website up for grabs.   Just follow the simple rules which you can find below,  and you never know, you could be our next winner.

The theme for October is ........ Fantastic Foliage, and Sweet Poppy have some gorgeous stencils perfect for this challenge.  Think trees, or leaves, grasses and greenery, and of course all those wreath designs ..... how about some quick and easy Christmas cards!


I used the Holly Wreath Stencil for this card, and a Brilliance Pearlescent ink (Thyme)  
Nice and simple, and perfect for sending through the post .......... I've mat and layered this a little bit but, you could leave it as a one layer design. 

I stamped the pretty ribbon first, from the Sweet Poppy stamp set Victorian Bauble ...... black ink and then coloured it using a red Distress Ink Re-inker (Barn Door) and a fine paintbrush


I then sponged the pearlescent ink through the stencil, building up the depth of colour gradually.  Less is definitley more when stenciling with inks, especially juicy inks ...... too much ink on your sponge could cause the ink to bleed under your stencil whuich means you won't get a crisp finish to your stenciled image.  Taking a bit of time to build up the colour is well worth the effort.


Once the ink was dry I then used a red glitter glue to add some berries and a quickie glue pen and fine crystal glitter on the rest of the dots.


A festive sentiment stamped in the middle finishes it off nicely


I did look on the Sweet Poppy website for the link to this Holly Wreath stencil but I couldn't find it.  I'm not sure if that means it's been discontinued, or it's just out of stock.

One design that is on the website though is this pretty Holly Wreath ........
A simple, elegant design which, for these two cards I've used the stencil twice, slightly offsetting the second layer, to give the wreath a fuller look.


I've taken the design off the edge of my card and used gold and silver metallic inks


Adding a touch of glitter to some white enamel dots, for a little more interest.

Or, do you prefer more traditional Christmas colours .......


The first layer of the wreath was done using a green ink.  Then I offset the stencil slightly over the top and this time I used white stencil paste through the design, and sprinkled with green glitter whilst the paste was still wet.


A few festive red berries here and there, and a stamped sentiment in the middle ....... same stencil, different look!


The challenge is open until the 29th of October and here's the simple rules you need to follow .....


Happy stenciling!

Thanks for popping by ....... enjoy the rest of your day.

Cheerio until next time .......

Sunday, 31 July 2022

Oh no! ..... is it really time to start thinking about Christmas .......

Happy Sunday to you ........ 

I hope you're enjoying the weekend.

Dare I say it ......... are you getting that festive feeling yet?  Thinking about making a start on all those Christmas cards!  Well, there is only 146 days to go ..... just saying! 

For all you Sweet Poppy Stencils fans, I've got a little heads up ...... Lucy is back on our TV screens tomorrow with more gorgeous, new, Sweet Poppy goodies ..... yeah! 
There's brand new Sweet Poppy festive stamps and stencils, along with some back in stocks, and a few old favourites, so if you are thinking about Christmas you wont want to miss the show (details and times are at the bottom of this post) 
 
As always Lucy will be working her magic showing us how to get the best from our Sweet Poppy stash, and there'll be lots of gorgeous inspiration from the rest of the Design Team.

I haven't had much time to play with the new Christmas release ....... holidays and family stuff getting in the way, you know how it is.  And it was a bit weird making Christmas cards when the temperatures were soaring outside, and even more so in my craftroom!  But, I did manage to get a few done .....


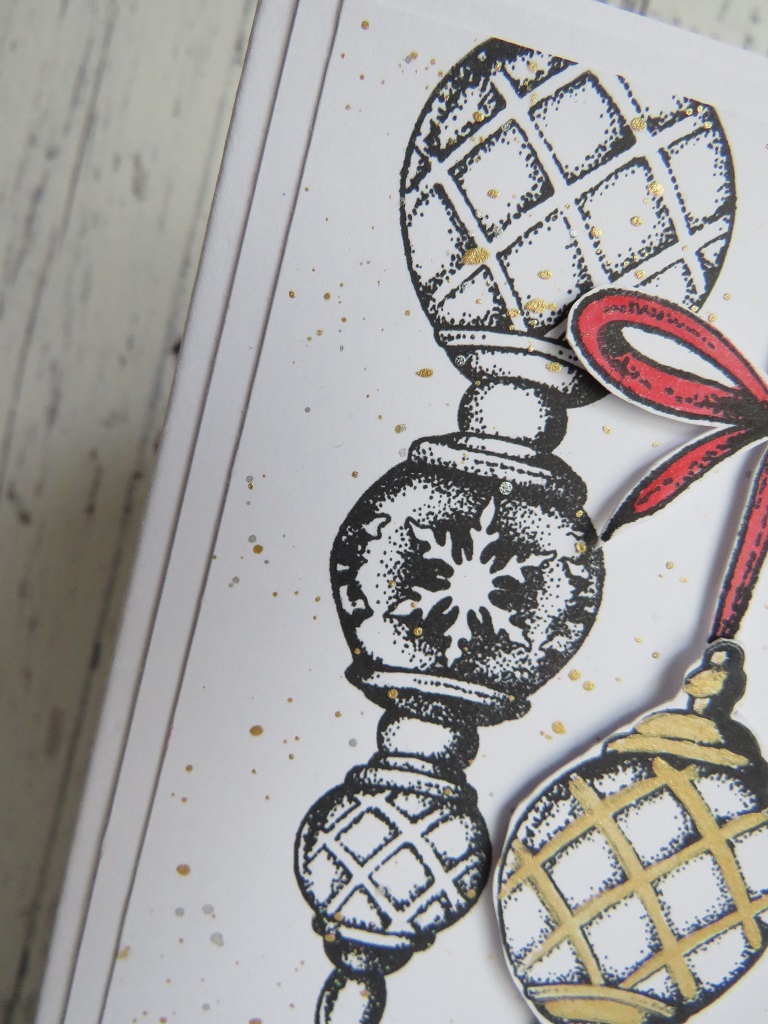
I love this new Victorian Bauble stamp set! ........ you know me and my tree decorations.  You can never have too many pretty baubles!

Using a black ink, I stamped the baubles (you get two different sizes in the set), two of them directly onto a piece of white card cut to fit my card base, and then a third one onto a seperate piece, which I added a touch of gold and silver paint to, and fussy cut.


I also stamped one of the ribbons that comes in the stamp set, coloured that in red and fussy cut, and then attatched both to the front of my card using foam pads to add dimension


A few splatters of gold and silver paint onto the background, 


and a sentiment stamped on the bottom


Really quick and easy to do, great for batch making, which we all do with Christmas cards.  
And, if you're worried about postage, instead of fussy cutting and using foam pads, you could stamp the centre bauble first, create a mask and simply stamp the two in the background over the top to create the same look.

Keep things even more simple by just using one of the stamps ........ classic gold and silver on black cardstock ...... always a winner!


Stamped and heat embossed in gold and then coloured using pearlescent paints ...... I kept it to just silver but, think of all the colours you could use ..... so stylish!


A few matching splatters, and a heat embossed sentiment, and you're done!  A batch of these would be really simple to do.


For this last one, I used the emboss resist technique ....... 


I stamped and heat embossed the baubles in gold, and then used Distress Inks over the top to add the colour ...... Evergreen Bough and Festive Berries (love this combination)


I started blending the colours from the top of the card, and worked down the baubles fading out the colour gradually, as I got closer to the bottom.

I also used a wet paintbrush to 'bleach' out the colour a little, from inside the baubles and the ribbons, before using a Distress Reinker (Festive Berries) to paint the ribbon .......


and I added some fine crystal glitter to the baubles


To finish off I added some of my all time favourite product to use on Christmas cards ........ Chunky White Embossing Enamel ........ I love this stuff!


I simply sprinkle a little where I want the snowy effect, no embossing ink required,  then I gently heat from underneath until the embossing powder begins to melt ...... so effective.


Three very different looks from the same stamp set .....


This is just one of the stamp sets that Lucy will be showcasing tomorrow.  So don't worry, if you're really not in the festive mood just yet, it won't all be about Christmas.
Check out the show times below and tune in.


Thanks for popping by ..... enjoy the rest of your day.

We're taking advantage of the nice weather and having a BBQ later.  Nothing fancy, just getting the family together. 
It was our wedding anniversary yesterday, 34 years since hubby and I tied the knot ...... time flies when you're having fun!
We celebrated with a lovely lunch out yesterday, so it'll be nice having everyone together later.  And, I won't have to do the cooking, which is even better!

Cheerio until next time ........


Supplies
Stamps: Victorian Bauble stamp set (Sweet Poppy Stencils)
Inks: Versamark ink; Versafine Clair - Nocturne; Delicata - Golden Glitz & Slivery Shimmer inks; Distress Inks - Evergreen Bough, Festive Berries
Other: Gold and Silver Embossing Powders (WOW!); Gold paint (PaperArtsy); Quickie Glue Pen; Fine Crystal Glitter; Pearlescent Paints: Chunky White Embossing Enamel (Stampendous)