Showing posts with label Vellum. Show all posts

Sunday, 28 October 2018

Introducing ....... Winter Botanicals Sweet Broom and Quilted stencil

Happy Sunday ........

Did those that needed to, remember to put the clocks back an hour last night? 
Yes here in the UK we're back on Greenwich Mean Time.  We all got an extra hour in bed this morning ...... hmmmm,  doesn't feel like it ....... and I'm not looking forward to it going dark earlier either.

Anyhow ....... Bev and the Design Team are introducing more fabulous designs from the brand new Uniko release coming VERY soon.  How's the shopping list coming along?

Today we have another lovely new stamp set ........ Winter Botanicals - Sweet Broom
A pretty layering set ......

And, the last of the new stencil designs ....... Quilted
I can see this being used for quite a few occasions.  Great for backgrounds, perfect for new baby cards don't you think


I've used it here with some vellum on a Christmas design (I'm on a mission to fill my festive box!)


I've dry embossed the design first by running the stencil through my big shot with the piece of vellum, and then I added in some white detail using a fine embossing tool on the back ......


This is about as close as I get to parchment craft!!

I then stamped some foliage (from Uniko's Winter Foliage)  onto a piece of coloured cardstock, using the same shade of ink. You can see it just shows through the vellum panel giving it a really soft look.
The vellum was attached to a die cut frame and placed over the top.

The sentiment was heat embossed on the bottom using WOW's Platinum EP ....


and I stamped, heat embossed and fussy cut more elements from the Winter Foliage set to embellish the frame


I also added tiny dots of glitter glue onto the vellum panel, to add just a touch of winter sparkle.


Here's another festive idea using the Sweet Broom stamp set (I said I was filling up my festive box!)


I started by stamping my sentiment first using a gold ink (from Uniko's All Occasion Sentiments #4) 


Next, I used the outline stamps of the leaves and heat embossed these in gold.  


I then used my MISTI to add the layer of detail to the leaves, and stamped this using a platinum metallic ink.  It has a nice green tint to it and looks pretty against the gold.


The berries were simply coloured using a ZIG marker and a bit of water and I finished off with a few splatters of gold ink and a sprinkling of  Chunky White Embossing Powder.

That's it from me for today ...... there's one more day of introductions to go then the big release day is Tuesday, so you haven't long to wait.

Thanks for popping by ..... enjoy the rest of your weekend.
Time for another coffee I think

Cheerio until next time ......

Thursday, 10 November 2016

DAY 4 ...... Feeling Festive with Loll and Friends

Happy Thursday ......

The weekend is almost here ..... and at least I got the day right this morning!!
Once all the usual household stuff was out of the way, and seeing as how the weather was still not very nice, it was back to the old craft room.

It's Day 4 of the 12 Tags for Christmas with Loll & Friends event ..... and whoo hoo!! ..... I'm keeping up!!


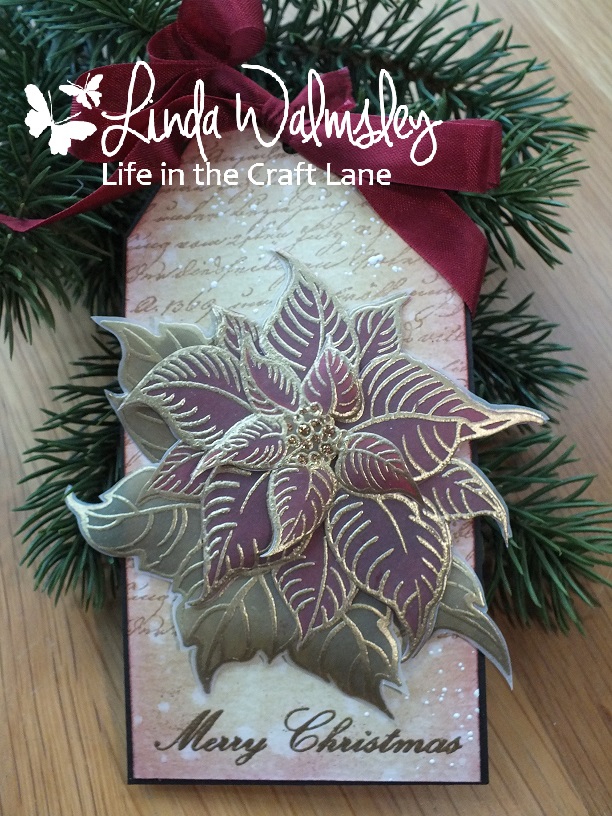
Here's my tag for today .... using up bits and pieces that were lying around my work desk .... you all know how I don't like to waste anything


A manila tag this time .... coloured using Distress Inks (Antique Linen/Vintage Photo and a touch of Aged Mahogany around the edges)  
I then stamped some old script in the background using a Vintage Sepia Versamark ink pad ....  a really old one, so no need for second generation stamping ...... the ink is coming up quite pale anyway


I sprinkled on a little Frantage Chunky White Embossing Enamel over the top ..... love this stuff, especially on Christmas designs


And then I stamped and embossed my greeting on the bottom


The focal point of my tag is this gorgeous vellum poinsettia (left over from my last workshop)


The image has been stamped and embossed in gold onto plain vellum, and then I've added colour to the back using Distress Inks .... direct from the ink pad to the vellum ... so pretty!

I finished off with a few dots of glitter glue to the centre, and a festive red bow on the top of the tag.


Pictures are still not up to scratch ..... sorry!  Today has been so grey ...... and sooooo cold.  Still not had any snow yet .......  I'm keeping my eye on the webcams on the mountain though.

Thanks for popping by ..... enjoy your evening.
Time to do battle with the supermarket website .... I have a delivery booked for tomorrow morning!

Cheerio until next time

Tuesday, 1 November 2016

53 days .... and counting!

Happy November to you ........

53 days until Christmas ..... so my countdown tells me ........ eeeek!!!
Halloween is out of the way ........ and it wasn't too scary.   We've got Bonfire night on Saturday, with a fireworks display over Douglas Bay, then that's it ...... Christmas is coming!  I'd better start making a list.

We went a little bit festive at the weekend for my workshop, and the ladies loved it!  We had fun playing with VELLUM.  Not everyone's favourite, I know but ...... it's nice to venture out of our comfort zones occasionally.

Now I'm not into parchment ... at all.  Don't get me wrong though ...... I love the look of all the embossing, and the white work, and I fully appreciate all the time that goes into creating those stunning projects ....... it's just I haven't got the patience to sit down and do it!
However .... I do like to use a touch of vellum every now and again.  It looks great on Christmas cards, and I think it adds a nice softness to your designs.

We started out by stamping and embossing onto the vellum, to create a pretty festive poinsettia that they then used to embellish a Christmas card

 
The image (Perfect Poinsettia from Honey Doo Crafts) was stamped 4 times onto the vellum, embossed with a White Fine Detail Embossing Powder, and then fussy cut, cutting each layer smaller each time .......


I love how delicate this looks .... you can see I added some colour to the leaves on the bottom layer, this was done using Distress Ink (Peeled Paint) and a little water, applied to the back of the vellum.  I then used foam pads to layer the poinsettia, adding lots of dimension.
A few dots of glitter glue to the centre finishes it off nicely.
I gave them the option of adding more colour if they wanted ...... poinsettias do look very festive in the red .....


This time the embossing was done in gold,  and each layer was coloured on the back using Distress ink .... which is your favourite?


To finish the card we revisited the last workshop I did with the white on Kraft ....... a couple of the ladies missed the original class so they were pleased ......


A touch of Distress ink in the background and a bit of Christmas script adds more interest to the design


And there's always something on the inside .......


Not a design for making lots of cards .... but nice for those special people we send to.

Next up was more embossing, a bit more CAS this time and adding more colour


A pretty floral design from Woodware, stamped and embossed with Ranger's Liquid Platinum embossing powder and then coloured in on the back using Distress inks again ...... so pretty


To finish off the afternoon we did another Christmas design, this time using vellum with an embossing folder.
The little man had seen me prepping this one and he wanted to make it too so, Alex joined the ladies for the last part of the afternoon ..... and made his mummy's Christmas card.  I may have started something there!!


I used the Stampin Up! Softly Falling Embossing Folder and ran the vellum through the Big Shot. Love this effect ..... and its so simple to do


The little winter scene was stamped onto a piece of white card using a Black Versafine ink.
The tree is from the new IndigoBlu Winterland Wood stamp set ..... stamped various times using a simple mask from a piece of copier paper to create the look of hills


and the little jolly snowman is an old  Inkadinkadoo stamp


You can see I added a touch of colour to the snowman before overlaying the scene with my piece of embossed vellum.

A simple embossed greeting .......


and a black frame around the edge finishes it all off ...... the frame also hides all the adhesive too ... clever eh!

We're going to be doing something a little different next time ..... still with a Christmas option but it won't be cards.

Thanks for popping by ..... enjoy the rest of your day.
Things are about to get busy in the old craft room.  It's the beginning of the month so that means brand new Blog Challenge themes to get underway ..... you'll be hearing from me a lot this week!!

Cheerio until next time