Showing posts with label wall hanging. Show all posts

Tuesday, 15 November 2016

A quick catch up .....

Happy Tuesday ........

Busy day today ......... I'm off out looking for pine cones!  I need quite a few for a little festive project coming up soon.
I know I can get them on eBay but that's no fun ........ however if today is unsuccessful I'll bite the bullet and place the order!!!

Before I go on my search, I want to share last weekend's workshop inspiration with you.  It was a busy class again and the ladies really enjoyed it.
We did something a little different .... no cards this week. Instead they made a three tiered wall hanging from pieces of greyboard, decorated with acrylic paints.
I gave them a couple of options ...... what I call an everyday version using floral designs ......

 
Option one ..... create a little floral scene .......
I painted the background using PaperArtsy Fresco Finish paints, then stamped my images in black ink and embossed with a clear powder (flowers are from the PaperArtsy stamp set EDY10)


I then used the paints to colour in the flowers


I splattered a little bit of white paint onto the background and added in a few doodled dots using a gold and silver gel pen.

Here's option 2 .....
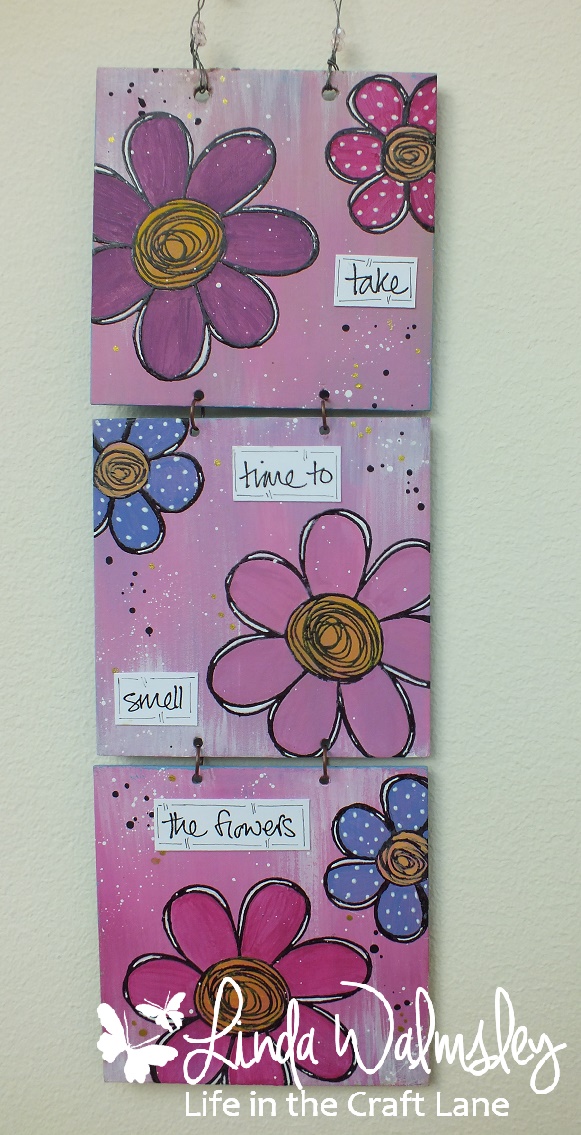

Same techniques, same paint range just different colours and different stamps (PaperArtsy EEG14)


A little bit of dry brushing with a white paint adds a bit more detail to the background and a splattering of black and white paint this time, still with added dots of gold


I also added more words on this design ..... one of the JOFY sentiments, stamped onto white card, then I cut around each word and arranged them across the three panels ......


The favourite of the day was this little guy though ....... Option 3, the Christmas version ...


A little winter scene using the cute little Penny Black Snowman die ..... I love him!!! (so did the ladies at the weekend)

As before the panels were painted with the acrylic paints ...... a bit of dry brushing too.


I used a mask to create the moon and used white pearlescent paint and a spritz of Perfect Pearls for added shimmer ....


I then added in a wintry scene at the bottom ...... white paint sponged along the edge of a simple paper mask and trees stamped with a grey ink across the background.


The snowman has been cut multiple times and layered to add dimension


The whole thing was finished off with some stamped and embossed snowflakes, a touch of glitter and a few snowy dots with a white gel pen.


A festive die cut adds the final touch .....  Let it Snow from the CUTplorations range of dies by STAMPlorations, cut from black and white card and layered, slightly off set to give that shadowed look


As I said ..... Frosty here was the most popular of the day although a couple of the ladies had the idea of doing both versions ..... back to back!

We had a great day as always .... there's only two more workshops left before the end of the year, the next one is baubles and then we're finishing off with a wreath ..... that's if I find my pine cones!!!

Thanks for popping by .... enjoy the rest of your day.

Cheerio until next time

Friday, 4 March 2016

It's time to get those stamps out .........

Happy Friday .......

It's the first one in March so that means there's a brand new Take It Make It Challenge over on the Craft Stamper Blog.
This month it's the turn of Take a Stamp ....... that means Anything Goes, as long as there's rubber stamping on there somewhere!

Our sponsor this month is ..... Basement Studio


and the challenge winner will receive a voucher with a value of  €20 (EUROS) ...... to spend in the store.

I've been having fun playing around with the new JOFY stamps from PaperArtsy ....... I love these new collections!


I've put together a cute little wall hanging ..... made especially for a friends birthday.  I'm OK sharing it on here today as it was her birthday yesterday and I know she's received it!
Speaking of birthdays .... it's mine tomorrow.  Yes I'm 29 and a bit!  Well .... more than a bit I suppose but hey! who's counting!!

Sorry ... I digress ........ This project actually started out as a card but kind of evolved a little.  I wanted to use the PaperArtsy Fresco Finish Acrylic Paints with the stamps and then things got a bit big to go on a card, and I wanted to layer the large flower etc., etc., so ...... wall hanging it was.  I love how it turned out!

I stamped the little girl (from JOFY 42) onto some white card and coloured her using a mix of pencils, Pro Markers and Distress Inks and then I fussy cut around her.


How cute is she .... I just love her boots!!!

I also stamped the large flower head, from the same stamp set, a couple of times onto white card .... embossed with a clear powder, used the paints to add the colour and fussy cut those so that I could layer up the bloom later to add dimension


The brick wall design in the background is actually from my unfinished bits box .... it's a piece that was stamped using an embossing folder ......


I then stamped the large bloom and the stem over the top of the brick wall, and embossed again with the clear powder.  I like to emboss if I'm using paints to colour as the embossing acts as a resist .... so it's not that easy to go outside the lines!

I added a few leaves across the bottom (also from the same stamp set) and then painted everything using the Fresco Finish Paints.  These are so easy to use and they blend so well ..... just mix them with a little water and paint away!

For the backing piece I used the flower stamps again from JOFY 42 and also added in one of the images from JOFY 41 another of the new releases.
They were stamped and embossed as before and painted in the same way.


You can see I also gave the background a wash with one of the shades of blue from the paint range.

I painted a square of greyboard with black gesso and then mounted everything on the top using foam pads to add dimension.


A nice sentiment and some sparkly sequins finish it all off nicely.

Now it's over to you!  The challenge is open until Wednesday 23rd March so you've lots of time to get your entries in ....... happy stamping!!!

As I've used brand new stamp sets for this project ..... I'm also going to link this up to Darnell's NBUS Challenge #6
If you're wondering what I'm going on about, pop over to Darnell's blog and you'll find out all the details ..... and then join in the fun .... you must have something in your stash that hasn't been used before ..... go on, admit it!!!


Thanks for popping by .... enjoy the rest of your day and have a lovely weekend
And if you're a Mum .... Happy Mother's Day for Sunday xx

Cheerio until next time

Linda
xx