Showing posts with label Foiling. Show all posts

Thursday, 24 November 2022

The final Simply Sweet Poppy Facebook Challenge ..........

Happy Thursday ..........

I hope you're all well. It's very wet and blowing a hoolie here, not the weather we wanted for the Christmas Lights switch on in Douglas this evening.  Think we'll give it a miss if it stays like this, and I might just switch on my own Christmas lights and decorate another tree ....... a bit early I know but there's already one up in the hall!! 

If you're a fan of the Simply Sweet Poppy Stencils Facebook Challenge then time is running out to get your entry in for this, the final challenge .......... The Magic of Christmas!.  

As always, there's a £40 voucher for the winner to spend on the Sweet Poppy website.  Just follow the simple rules .........  use only Sweet Poppy stencils, keep any stamping to a minimum, and stick to the challenge theme ...... easy!

So, what makes Christmas magic for you?  

It's got to be family and friends for me, and I love all the trees and decorations .........


For this card, I used the Sweet Poppy Snowflake Tree (at least I think that's what its called ...... I can't find it on the website so unfortunately I think it may have been retired, which is a shame as it's a lovely tree.  There are other gorgeous designs on there that you could use instead)

I used Pearlescent White Stencil Medium onto black cardstock, sitting the stencil off the edge of my card


Once the paste was dry, I used a blue Stardust gel pen to add colour to the ribbon.
I also used a glue pen to add glitter to the snowflakes ...... looks so pretty and sparkly in real life.


I finished off with white paint splatters on the background and a simple heat embossed sentiment


Next up, baubles!  You can never have enough baubles on your tree!


I'm so sorry but, I think this stencil is also retired, or it may just be out of stock, because I couldn't see this on the website either ........ maybe I should check the website first, before I make my cards!!!!!

Anyway ...... I used the paste again, this time when it was dry I added some rainbow coloured foil over the stenciled design, and then ran it through my laminator


I added some crytal glitter to give sparkly highlights (and also disguise where the foil hadn't quite covered completely!) 


And I finished off with some white paint spatters and a festive sentiment 


The challenge is open until the 29th of the month so there's only a few days left to get those entries in.

Happy stenciling!

Thanks for popping by ..... enjoy the rest of your day.
We might have another tree up this evening, we'll see how things go today.
I've got my crafty bunch coming at the weekend and the deal was, I had to have a tree up as it's probably our last crafty get together before Christmas.

Well ....... I did it.  There is a tree up, only took me five and a half hours!    


It still needs a few more baubles on it though.  I'm sure it grows every year!!!  I'll have to see what I can do before weekend!

Cheerio until next time .......

Tuesday, 15 November 2022

Oh Christmas Tree, Oh Christmas Tree ........

Happy Tuesday ..........

I've been at it again, batch making Christmas cards that is ...... well there are only 40 days to go before the big day!!!!!

Now you know me, I do love a nice Christmas tree and yes, it is almost time to get those baubles out and start decorating! (Carol, if you're reading this, there will be a Christmas tree up for our crafty get together next weekend ........ fingers crossed!) 

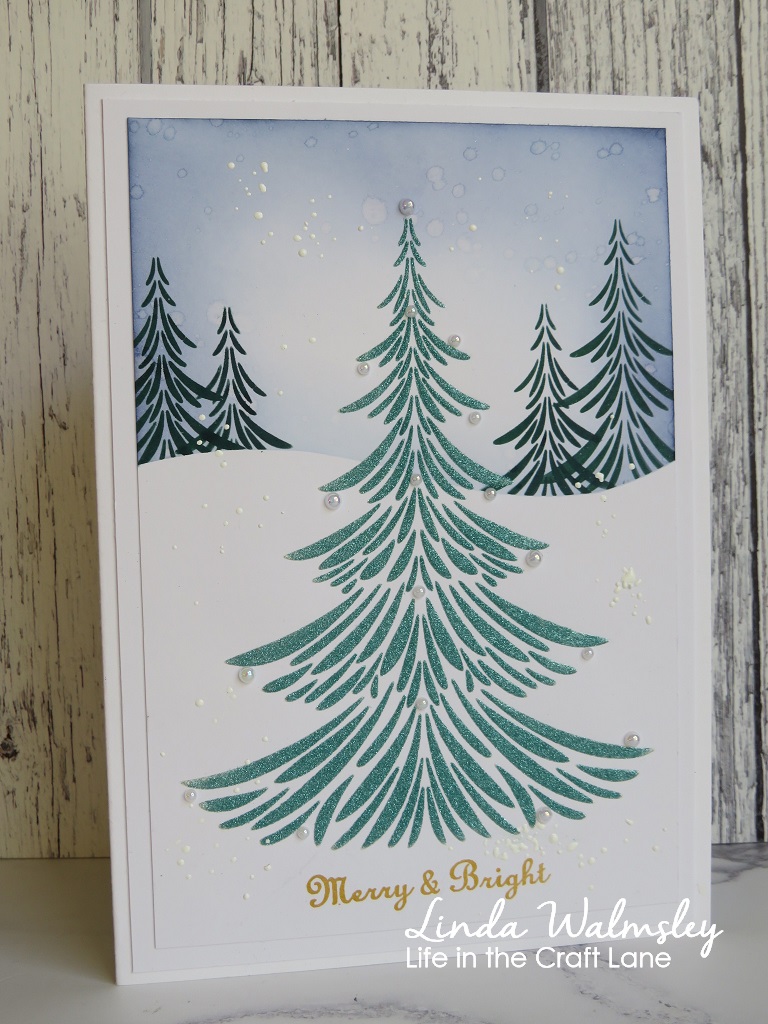
Anyway ......... speaking of Christmas trees, here's a beauty.  One of the latest stencil designs from Sweet Poppy ...... the gorgeous new Fir Tree


It is a large stencil but, as I always say, you don't have to make large cards.  These are 7x5 inches (my go to card size), and I think it looks great.

This was the sample I did for the TV show last month ...... I love it!  So CAS, I just had to make more. 


I used the Sweet Poppy Stencil Medium in the Pearlescent White through the stencil and then sprinkled over with Fine Crystal glitters whilst the paste was wet, and left them to dry naturally.


A few little sparkly gems added here and there, and a star on the top ......


All finished off with embossed sentiments.


Here are a few more ideas done last month for the TV show, using this fab stencil .......


Here's the tree full size ..... it's so pretty!
I used the stencil medium again, this time sprinkled with green glitter and then I fussy cut the tree once it was dry, and used fom pads to attach it to my card


A few gold and silver ink splatters on the background, dots of glitter glue for the baubles to decorate the tree, and a tub for it to sit in on the bottom ..... very festive!


Same stencil ..... used this time to create a little winter scene.


Just by using a little bit of masking you can alter the size of the tree, and create a little forest scene in the background .........


 adding the full size tree in the centre


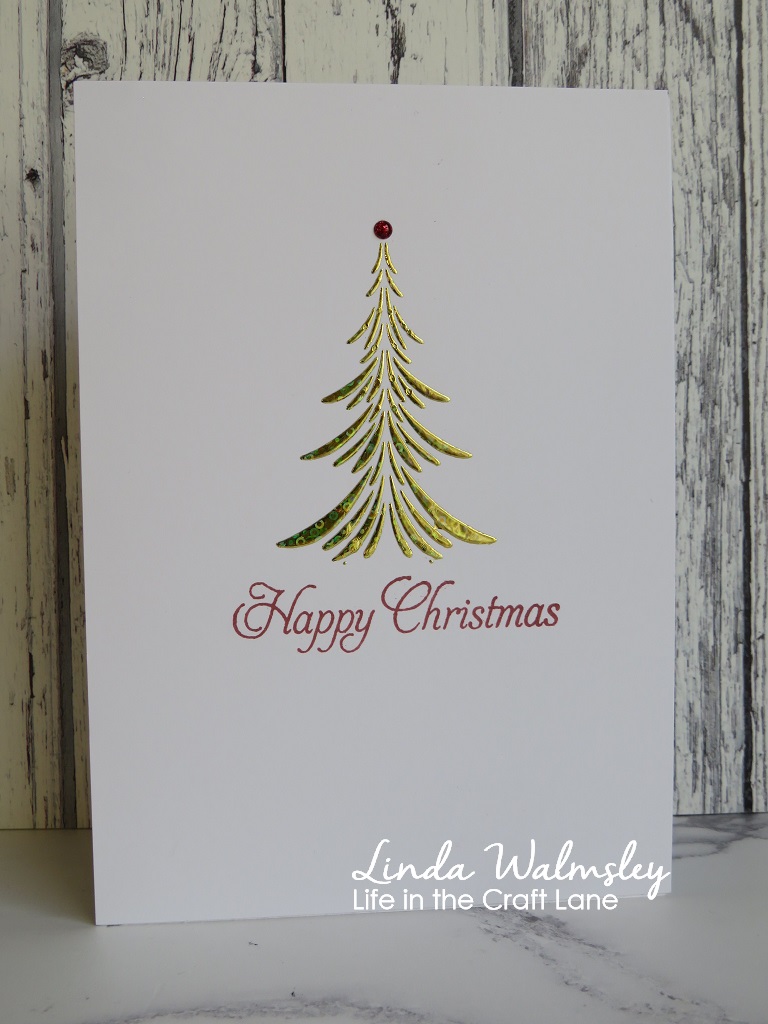
Large trees not your thing? ....... then just mask off the bottom of the stencil ....... make the tree a size to suit you


This looks so cute ....... and it's one layer, so perfect for posting!

I simply used a bit of masking tape to cover the bottom the part of the stencil, before using the stencil medium.  I left it overnight to dry completely, then I used foil over the stenciled design and ran it through a laminator.  
Quick tip - if you're using foil on your stenciled designs, before you apply the foil, carefully dust around the edges of your design with an anti-static bag, being a bit careful not to get the dust on the stencil medium.  This avoids the foil sticking where you don't want it.    If  this does happen though, you can remove the foil by gently using a sand eraser (check them out on Amazon, they're not expensive)


A simple gem on the top of the tree, and a sentiment stamped underneath ...... done!


I love it when it's time to put the Christmas tree up, and it's almost here ...... whoo hoo!! 
A few new baubles have already been bought, and I'm already thinking of where to put the trees.  
I am a little nervous though ...... this year we have a little one who is now very mobile, and is into everything.  Christmas is going to be fun this year! 


Thanks for popping by ..... enjoy the rest of your day.

Cheerio until next time .......

Saturday, 15 February 2020

More CAS inspiration ......

Happy weekend folks ......

Well, we're back to flights cancelled and no ferries sailing.  Storm Dennis has arrived!!  Looks like hubby maybe be grounded tomorrow too ..... his afternoon flight to the UK has been cancelled just waiting to see if he can get on the evening one ...... unless that's cancelled too!

Anyway ......... it's time to remind you about this month's CAS Challenges ...... CAS Mix Up and CAS Stencil

Lets start with the CAS Mix Up Challenge
Joanna is our host this month, and the theme is Stencil using a Die Cut


I've used one of my all time favourite dies from Penny Black ..... I love this flower! 


I simply die cut the flower from a piece of white card stock ..... put the flower to one side for later and used the what was left of the card as my stencil.

Blended Distress Oxide inks through the design to create the background layer of flowers


I cut the flower again from another piece of white card (that's another one I can use as a stencil), layered the two together and then coloured the top one with Oxides inks, before attaching it over the top of the stenciled versions creating a pretty little bouquet


A few inks splatters,  a cute little twine bow and a sentiment to finish off


On to the CAS Stencil challenge.   Hosted by the lovely Barb,  the theme is .......  Foil


Check out the CAS Stencil Blog for links to some fabulous tutorial videos on different ways of adding foil to your projects.

I've used a really simple way of adding just a touch of foil ...... not to easy to photograph though especially with the weather we're having at the moment!!


I masked around the edges of a piece of white card, and then stamped the script in the background. 
Still with the masking tape in place, I added Distress Ink around the edges.  Distress ink stays wet for a little while so, if you're quick you can get embossing powder on there.  I used the tacky stuff, you know the one, looks like embossing powder but it goes sticky when heated.
I sprinkled just a little around the edges, brushed most of it away and then heated what was left and quickly applied my foil over the top.  I let it cool for a couple of seconds and then rubbed over the foil to make sure it had stuck.  And this was the look I got ........ a sort of distresed, grungy look .....


I removed the masking tape and stenciled the flower over my background.  Again the ink I used stayed wet for a little while so I did the same again with the sticky powder - sprinkled some on, brushed off where I didn't want it and heated it.  Placed the foil on top and then peeled it away ..... voila!  just a touch of shimmer and shine.


I really like the effect.

There's still a week left if you fancy joining in with any of the CAS challenges ..... hopefully I'll see you in the gallery.

Thanks for popping by ..... enjoy the rest of your weekend.

Cheerio until next time  ........

CAS Mix Up
Products used:
Stamps: Share Laughter clear stamps (Hero Arts) for the sentiment 
Inks: Distress Oxide Inks - Mowed Lawn, Picked Raspberry; Scattered Straw; Dried Marigold; Versafine Clair - Nocturne; Delicate - Golden Glitz (for the splatters)
Others: Bashful Die (Penny Black); Natural Twine; Wonky Stitched Rectangle Dies (CUTplorations from STAMPlorations

CAS Stencil
Products used:
Stamps: Labeled Messages (Mama Elephant); Script Background (Uniko)
Stencils: Floral Stencil (Tim Holtz)
Inks: Distress Inks - Vintage Photo, Gathered Twigs; Versafine - Smokey Grey; Versafine Clair - Nocturne 
Others: Ranger Tacky Embossing Powder; Foil from my stash

Thursday, 6 February 2020

More new releases ....... Sweet Poppy Stencils are back!

Happy Thursday evening .......

How's your day been ......... are you ready for the weekend? 
If you're a Sweet Poppy Stencils fan then you're in for a treat.  Book your place on the sofa, or set your box to record, because Lucy is back on our TV screens ..... yeah! 
New stencil designs, new Sweet Poppy foils (oooh!) and lots of tips and techniques.

Saturday 8th February ...... 8am and 12 noon
Hochanda ..... Sky channel 673  Freeview 85  Freesat 817

Here's a peek at some of the new stencil designs, and a look at what's come out of my craft room this week.


Fancy a closer look? ....... oh go on then!


I think this little guy is my favourite ...... I love hares!  And he's so easy to use. 


I created my backdrop for him first ....... I simply drew around the outside of the stencil with a pencil, just to give me an idea where I needed to apply the colours.  I then used Distress Oxides and a bit of masking to create the scene.
Once I was happy with it I placed the stencil over the top and used black ink to add the design


A touch of crystal glitter to some of the foliage .....


And I finished off with a sentiment on the bottom .....


Can you spot the touch of foil on the word Love ....... I used a sticky embossing powder, heated it and then laid the foil on the top ...... simple!


I know I keep saying this but .......you don't always have to use the whole of the stencil design.  Another great thing about stencils is you can turn them over ..... see how the hare is facing the other way


This little guy looks great on his own, and I thought he was perfect for one of the Sweet Poppy sentiments


I used Oxide Ink through the stencil ....... and then fussy cut around the hare.  How cute is he!


Another gorgeous new circle design is the Fairy Circle 


These designs are the perfect size to fill the whole of a card ..... all you need is a pretty background.
This was in my leftovers box, already coloured (with Distress Oxides I think)  I just added a little bit more interest with some stamping, using one of the Lavinia script stamps and an ink that was a similar shade to the background


Black ink again through the stencil, and a touch of sparkle with some crystal glitter


No sentiment this time, but I did add a few dots of Nuvo Drops around the edge


Well that's two of the new stencil designs that will be on the show, hope you like them. 
I do have two more which I'll share tomorrow.

Thanks for popping by ..... enjoy the rest of your day.

Cheerio until next time .....


Products used:
Stencils: Hare Circle, Fairy Circle (Sweet Poppy Stencils);
Stamps: A6 stamp sets - Family and Life is a Journey - for the sentiments (Sweet Poppy); Sacred Spells (Lavinia script stamp)
Inks: Distress Oxide Inks - Scattered Straw, Stormy Sky, Faded Jeans, Chipped Sapphire, Evergreen Bough; Hickory Smoke; Versafine Clair ink - Nocturne; Versamark ink;  Delicata Gold and Silver inks for the splatters
Fairy card ...... I think the colours are Mustard Seed, Dried Marigold, Worn Lipstick and I stamped with Versafine Clair - Summertime
Others: Sticky Embossing Powder (Ranger), Turquoise Metallic Foil (Sweet Poppy); Crystalina Glitter (Sweet Poppy); Nuvo Drops