Wednesday 31 August 2016

Sorry I'm late ......

Hi there ..... Happy Wednesday evening,

Is it really over a week since I blogged ....... I haven't been on a jolly or sat around doing nothing, there's been a lot going on, but more about that later.

In case you haven't already heard ....... there's something special going on today over on the STAMPlorations blog.  Shery and the girls are having a Blog Hop and Linky party to show off the brand new STAMPlorations  COLOR BLOOMS colouring book ..... 


It's a fabulous new colouring book created for the cardmaker, papercrafter and mixed media artist in you!
34 pages filled with gorgeous floral designs for you to colour using your favourite medium .... pencils, pens, crayons, inks, paint you name it.  Then, once you've your coloured page, remove it from the book (yes that's right ..... take it out of the book) and use it to create beautiful projects ..... cards, tags, gifts.  Add parts to scrapbook pages, a journal or even make home decor pieces.

Check out today's blog and see what the fabulous Design Team have come up with .... you'll be amazed just what you can do with a page from a colouring book.

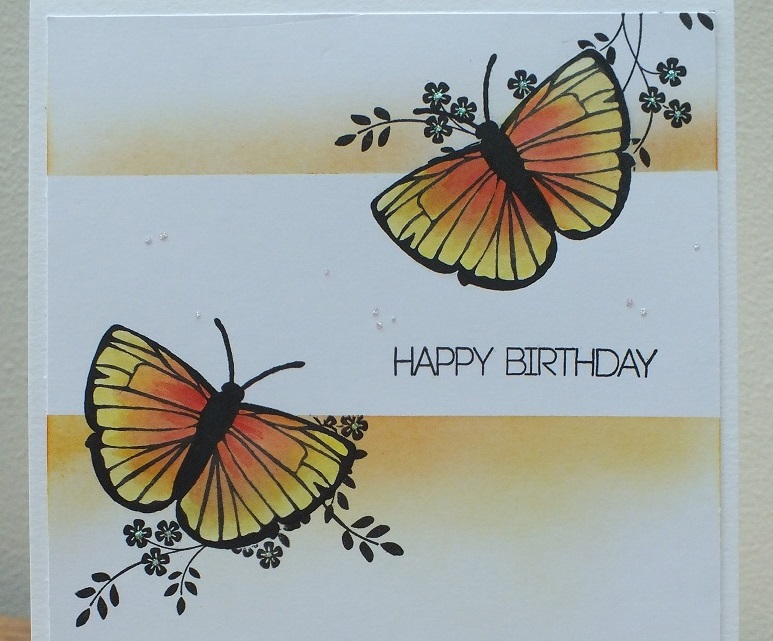
Here's what I came up with ...... a home decor piece, a gift for someone special with a greeting card to match


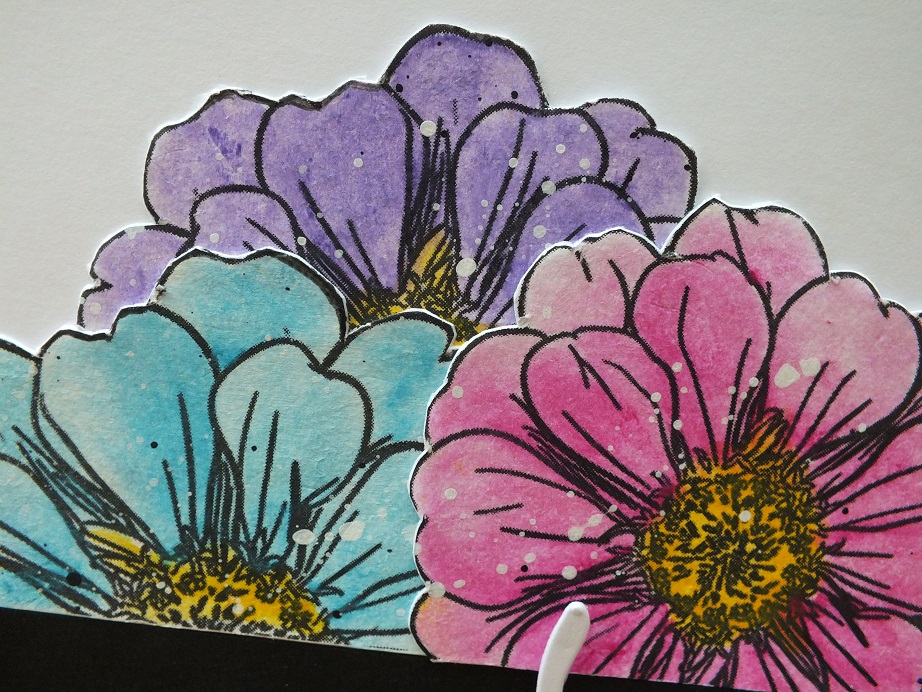
I coloured in the zinnia page using Inktense pencils and used a little bit of water to blend my colours


I added a touch of colour to the background using Old Paper Distress Ink again mixed with a little water, and finished off by splattering a touch of Dylusions white paint over the whole page.


Once everything was dry I glued the page to a sheet of white card to give it a bit more strength.  I then cut a piece to fit in my frame and added the die cut 'happy'.  I love these new CUTplorations thin metal dies, the words are so versatile and all the dies cut really well. 


Because I hadn't used the whole of the coloured page I decided to use the flowers that were left to make a matching card ....


It didn't matter that the flowers were off the edge of the page ..... I simply arranged them so it wouldn't show ......


There's that die cut again .... I can see this becoming a favourite ....


I even had enough flowers to put one on the inside too ....


The COLOR BLOOMS book is available for you to buy on the STAMPlorations website, so why not grab a copy and get colouring!

The Blog Hop/Linky party is open until Tues 6th September .... full details can be found on the STAMPlorations blog along with prize details ...... ooh did I forget to mention there's prizes up for grabs!! 
And if you fancy joining in the fun there's a Color Blooms sampler page for you to download from the Blog.  Simply download the page, colour, and then create something fabulous with it. Don't forget to link it to the Blog Hop ..... we'd love to see it!

Have fun!

Because I had this brilliant idea last week, to move my craft room down to the ground floor ..... I'm a little late in joining in the fun .... but they do say better late than never.
I thought it would be an easy job taking everything downstairs .... let's face it there wasn't that much to move now was there ..... yeah right!   
Here's the new room in the process of coming together ...... 


Bookcases filling up nicely ......


Nearly there .... the old room being emptied ....... only one more desk to move


And the rest of the large unit .... home for some of my stamps


Anyway .... it's all done now.  Hubby and I did the lot and never argued once! Didn't drop anything either which was a bonus.

Everything's in it's new home ....... for now!  I'm sure I'll be moving stuff around for the next few days .... or weeks even, until I get really settled, but at least the old craft room is up and running again.  Just as well seeing as we start a new month tomorrow ..... all those new blog challenges.
It's too dark to take pictures now but I will share my new crafty space with you soon .... when it's tidy, I've been a little on the busy side today.

Thanks for popping by ...... enjoy the rest of your day/evening (what's left of it) and I'll see you in September (that's tomorrow)

Cheerio until next time

Tuesday 23 August 2016

Simple masking techniques .......

Happy Tuesday to you ......

Finally .... 5 minutes to sit down and catch up.  How is everyone?

We had another fabulous workshop over the weekend  ....... 8 lovely crafty ladies around the table, all playing with simple, fun masking techniques, Distress Inks and we even used the MISTI to create gorgeous CAS cards ...... they all say they NEED one now!! (ooops! sorry girls)

You don't need anything fancy though to do the masking ...... just low tack tape, copier paper or even Post It Notes.
Here are a few samples I made to get them started .......


A simple panel across the card, masked using the low tack tape then colour added to the panel using Distress Inks

I then stamped the floral image using a black Versafine ink, and used the same Distress Inks to add colour to the flowers ..... so easy


Here's another version (one of the favourites from the day) ......


The panel doesn't always have to be across your card .... why not go top to bottom for a change

Mask the panel with the Low Tack tape ..... add in a circle mask to create the moon and then ink with shades of blue and purple  Distress


I spritzed with a little water before removing the masks and then added in a little yellow ink to the moon

The gorgeous fairy is from Lavinia and I finished off with a sentiment and a touch of sparkle.


This is where the MISTI came in.
I don't know about you but I sometimes struggle to get a perfect image with silhouette stamps.  No matter how much ink you apply, or how much pressure you use, there's still paler bits here and there. I know you can use a black ink to paint over them, or use a black pen to fill in but .... it's never quite right.  Not with the MISTI ..... if it's not right the first time ink up the image and stamp it again ....... and again ....... and again .... until you're happy with it.  The stamp is not going to move, it will always stamp in exactly the same place ...... perfect every time. What did I ever do without it!

Anyway ...... you don't have to use silhouette stamps ....


Use pretty floral images ....... or butterflies


And why not create a panel with the ink on the outside edges .....


Create the layered look by inking, spritzing and then stamping onto the panel before removing the masks, with something like a script stamp


The perfect backdrop for one of my favourite images ....


But I must say .... this little guy stole the show.  Yes .... they were making Christmas cards .....


Use your dies to cut shapes to use as masks ....... from acetate, masking sheets or simply good old copier paper.

These are a couple of cards I made last year but they loved them .....


It's surprising what you can do with a bit of low tack tape and a piece of copier paper!

The move went well last week.  Lauren and the little man are all settled into their new home ..... we do miss them (sigh!) ..... it's so quiet!  Just hubby and I here now.  Saying that we have seen them nearly everyday since they left ..... we're still on school holidays so Alex is here while his mum's at work.
Of course we now have empty rooms ...... so it's time for a change.  We've already moved our lounge up a floor ......


 Well .... it's a bigger room .... with a nicer view over the square


There's still the bookcases at one end to change around ...... Lauren's library is still here (I thought we had a lot of books!!) but I can live with that.  It does mean of course ..... the downstairs lounge is now empty ........ hmmm ..... are you thinking what I'm thinking?
You guessed it ..... the old craft room is on the move.
Yep ..... I'm bringing the whole lot downstairs.  It does mean I'm going to have to tidy everything away but hey .... at least my desk will get a good clean!

Thanks for popping by .... enjoy the rest of your day.

Cheerio until next time

Thursday 18 August 2016

Have you entered the challenge yet? ......

Happy Thursday folks,

Well .... it's moving day today ...... not us (thank goodness ... well, not YET anyway!)  
It's Lauren and the little man that are on the move ..... into a place of their own, with Lauren's partner. We're doing our bit to help .... so that means this is a scheduled post.  Hubby's taken the day off work to give them a hand moving the heavy stuff, and me well ... I'll be at one end or the other,  packing, un-packing, cleaning you name it.  Although by the time this goes live I may just be sat with a well earned cuppa .... hopefully!

Anyway it's time to remind you about the latest CAS Card Challenge over on the STAMPloaration blog
As always the theme is Anything Goes .... as long as its CAS ...... with an optional Colour Twist 

There's just a few simple things to remember when entering the challenge ......
  • To be in with a chance of winning one of the prizes you must display the challenge graphic in your Blog post 
  • Link back to the actual CAS Challenge post NOT just the STAMPlorations blog
  • You don't have to use STAMPlorations products to enter the challenge ..... but it would be nice if you did
  • and ...... you can link up to 3 entries into the challenge


As you can see this month's colour twist is .......

GOLD


I've gone a bit autumnal here I think ...... don't know why, it's been glorious the last few days!

A nice easy design using the STAMPlorations Trendy Leaves ..... love this stamp set!
I simply stamped one of the leaves using different colours of Memento inks ..... a green, a brown and a touch of orange ........


Then using another leaf design from the set, I stamped over the top with Versamark ink, and embossed using a gold fine detail powder


I added a sentiment ..... from the STAMPlorations Noteworthy set .... again embossed in gold


And finished off with a few tiny dots of glitter glue.

There's more leaves on the inside too ......


Check out the STAMPlorations Blog for more ideas and inspiration for this month's challenge and then why not give it a go.  I look forward to seeing you in the gallery.

Happy stamping!

Thanks for popping by .... enjoy the rest of your day.
It's going to seem really strange and very quiet in our place tonight.  We seem to have had a house full for so long ..... I'm going to miss them (sigh)

Cheerio until next time ......

Monday 15 August 2016

CAS Mix Up ........

Happy Monday ......

And what a lovely Monday it is too ..... we've got blue skies and sunshine again.  I do hope it's nice where you are.
How was the weekend?  We had a lovely surprise,we were invited to the theatre on Saturday evening with Chris and his girlfriend, to see Oliver


It's the latest production from the Taylorian Company at the Gaiety in Douglas, and what a great show it was.  One of Chris's members of staff was in it .... Tom .... not only can he pull a good pint he can sing pretty good too (comes in handy on the karaoke nights!) He played the undertaker Mr Sowerberry ....... and he did a grand job!

picture courtesy of Taylorian Productions
But, I've got a lot to do this week so I'd better get on .... what with Lauren moving (we've still not got everything packed), a few bits and pieces to do in town (I may just make the most of the sunshine and do all that today). a friends birthday to celebrate at the end of the week (party time!), and a workshop to prep before Friday ...... it's going to be a busy one!

Before all that though .... I'm going to start the week having a bit of fun playing along with a favourite blog challenge of mine ...... CAS Mix Up ..... a Clean and Simple Mixed Media Challenge.

You all know I love the CAS design, and I do like a bit of Mixed Media ..... so why not join the two together.
This month the requirements are .....


Think I've got it covered .......


OK .... there's not much stamping on there, but ..... there doesn't have to be (thank goodness!) 

The spray part is ..... a water spray.
I've used the stencil mono-print technique for the background.
I sprinkled two colours of Brusho onto the pretty Roses stencil from IndigoBlu (Rose Red and Lemon I think) and then spritzed it with a little bit of water.  I then laid the stencil onto a piece of mixed media cardstock, gave it a little press down, mopped up any excess colour/water with a piece of kitchen roll then removed the stencil, leaving the rose design with a pretty coloured background


Once it was dry I placed the stencil back over the design and used the your choice part of the challenge which is ...... pearlescent texture paste ...... I'm loving this stuff at the moment, it gives such a pretty shimmer ......


The lovey Loll Thompson (one of my bestest blog buddies .... and one of the creators of the CAS Mix Up challenge) used the same technique on one of her designs last week only she used White Crackle Paste and it looked fab!!! Check it out here.
Guess what the postman has just handed to me this morning ..... yep!  the White Crackle Paste ..... can't wait to have a play.

Back to the card ....... I left the paste to dry. and then I cut a small strip off the bottom of the panel, attached both pieces to a larger piece of card leaving a space to stamp my sentiment ..... told you there was stamping on there!


I used foam pads to attached the panel onto a card blank to add a bit of dimension ....... nice simple design suitable for quite a few different occasions.

Well that's it from me today ...... thanks for popping by.
I'm off to the old craft room now to make a start on the weekends workshop.  It was all sorted but .... for one reason and another, I've changed my mind and decided to do something different.
Never a dull moment here!

Enjoy the rest of your day.
Cheerio until next time

Friday 12 August 2016

Love is like a butterfly .......

Happy Friday folks .....

Another week has whooshed by ...... and what a busy one it's been.  Preparations are well underway for Lauren's move next week ..... boxes are being filled as we speak.

We're going to miss her and the little man ...... but it does mean there's going to be lots of space, if the old craft room needs to spread out a little .... just saying!

August's Craft Stamper Take It Make It Challenge is also well under way ....... it's Take a Technique this month and it's all about Stencils and Masks. Just remember to also include some stamping on your projects too.

I love my stencils .... and I have to admit I do have my go to all the time favourites, tow of which I've used here on my inspiration piece ......


Stencils and masks can help you create the look of layers, and add depth to your projects, as well as allowing you to add fabulous textures by using embossing pastes.

I started out by adding a touch of colour to the centre of a piece of white cardstock using Victorian Velvet Distress Ink, some water and a piece of acetate to smoosh the ink around.
I then used the Tim Holtz Harlequin stencil with the same colour of Distress ink to add more detail, and another layer, to the background .......


I didn't ink through the whole of the stencil .... just the bit down the centre brushing more ink over some of the design to add shading.

Next came a little bit of stamping using a script background and Grey Versafine ink


Texture Paste next ..... and the Tim Holtz Flourish stencil (love, love, love this!!).  I used a pearlescent paste and I must say I really like the look .... sort of an ivory colour and then when the light hits it you get a gorgeous shimmer .... really pretty.


I stamped the Inkylicious butterfly directly onto the card ..... to get the antennae,  and again onto a separate piece of card, coloured it using different shades of pink Distress inks and then fussy cut it out and attached it over the image on the card.


I added my sentiment on the bottom .... ... (an old Stampin Up! stamp I think!)


and splattered a touch of black ink here and there to finish off.

I did pretty much the same on the inside only this time I stamped the butterfly first, created a mask to cover it over whilst I added the detail to the background ......


Same colours ..... same stencils .....


Hope you like it and that I've inspired you to enter this month's challenge.  We've a great sponsor for August ...... the fabulous  GioGioCraft


and the challenge winner will receive a set of FOUR gorgeous stencil designs


You'll find more fabulous inspiration and ideas from the rest of the Design Team over on the Craft Stamper Blog, along with all the challenge information and more details of the prizes up for grabs.

Happy stamping!!

Thanks for popping by .... enjoy the rest of your day.
I'm getting ready for the weekend not that we're doing much .... mainly packing for Lauren I think. I'm trying to catch up with what I should have been doing during the week
We are going out for tea this evening I think ...... so no cooking again.  We have some good news to celebrate ....... hubby got promoted at work ..... whoo hoo!!!
It's all been a bit hush hush for a few days, but it was made official at the beginning of the week .... he's now Director of Business Analytics (I think I've got that right ...... sounds posh to me!!)
Congratulations love .... you deserve it!
The bottle of champagne that's chilling nicely in the fridge is going to have to wait a while longer though ..... I'm determined I'm sticking to the no alcohol this month!!!

Have a great weekend ..... hope the sun shines for you.

Cheerio until next time