Showing posts with label Acetate smooshing. Show all posts

Tuesday, 24 October 2023

Two-fer Tuesday .........

Happy Tuesday ........

I do hope your week has got off to a great start.  
It's school half-term here this week so we've got Alex at home ........ life with a 13 year old, ohhhh I remember it well!!!

I've got a two-fer for you today ....... two cards, and two challenges. 

First up ....... Simply Less is More
It's the dreaded One Layer Card challenge (always fun to do), and the theme is Hello Sunshine
(I remember what that is I think!)


I started by stenciling the sunshine (Julie Hickey Designs) on the top corner of a piece of white cardstock, blending shades of yellow Distress Oxide ink from the centre of the sun outwards.


Next, I stamped the flip-flops (Newton's Nook) ...... stamped the right one first and made a mask to cover it, then stamped the left overlapping it just a little bit.
Coloured them using ZIG Clean Colour Brush Markers.


I finished off  the card with a heat embossed sentiment. That's the One Layer done!

Next up is the Color Hues Challenge
For this challenge the colour combination is ....... Yellow & Kraft


The yellow part was still out on my desk ....... the Distress Oxide inks, and the Kraft bit was easy, always happy to add in a little kraft card


I smooshed a little Distress ink onto a piece of white cardstock using a piece of acetate to create a background.


Next, I used the Etched Layered Daisy Stem die from Simon Says stamp, cutting the flower heads from white cardstock, and the stem from Kraft.

I used two shades of yellow Distress Oxide Ink (Scattered Straw and Squeezed Lemonade) direct from the ink pad to colour the daisy heads and layered them together.


I attached the stems onto the card, added the pretty layered daisy heads, and finished off with a few splatters of Brushed Corduroy Distress Ink (hope this can be classed as a shade of Kraft), and a tiny tag for my sentiment


Both challenges are open for another few days if you fancy playing along.

Thanks for popping by, enjoy the rest of your day.

Cheerio until next time ......

Monday, 1 August 2022

Emboss Resist for CAS Mix Up!

Happy Monday! .....

Well, July was a bit of a whirlwind month ......... welcome to August!

A new month, means we have a new CAS Mix Up Challenge.  
It's Mixed Media month, and the lovely Nancy is our host.  The theme she's chosen for August is ......
Emboss Resist ......... one of my favourite techniques.

If you're not familiar with this, or you need some inspiration, then check out the CAS Mix Up Blog.  On there you'll find lots of ideas from the Design team and links to some really great videos on different ways of doing this really fun technique.


Emboss Resist will work with lots of different mediums ....... ink pads, spray inks, pigment powders such as Brushos, paints, watercolour markers, but one of my favourite things to use is Distress Inks.  Because they react so well with water, the embossing resists the ink colour really easily.  
There's so many different ways of using Distress inks too ..... straight from the ink pad, blended with brushes for example or, as I've done for my inspiration piece ....... acetate smooshing!
 
I stamped the pretty floral bouquet onto a piece of white cardstock using Versamark ink, and then heat embossed in white.
 

Hmmm ........ white embossing on white cardstock?  Not an easy thing to see but, with the emboss resist technique all will be revealed in the end! 

I then swiped my Distress ink pads onto a craft sheet ...... Picked Raspberry and Salty Ocean .......
and spritzed the ink with a little water.
I used a piece of acetate to pick up the colour and then laid it onto my cardstock, over the top of the embossed image, pressing lightly with my fingertips to move the ink around a little, making sure that the whole of the embossed image was covered


I repeated this for both colours of ink, building up the depth of colour gradually. 
You can see I wasn't careful about keeping clean edges, I wanted more of the random, splattered look.  
I also overlapped the two colours to give some shading here and there 


Once I was happy with the colour, I moppped up any excess ink with a paper towel and then gently buffed over the embossed image to remove any residue left from the inks.  
Because the embossing resisted the Distress Ink, the original stamped image showed through nice and clear.

To finish off, I die cut the sentiment three times, from white cardstock.  I layered them together, heat embossing the top layer with a navy embossing powder and off setting this slightly to give that white shadow


So, my elements used for this challenge are ..... 1. the theme ...... Emboss Resist  2.  Rubber stamping and 3. Acetate Smooshing, or it could be die cutting,  I suppose.

The challenge is open until the 24th of the month, so lots of time to play along.
Check out the CAS Mix Up Blog for more Emboss Resist inspiration from the Design Team and also, pop by say hello to our fabulous Guest Designer this month ....... Brenda (Inkspired to Stamp) is joining us for this challenge. 

Happy stamping!

Thanks for popping by ..... enjoy the rest of your day and have a great week!

July was a busy month for me but, August looks even busier.
We're off out this evening for a birthday dinner ..... our favourite restaurant is 4 today!
Then I've got my big brother and family coming over for a few days on Wednesday, so we'll be off out again then.   
When he goes home I have a crafty day with the girls planned, we haven't had a get together in such a long time.  There's also lots going on with Alex and his pals (school holidays are so much fun!)  And then, we're off again in the van on the 17th, and we don't get back until 3rd September!!!  So, that's August done ......... like I said, a busy month!  I'd better get a move on!

Cheerio until next time .......


Supplies
Stamps: scented message wood mounted rubber stamp (Penny Black)
Inks: Distress Inks - Picked Raspberry, Salty Ocean; Versamark ink
Other: Bright White,  Pea Coat embossing powders (WOW!); thanks thin metal die from my stash (not sure of the brand)

Wednesday, 1 June 2022

We're back!! ..........

Happy Wednesday ......

Can you believe were in June already!!!!  How's your week going so far? 

It's all go here on the island.  What with the TT that's well underway,  and the Queen's Platinum Jubilee weekend coming up, there's loads going on.

This month also sees the return of the CAS Mix Up Challenge! ......... whooo hoo!!!  Have you missed us?
It's so nice to be back after our little break, and we've got a fun challenge for you this month.   
We're kicking things off again with a Stencil challenge.  
There's lots of ways to use stencils but for this particular challenge we'd like to see you use them with Pastes or Gels


There's lots of different pastes and gels out there ..... from simple white embossing pastes, or clear gels that dry glossy or matte, through to glitter pastes, crackle pastes, or gels with different textures in them.  And of course you can always create your own.  Check out the video links on the challenge post for some great tips and techniques.

Need some inspiration?  How about a pretty floral card using the new gorgeous Peony stencil from Sweet Poppy


I used Distress Inks first to apply the colour through my stencil


I removed the stencil and cleaned off any excess ink before placing the stencil back over the top of the colour.
I then applied Translucent Stencil Medium to the flower heads, over the top of the ink.  I carefully removed the stencil and whilst the paste was still wet I sprinkled some clear Ultra-fine Glass Microbeads over the top and left it to dry


The ultra-fine beads are tiny, and they give a lovely fine texture whilst letting the colour show through


To add a bit more interest to the background I used a piece of acetate to smoosh a little more of the Distress Ink colours on there


and then finished off with a simple sentiment.


Check out the fabulous makes from the rest of the Design Team and, to celebrate the return of the CAS Mix Up Challenge we have not one, but two amazing Guest Designers this month.  Julie (Crafted by Jules) and Darnell (Djkardkreations) are both joining in the fun, so be sure to pop by and say Hello!

I can't wait to see you all in the gallery ....... it's great to be back!!

Thanks for popping by ..... enjoy the rest of your day.

As I said it's so busy here at the moment, TT fans are arriving by the ferry load everyday and the roar of motorbikes around the island sounds amazing!
Practice week is in full swing and, we got our TT celebrations off to a good start on Sunday evening when we went to see Jessie J .........


We had a great night ...... she was amazing!!!

So, this week we have the long Bank Holiday weekend to look forward too. We've got some friends comming for a BBQ tomorrow, then it's Mad Sunday.   Hopefully we'll get up to the Grandstand at some point over the weekend, and then it's race week next week,  with the Red Arrows coming over on Tuesday, and we have another bank holiday here next Friday, for Senior Race Day ...... its all go!! 

Cheerio until next time ........


Supplies:
Stencil: Peony (Sweet Poppy Stencils)
Inks: Distress Inks - Kitsch Flamingo, Mowed Lawn; Versafine Clair - Nocturne (for the sentiment)
Stamps: better with age (Penny Black)
Others: Translucent Stencil Medium; Ultra-fine Glass Micro beads - clear (Sweet Poppy Stencils)

Wednesday, 14 April 2021

Perfectly CAS Challenge #14 .......

Happy Wednesday ........

I hope you're enjoying your week.  It's been lovely here so far, Spring has finally arrived.  
The BBQ is back in action, the hot tub is up and running .... and the grass is growing!  Guess what I'll be doing later in the week!

It's time now though to get the next Perfectly CAS challenge underway.  It's challenge #14 and the theme this time is ...... WINGS


Before I share some inspiration, a quick reminder about the rules for this challenge.  We've noticed a few entries recently that don't quite fit the bill.  The main requirement for Perfectly CAS is ........ that you only use one third of your card space, or less. 
 
So, what is Clean and Simple (CAS)?   For me it's .........
  • one main focal point
  • Lots of white space
  • minimal layers
  • minimal embellishments
Of course one persons idea of CAS can be completely different to the next but, if you stick to using just one third of your card space you can't really go wrong.  Your cards will always be Perfectly CAS.
Check out the grid below ......


Divide your card space into thirds, use just one row/column and leave the other two blank ....... easy!   


Using my MISTI, I stamped the bee not quite in the centre of my card.  
With the card still in my MISTI ....... and I didn't remove the stamp ...... I added a touch of colour to the bee using Prismacolour pencils.  Because I hadn't removed the stamp, or my card, it was easy to re-stamped the image over the top of the pencil crayon, to put all the detail back in again


A tiny sentiment underneath and the card is done!


When using the one third rule, you don't have spend time measuring and getting everything exact ....... if you go over just a little bit that's fine.  
If you see below, my ink splatters have gone outside of my chosen third, but the overall design is still very CAS.  Splattering ink is not always easy to control!  I suppose I could have covered it up but, I didn't ...... oh well! 


You don't always have to use small stamps to create CAS cards ....... my favourite butterfly was a little too big to use in full so, I just stamped it off the edge


Smooshed some Distress Inks over the top and added in the splatters ......


I added a bit more colour with some coloured pencils, and a few gold highlights here and there, before finishing off with my sentiment.


Happy stamping!

Thanks for popping by .... enjoy the rest of your day.

Our little island is preparing to get back to some sort of normality.
Fingers crossed, we're hoping that from next Monday most, if not all of our current restrictions can be lifted ...... except for the borders I think.  We'll know more tomorrow but,  the kids will all be back at school on Monday ..... thank goodness.  Non-essential shops can open up again ........ yeah! and I believe that the hospitality trade will be back ..... whoo hoo!!   We've already booked a table at our favourite restaurant for Wednesday, so we're hoping for good news!  I'll keep you posted.

Cheerio until next time ......


Products used:
Card 1
Stamps: Queen Bee Mini (IndigoBlu); Warrior (Tracey Hey) for the sentiment
Inks: Versafine Clair - Nocturne
Other: Prismacolor pencils 

Card 2
Stamps: Perspective (Tim Holtz); Tiny Words (SSS)
Inks: Versafine Clair - Nocturne; Distress Ink - Kitsch Flamingo, Cracked Pistachio
Other: Prismacolor pencils;  Gold gel pen

Thursday, 31 October 2019

Finished at last!!! .......

Happy Halloween ...... or Hop tu Naa as it's known in the Isle of Man,


I hope you're having a good week. 
Things are a little less busy here ........ thank goodness.  Although saying that, it's November tomorrow, and we all know what happens at the start of a new month ........ lots of Blog challenges, so you'll be hearing from me quite a bit in the next few days.
I'll also try and catch up with all my Blog visiting too.   I do apologise if I haven't made it over to see you yet ..... I will get there, I promise! I don't want to miss anything!

It's been a nice week actually .... the weather's been good, although I think all that's about to change.  I was in town this morning and it was a little bit cold and grey.   Fingers crossed it stays fine for this evening ....... there's a little velociraptor that's looking forward to going Trick or Treating (I've had to stuff a tail this morning ..... but we won't go into all that!)

Last weekend was workshop weekend ...... the last of the calendar pages  Whoo hoo!!!
Not everyone could make it unfortunately but, the ones that were there finished all three pages. 
I'm so proud of them, they've all worked so hard over the last few months to get their calendars finished and I think they were all pleased with the results ........ here's a little look at some of their favourite pages .......


Sorry but I can't remember which page belongs to who but there's ...... Carol W, Carol J, Lyn, Mandy, Jenny and Ruby.  Well done, your calendars all look amazing!

We had just three pages to do.  On the two calendars I've been doing I had August left ...... we used stamping and simple masking techniques, watercolouring and acetate smooshing.


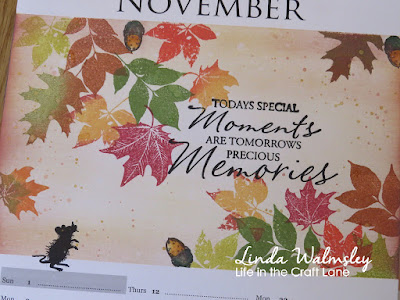
November ........ I'm loving these new large stamps from the Colorado Craft Company.
More masking, this time masking off the background to add colour to the leaves using Distress inks


I also did some stamping with different coloured inks ...... very autumnal!


And we finished with October .......


The calendars have been a big project but, I do think it's been worth it.

The final workshop of the year is in November ...... and it's Christmas themed ..... Ho! Ho! Ho!
I just need to get a move on with my finished sample.

Thanks for popping by ..... enjoy the rest of your day, and have a fabulous Halloween or Hop tu Naa
Happy trick or treating!

See you in November! ........


Products used:
Stamps: Butterflies, Sentiments (Inkylicious); Elements of Style (SU! - discontinued);Handpicked Bouquet (Altenew); Big & Bold Oak Leaves & Acorns, Jack-o-Lantern (Colorado Craft Company); Trendy Leaves (STAMPlorations); Maple Leaf (Clarity)  
Inks: Various colours of Distress Inks and Distress Oxides; Versafine Clair - Nocturne
Others: 2020 A4 Calendar (Papermill Direct); Clear embossing powder, Gold Embossing Powder (WOW!); 

Friday, 4 October 2019

It's the first Friday of the month .........

Happy Friday .......

It's almost the weekend ..... whoo hoo!!  I hope you've had a good week.
It's been a bit crazy around here but, only one more sleep then it's time for some R&R!  That's if I ever get the suitcases packed!  At the moment I've got my pj's, toiletries and a swimming costume in there, oh and my flip flops .... I suppose I could manage with those at a pinch!
We don't actually fly to Santorini until Sunday morning, but we're flying over and staying at Gatwick tomorrow night .......... I've still loads of time to pack!

Before all that though, it is the first Friday of the month so, that means it's time to launch October's Craft Stamper Take It Make It Challenge


As always there's no particular theme to follow ....... it's Anything Goes.  Anything that has actual rubber stamping on there that is .... so NO DIGIs please!
You can find all the guidelines for the challenge over on the Craft Stamper Blog, along with the details of this months prizes.  There's also some amazing projects on there from the Design Team
if you need a little inspiration to get you started.

Before I get full of the Christmas spirit and go all festive, which will no doubt happen once I get back from holiday (I hope anyway ...... I've still got all my Christmas cards to make!  I've got a pretty floral design using one of my favourite stamps at the moment from Altenew .....


I masked off around the edges of a piece of white card using low tack tape.  I stamped the pretty floral image onto two opposite corners (I do like working on the diagonal), and heat embossed in white.


I used my ZIG Markers to add colour to the flowers and quite a bit of water.  I like to paint the petals with water first, then add a touch of colour using the pens and then, add a little more water to my paintbrush to move the colour around giving a nice watercolour effect ..... great for adding shading too!


I used the acetate smooshing technique to add the background colour ....... smooshed Distress Ink onto a craft mat, spritzed with water and then used a piece of acetate to pick up the colour and then 'smoosh' it on to the background .....


All this, by the way, was done with the masking tape still in place around the edges.
Once everything was dry then the tape was removed, and I was left with this lovely framed look, without having to add another layer of card.

A simple stamped sentiment in the centre, and a few sparkly sequins finish it all off.


The challenge is open until Oct 23rd so there's plenty of time to get your entries in.
As always we have two fab prizes on offer ......
1.  The Design Winner ..... chosen by the DT.  Their winning project will be featured in the Craft Stamper magazine along with a Winner's Profile, and they will also be invited to be a Guest Designer on a future challenge.
2.   The Challenge Winner ..... randomly chosen, will receive this month's fabulous challenge prize
Two x Prima Redesign Moulds ...... In the Garden and Leafy Blossoms.  How pretty are those!


Happy stamping!

Thanks for popping by ...... have a lovely day and enjoy your weekend.
I'm off to finish up in the craft room and then try and get it tidy ..... if that fails I can always close the door and no-one will be any wiser!!
I'll also be back again later with one more blog challenge for you, then it's sun, sea and greek salads for me!!

Cheerio until then .......


Products Used:
Stamps: Handpicked Bouquet (Altenew); Special Sentiments (Penny Black)
Inks: Versamark ink; Versafine Clair - Nocturne; Distress Ink - Tumbled Glass
Others:White Detail Embossing Powder (WOW!); ZIG Clean Color Brush Markers; Low Tack Masking Tape; Sequins