Showing posts with label Gilding Flakes. Show all posts

Tuesday, 18 May 2021

CAS Christmas Card Challenge .......

Hello there, happy Tuesday .........

Guess what!  I've got my festive hat on again for this month's CAS Christmas Challenge ..... Falalalala lalalala! (are you singing along now?)


It's all about Foliage and Berries this month, and so tempted as I was to go all traditional in festive greens and reds, I decided to have a change ...... what do you think?


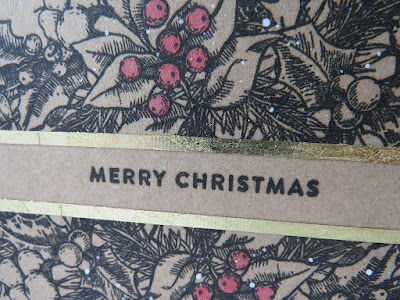
I do love simple black stamping onto Kraft card, and this pretty stamp from Simon Says has so much detail in there


It's from a stamp set called Joyful Season, and I think it was in the SSS December Kit of the Month last year.

I covered  a strip across the centre of my card with a piece of low tack masking tape, and stamped the image top and bottom using a black ink.  
I removed the tape, and stamped my sentiment in centre, and then added strips of narrow double sided tape along the edges of the foliage and covered these with gold gilding flakes .......


It's a quick and easy way of adding that foiled look ....... no need for laminators or special gels or glue, and it also gave a nice finished look to the edge of the stamping.

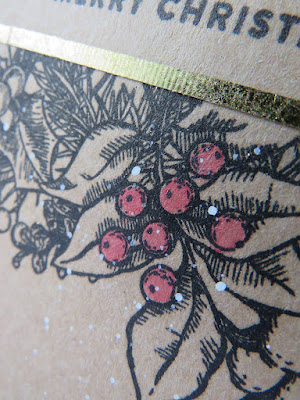
I did add a touch of colour to the berries with some Distress Ink ......
 

and finished off with a few splatters of white paint.
Not the traditional Christmas colours but, I like it!

Thanks for popping by ..... enjoy the rest of your day.

I've spent most of this weekend getting to know my birthday present ....... from last year!!!  


Yes hubby finally got around to buying me a new phone ...... about time!
To be fair it's not his fault that I've waited so long.  Since my birthday 2020 we've been in and out of lockdown, the shops haven't really been open that much, and I didn't want to order one online (I couldn't decide which one I wanted to be honest!)   And lets face it, I've spent more time using my laptop recently than I have my phone!
I'm still getting used to the new one ....... it's bigger for a start, and I have to remember that it has a new ringtone ...... there's been quite a bit of 'Mum, your phones ringing again' this weekend.  Me and new technology don't always get off to a great start!  I haven't played with the camera on it yet which could be fun,  apparently it has 3!!!   And, I also have to remember NOT to put this one in my back pocket, and then go to the loo!!!! 

Cheerio until next time .......


Products used:
Stamps: Joyful Season (Simon Says Stamp)
Inks: Versafine Clair - Nocturne; Distress Ink - Festive Berries
Other: Narrow double sided tape (from my stash); Gold Gilding Flakes - (IndigoBlu); Fresco Finish Acrylic Paint - Snowflake (PaperArtsy)

Wednesday, 15 April 2020

There's still time to play along with this month's CAS Challenges .......

Happy middle of the week ......

We've had another lovely sunny day here, and I've done absolutely nothing!!
I did go into the craft room this morning, put a few things away, moved stuff around a little bit on my desk, and then walked straight back out again ....... it was too nice to be in there.  Instead I grabbed my laptop and Kindle, a bottle of sun cream and headed outside.  It's been lovely catching up on emails, watching some FaceBook Live craft videos, and just enjoying this nice weather.  Might even go in the hot tub later!

First, I have got a quick reminder for you, about a couple of this month's CAS Challenges.
We like to give you a few more ideas mid way through the challenges just incase you need a little bit of inspiration.

First up ..... the CAS Mix Up Challenge, where the theme this month is Bleaching


Don't forget to check out the links on the CAS Mix Up blog to some useful videos on using this fun technique.


You might think using bleach on your cards is not for you.  I know I'm not that keen on the smell, and even though you can get odourless ones these days there are other ways of achieving the same look.
I like to use plain old water, and Distress Inks, it works a treat. 

I stamped the flowers across the centre of a piece of white cardstock, heat embossed the image in gold, and then blended Distress Ink over the top.


Using a paintbrush and some clean water, I 'bleached' out the colour from the leaves.
I simply painted the water onto the leaves and then mopped it away with a piece of paper towel removing the Distress Ink too.  The more water you apply, the more colour you will remove


Once it was dry I fussy cut around the bottom edge and then attached it to the top the front of a card blank, leaving white space at the bottom to show off the fussy cut edge


I stamped a sentiment on there and finished off with a few sparkly gems


Next up .... the CAS Stencil Challenge
This month the theme is Gilding Flakes. Not a product known for using with stencils but, they work.


I've gone for a 'less is more' approach on this design with just a touch of gilding flakes on the stenciled detail in the background.

I smooshed a little Distress Ink onto the centre of a white cardblank using a piece of acetate, and then stenciled over the top with some texture paste.


Once this was dry I placed the stencil back over the paste and used my finger to apply a little bit of glue to the surface ...... not too much, and I wasn't that careful about applying it as I wanted a sort of grungy look, I didn't want to completely cover the texture paste.

I removed the stencil and then applied the Gilding Flakes.  A gentle rub over to make sure they had covered all the glue, then I took a sponge and rubbed away any excess


I stamped the butterfly onto a piece of mop up card and added a touch more colour to it using some coloured pencils before fussy cutting around the edge


He was attached onto the card, and I finished with a sentiment


 I think we could all do with some happy thoughts right now!

There's still plenty of time to get your entries in for all the CAS Challenges, and if you need more inspiration then check out what the rest of the Design Teams have been up to.

Thanks for popping by ..... enjoy the rest of your day.
I'm off to create something in the kitchen now, not quite sure what yet.  I'm thinking a chilli maybe with a nice bottle of Malbec.  Well it is World Malbec Day on Friday this week ..... we've already booked our special menu for Friday night, freshly prepared and delivered from our little place in town ...... looking forward to that.

Cheerio until next time ........


Products used:

CAS Mix Up
Stamps: Precious Peony (Altenew); Special Sentiments (Penny Black) 
Inks: Distress Ink - Picked Raspberry; Versamark Ink; Versafine Clair - Nocturne
Other: Gold Embossing Powder (WOW!); Clear Glitter Gems

CAS Stencil
Stamps: Flutters 2 (Inkylicious); Happy Thoughts (Penny Black sentiment)
Inks: Versafine Clair - Nocturne; Distress Ink - Picked Raspberry
Other: Tim Holtz Stencil - Stripes; Texture Paste (Ranger); Flitter Glu, Gilding Flakes (IndigoBlu) 

Saturday, 4 April 2020

CAS Stencil Challenge ......

Happy Saturday to you ........

I hope you're having a good day.

It's time for another Blog Challenge.   Are stencils your thing?  Fancy doing something a little bit different with them?  How about joining in the fun on the CAS Stencil Challenge
We've got a great prompt for you this month .........


Cathy's  our Host for the April challenge,  and she wants us to use ........ Gilding Flakes

Possibly not the first thing you think of when using your stencils but ..... they do work so well.
If you're not familiar with using Gilding Flakes then check out the CAS Stencil Blog.  On there you'll find lots of inspiration from the Design Team, and our fab Guest Designer this month ...... Mac (The Sweetest of Peas).  There's also some links on there to some fab videos to give you some ideas on using gilding flakes.


I've used Gilding Flakes to add a touch of shimmer and shine to the background, using one of my favourite stencils ..... I do love this honeycomb design.

I started by using the stencil with Distress Ink directly onto my card.
I then took a piece of Cut n Dry foam and applied a light touch of glue, over the ink, through parts of the stencil ....... remember if you're using any kind of glue through your stencils clean them thoroughly asap after use.


I placed my Gilding Flakes onto the sticky surface, rubbed over the top with the flat of my hand to make sure I'd covered everything and then gently rubbed over the flakes using a sponge to take away the excess and bring out all the detail of the stencil again.

I stamped the pretty sunflower onto a seperate piece of cardstock and heat embossed the image with a clear powder.
I coloured it using Distress Inks, and fussy cut.


 I stamped the bee and my sentiment onto the card ......


The sunflower was added using foam pads to give a bit of dimension, a bit of colour onto the bee, and I finished off with a touch of shimmer on his wings ......


I'd forgotten how much fun Gilding Flakes can be ..... enjoy!

Thanks for popping by ..... enjoy the rest of your weekend.
I've got another night off from cooking this evening ....... we're having a little treat (again!)
A lot of the restaurants on the island have had to rethink ways of keeping their business going during this crazy time.  A lot of them, our favourite little place (Wine Down) included, have been offering take aways and delivery service for food, and wine.
Wine Down have also been doing their special menus ..... week before last was Greek week, which was delicious.  Last night we had a special Lebanese menu, which was amazing!  And when we saw the menu for this evening we couldn't resist so, we've ordered in again!
We've got Beef Wellington tonight.  It's all arrived, beautifully prepared, with full instructions on how to cook it and all I have to do is put the oven on and open the wine ....... sounds good to me.

Stay safe everyone ......... cheerio until next time


Products used:
Stencil: Texture Honeycomb stencil (MemoryBox)
Stamps: Sunflower Bee (Julie Hickey Designs; Bee Happy Clear Stamps (Uniko)
Inks: Distress Ink - Wild Honey, Scattered Straw, Tea Dye; Versafine Clair - Nocturne;
Other: Clear Embossing Powder (WOW!); Chariot of Fire Gilding Flakes, Flitter Glue, Scoochy Sponge (IndigoBlu); Yellow Watercolour pencil; Wink of Stella pen

Wednesday, 8 February 2017

I haven't forgotten my journal .......

Happy Wednesday ......

How's your week going? The sun has been shining but it's a bit on the chilly side over here.  Didn't stop a little trip out though.  I went AWOL today ...... took a break from the packing and had a lovely afternoon catching up over coffee down in the south of the island.  Managed to pick up a few bits for the new house too ..... ooops! more stuff to pack!

There's not a lot going on in the old craft room this week.  I'm just finishing off the last of this months DT projects. Oh ....... and playing around with a few pages in my journal.
Yes, I'm still playing along with Creative Journaling 365 ........ still trying to catch up though.  I'm way behind on the doing something everyday bit!

I have got a couple of finished pages to share ........ these have been on going for a few days, doing a little bit here and there.
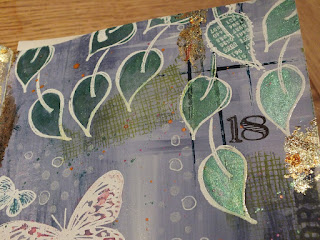
Pages 17 & 18 ...... I've been trying out the gorgeous Luscious Pigment Powders from IndigoBlu.
I've had some of these a while just never got around to playing with them, but after watching Kay on the telly I had to give them a go .......


The journal pages had already been painted with acrylic paint and a bit of dry brushing with some white gesso.  I'd stamped and heat embossed the Prima butterfly too, and that was as far as I'd got.


So .... out came a few leaf stamps and I added some foliage around the edges ...... love this vine from Dylusions


And Carabelle Studio ......


Then came the fun part ...... adding colour using the Pigment Powders.  WOW! these are so nice to use, the colours are gorgeous, the coverage is great, and the shine from the mica is just stunning. I used the green on the leaves with a touch of teal ......


I added a few more butterflies to the background ....... stamped and embossed and then added some colour using the Luscious again .......


There's a little bit of stencilling on there too ..... along with some more stamping here and there


And I finished off by adding some gilding flakes here and there for added shine.

Pages 19 & 20 are not quite so busy ........


This was my take on the prompt .... leave some white space.  There's plenty of space although it's not very white!

IndigoBlu again ..... this time the Giant Poppy stamp ..... love this large bloom!
I simply stamped it off the edge of the pages and heat embossed with a detail white embossing powder ......

I then used a red Brusho to add the colour ...... I wet the petals first using a paintbrush and water, carefully sprinkled on the Brusho pigment and then spritzed more water to spread the colour, trying to keep it just on the flower.  I did this a few times, mopping up the excess as I went along until I got the colour I wanted.
Some of the Brusho did go over the rest of the page and when I added some white paint on the top it gave this gorgeous pinky shade


I added a bit more detail by applying some white crackle paste through my favourite brick wall stencil and finished off with some words from Inkylicious


Things are getting a little bit crazy around here now getting ready for the move ...... the boxes are piling up as we speak. There's lists everywhere, and I'm cleaning for England!!
It's amazing how much stuff you accumulate over the years.  But, we're being ruthless (again!) ...... if it hasn't been worn in the last 12 months .... it's going!  If I haven't used it in the last 12 months ..... it's going (that doesn't include anything in the old craft room by the way!)  And all the kids stuff that we're still 'looking after' well that's going as well!  They can look after their own bits and bobs, they've both got their own places now.  This new house is just for hubby and I ..... we hope!

Thanks for popping by ..... enjoy the rest of your evening.

Cheerio until next time ........

Monday, 4 July 2016

Gold!! .......

Happy Monday .........

And Happy 4th July to all of you in the U.S.A.  I hope your celebrations are going well.

It's time to get a little festive now though with this month's Christmas Challenge over at Happy Little Stampers.  It's only 173 days before the big day ..... sorry!!!

The theme for July is ...... GOLD!!!


There's nothing like a bit of sparkle and shine on your Christmas cards ..... use gold mirri card to accent your designs.  Gold glitter on all those fab die cuts.  Gold embossing powder to give a nice bit of texture ... or what about using Gold Gilding Flakes .... one of my favourite ways to add shine.


I've gone for a traditional, classic look.  CAS, using one of my favourite bauble stamps along with gorgeous, rich gold gilding flakes ........ so elegant!


Gold is hard to photograph though .... especially in this light (we've had a horrible day, it's bucketed down with rain ALL day ...... and it's cold too!)

I've simply stamped the bauble, twice, using IndigoBlu's Flitter Glu then applied my gilding flakes over the top. I polished away the excess flake and I'm left with these pretty, shimmer baubles .... just look at all the detail .....


And so shiny when the light hits ........


A pretty HLS glitter enamel dot in the centre of each one, and then finished off  the front with a festive sentiment (HLS Mixed Christmas Sentiments)


I added more of those gorgeous baubles on the inside too ....


Along with  a greeting from the HLS  Everyday Sentiments set.

As always the challenge is sponsored by the Happy Little Stampers store


And the challenge winner will receive a $15 discount to spend in the store


Well .... that's another card done for the festive box ...... how are you doing with your Christmas cards?

Thanks for popping by ..... enjoy the rest of your day.

We've got a Bank Holiday on the island tomorrow .... it's Tynwald Day, the Manx National Day.
Let's hope the weather's a bit nicer than it's been today ..... it's been bucketing it down all day, and it's cold!  The Tynwald ceremonies, which have continued unchanged, except in detail, for over 1000 years, and the celebrations that follow, all happen over in St Johns, outdoors on and around Tynwald Hill.  Fingers crossed the sun shines ........ we're hoping to have a barbecue!

Cheerio until next time


Monday, 13 June 2016

Getting things back to normal ......

Happy Monday to you .....

It all seems a little quiet over here today ...... no roar of the motorbikes.  
The Isle of Man TT is over for another year ....... it all came to a close on Friday with Senior Race Day, and the weather held out too which was great. Unfortunately Ian Hutchinson didn't make it four wins in a row ...... but he did come in second so he was on the podium ...... Go Hutchy!!
Only 347 days until it all starts again!!

But .... enough of all that ..... it's finished! ..... over with!  Things are slowly getting back to normal over here ..... for a few days anyway.

I had a busy weekend as usual, well Saturday anyway ..... it was workshop time again.
This week, by request, we were getting to grips with Gilding Flakes ...... always fun, and a little bit messy!
Here's what we got up to .....

If you haven't tried Gilding Flakes yet you should definitely give them a go.  They take a bit of getting used to, especially if you use a glue ...... the common mistake is to use too much glue to begin with, then you don't use enough, but, once you've got the knack the results are stunning!


We revisited quite a few techniques this week ..... a bit of masking around the edges to give a nice centre panel, and then masking stamped images to add in detail to the background
.
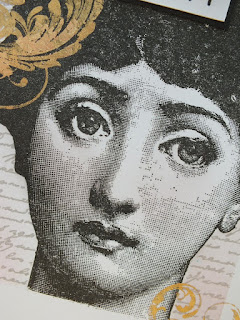
The beautiful Jane from IndigoBlu was stamped onto my centre panel ...... she hasn't been out for a while and I love this stamp!
I then masked over her whilst I added the colour to the background (Worn Lipstick Distress ink), and then stamped over the top using the IndigoBlu Script stamp


Once all the masks were removed it was time to add the Gilding Flakes ..... I used Chariot of Fire, the gorgeous gold colour from IndigoBlu along with their Vintage Flourish stamp


'Ink' up your stamp using IndigoBlu FlitterGlu, stamp your image onto your card ....... remember you are using a glue so don't leave the stamp on the card too long,  it will stick to the card and make a right old mess of your stamps!
Once you stamped your image, place your stamp into cold water and clean off the glue straight away.

Add gilding flakes onto the tacky image, smooth over with the flat of your hand to make sure all the glue is covered, then using a scoochy sponge remove all the excess flake and bring out the gorgeous detail of your stamped image


I added a sentiment ..... stamped twice, once in black ink and once using the gilding flakes, then I cut out the word Beauty from the gilded version and layered it onto the black using foam pads.


A bit of matting and layering, and then to finish off I edged around one piece of card using the FlitterGlu and then dipped the edges into the flake ......


Use the scoochy again to brush away any excess and you're left with a pretty gilded edge.
Use the flake on the inside of your cards too ......


Next, instead of using the flakes as an accent, we gilded the main image .......


A bit of acetate smooshing in the background ......


And then the flake over the top ..... Copper Kettle this time .... just look at that shine


You can add flake onto your double-sided tape to give you the look of gilded ribbons


And again .... use on the inside


We finished off with a full on gilded, two colour, Christmas card.  Yes ..... we've started making for the festive season.  Well, gilding flakes are perfect for Christmas cards, they look so rich


I did a similar design to this last year ...... love the stamp (Connor's Crown Jewels), will always be a classic for your Christmas designs and this is so simple to do.
Stamp the image using the FlitterGlu, then carefully add the gold flake to the centre, placing the flakes over the baubles.

 
Then add one of the silver colours around the edges.  I used Gin and Tonic, which has a few different colours in there,  but you could use Winter Dawn or even Sheffield Steel for a more solid silver.

A festive sentiment on the bottom and you're done


I won't tell you what my kitchen was like when they'd all finished but, I opened up the dishwasher this morning to empty it and what was on the bottom of the mugs ..... you guessed it .... gilding flakes!!! They do get everywhere ..... but they are fun to use.
Now I just need to get my thinking cap on for next month's workshop.

Thanks for popping by .... enjoy the rest of your day.
It's back to the old craft room for me ..... lots to get done before I close the door on Thursday evening.
Then we're all off to the UK for our little family break down in the lovely Cotswolds ...... can't wait.


Bourton-on-the-Water here we come!


Cheerio until next time