Showing posts with label Faux woodgrain. Show all posts

Thursday, 8 June 2017

Sweet Poppy Stencils ......

Happy Thursday .......

It's almost the weekend .... and, this time next week, hubby and I will be across in the UK, at the BBC Good Food Show at the Birmingham NEC .... not that I'm counting the days!!!
It's nearly time for our annual, post TT, family getaway ....... I mentioned a while ago that this year we're all going on a boat on the Norfolk Broads.  Well hubby and I decided to go across a few days early and catch the Good Food Show.  We haven't been for a while so we're really looking forward to it.  We can stock up on goodies for the boat trip too!!

There's still lots to get through though before we go ....... Blog Challenges, a workshop at the weekend and we've still got the TT Senior Race Day to come tomorrow.
And there's the Poker Stars Summer Party this evening ....... thank goodness there's no early start in the morning, we've got a Bank Holiday!!


Remember last week ..... Lucy, from Sweet Poppy Stencils, was back on our TV screens, with more fabulous designs and great demonstrations.
I gave you a sneaky peek of a few of my samples for the show ......


Well here they are in full if you fancy a closer look ...... grab a cuppa, there's a few photos!

First up ...... the gorgeous Poppies, such a beautiful stencil.


I've used it here on a faux woodgrain background from my stash ....,,,,


Stenciled the design twice, using the Glossy White stencil medium from Sweet Poppy and then sprinkled with a couple of colours from the range of Sweet Poppy Fine Glitters over the top whilst the paste was still wet .....


Same stencil, this time using Distress Oxide inks .......


Again using the stencil twice to fill in the piece of card .....


I love the soft chalky finish to these inks, and they work so well with the stencils


A simple sentiment is all you need to finish off.


Poppies again ....... different look.


Black paste on white card with a splash of colour ...... simple

Next up, that gorgeous Humming Bird Duo ........ love this!


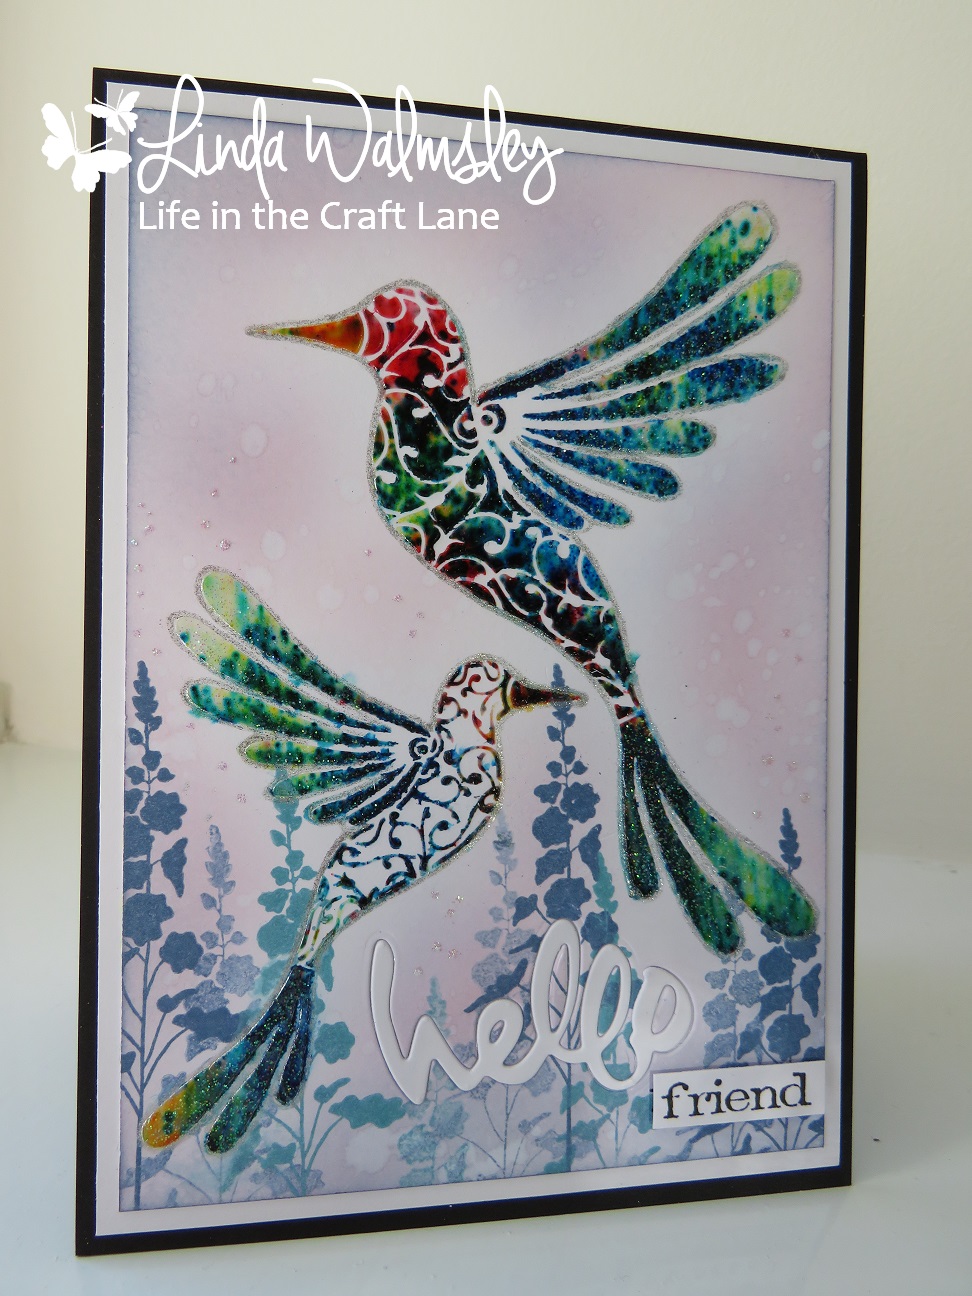
For this design I used Brushos and Gel Medium
I sprinkled various colours of Brusho through the stencil and then went over the top with the Gel Medium .... like you would with the stencil paste.  The Gel Medium reacts with the Brusho and the colours spread just like they would with water


Whilst the gel was still wet I sprinkled over some Crystalina glitter, juso onto the wings and tails of the birds


Once everything was dry I added some colour to the background using Distress Inks and stamped a little bit of foliage across the bottom, using one of the gorgeous Lavinia stamps


A simple greeting finishes it off nicely ...... partly stamped and partly die cut .....  inlaid with a white version to add a bit of contrast


Here are the birds again ... just the small one this time.


Using the same technique as above, with the Brushos and the gel, and then fussy cut before attaching them onto my card.


The background has been stencilled using another gorgeous Sweet Poppy design ..... one of my favourites in fact ....... Black Orchid 


Don't always use the whole design of the stencil, sometimes it's just nice to add a little piece of it to create backgrounds, or like the humming birds .... mask off one or the other and just use a single bird .....


A simple smooshed Distress Oxide background, the large humming bird stenciled with the white stencil paste and then sprinkled with fine glitters ..... simple


The detail is amazing on these designs ....... and just look at the sparkle from the glitter


All that's needed to finish it off is a sentiment .... stamped and heat embossed with clear embossing powder ......


The last one is using the Tall Trees  .........


Like I said .... don't always use the whole of the stencil.  Here I've just used some of the leaves and branches to decorate a frame around my sentiment


I took a piece of cardstock from my stash ..... cut it into a frame and used the white stencil paste to add the design


More of those gorgeous Sweet Poppy glitters were sprinkled onto the wet paste ..... there's such an amazing range of colours to choose from.
A simple sentiment, stamped and heat embossed in gold, onto a piece of card from my bit box (previously coloured using Brushos) creates the centre piece.


Phew!!! ....... I think that's the lot.

Thanks for stopping by .... enjoy the rest of your day.
I've still a list of things to get done, and a party to get ready for ..... hmmm .... what shall I wear?

A quick TT update ...... it's another wet and miserable start this morning, there is racing scheduled for later so let's hope the weather brightens up a little ..... I can't see it happening though!
We had a good day yesterday though, the sun shone and racing got underway as scheduled ...... 3 races plus qualifying sessions for the bikes and sidecars.
Unfortunately we didn't get to see any of it, hubby was working.   I spent the day in my craft room though so I could hear the bikes roaring around the track.
Hutchy won again .... this time in the Superstock.  That's TT win number 16 for the Bingley Bullet 


photo from the IOM TT Official website
Unfortunately there was also a sad side to yesterday ..... there were two incidents during the day where two riders lost their lives ..... that's now three from this years meeting.  My deepest sympathy goes out to all their loved ones, families and friends.  These men are the bravest people I know ..... it scares me going round the track in a car .... all I can say is they've got b***s!

Cheerio until next time .......

Tuesday, 18 April 2017

Sweet Poppy Stencils have moved .......

Happy Tuesday to you ......

I hope you all had a nice Easter.  We had a fab time with family and friends ..... very relaxing.  And I didn't eat my bodyweight in chocolate for once! Made up for it with the Hot Cross buns though. Never mind ..... the diet starts now (again!)

If you're a fan of Sweet Poppy Stencils ..... and let's face it who isn't! ....... you may have heard that our lovely Lucy and the team have moved ...... TV channels that is.  Sweet Poppy are now going to be on HOCHANDA  ..... yeah!!! (Sky 663 ....... Freeview 85 ....... Freesat 817)  Their first show is on Friday this week ...... April 21st 1pm and I think it's 6pm I will check that though.

There's brand new stencil designs and there'll be demonstrations full of fabulous tips and techniques from Lucy.
The Design Team have been busy too ..... here's a couple of my samples using one of the new designs.

I know I shouldn't really have favourites but, I do love this design ..... the pretty Delphiniums


It's a nice sized stencil with great detail ....... use it as is with your inks, paints or texture pastes onto your favourite backgrounds to create quick and easy cards ......


I've used the faux woodgrain technique here ........ pva glue onto cardstock and left to dry.  Scored lines on the back of the card (side without glue) then Distress Ink (Weathered Wood) applied directly over the glue covered side ...... love this effect


I then used the stencil along with the Glossy Black embossing paste  directly over the top ..... look at all that pretty detail .... gorgeous!


A few dots of glitter glue to the centres of the flowers adds a touch of sparkle and I finished off the front with a simple stamped strip of card across the bottom.


I added just one of the blooms to the inside of the card ..... again using the black paste and a touch of glitter glue


OK ...... same stencil, but a completely different look ...... I love how this turned out


Again really simple to do ....... using a couple of different shades of blue Distress ink and the Glossy White paste this time

I used the new Faded Jeans Distress Oxide ink to colour the background.   I'm loving these new inks .... they're so different to the regular Distress but you can still do all the fab techniques with them.
I simply smooshed the ink directly onto my craft sheet, spritzed with water and then swiped a piece of white cardstock through the ink.  I repeated this until the whole piece of card was covered then I dried it off with a heat tool.  Love the effect


Using regular Distress ink this time I applied Chipped Sapphire through the Delphiniums stencil, applying more ink in places to give a little shading, and repeated the design across the whole of the card.

I then die cut the word 'happy' from the card, and again from a piece of plain white cardstock and a piece of black, giving me three layers all together


I inlaid the plain white one back into the stenciled card making sure to put all the little pieces from the coloured card, that would normally end up in the bin, back into place ....... the centres of the letters and the piece from the gap in between the a and the p.  Even the tiny bit in between the two p's had to go back in.  I know this seems a little fiddly but, it needs to be done to complete the finished scene ..... you don't want any gaps! Hope that makes sense!

The black 'happy' and the one from the stenciled card were then layered together, and put to one side whilst I added more delphiniums using the paste ......


You can see I covered the white paste with fine crystal glitter .... this looks so pretty and gives a nice delicate look to the flowers


The 'happy' was then put in place .... you can see I slightly off set the two layers to give the look of a shadow and I finished off by stamping the second part of the sentiment just underneath


Again I used the stencil on the inside .......


Don't forget to tune in on Friday to see Lucy work her magic.  I will confirm the times with you later in the week when I'll be back with a few more designs for you using more gorgeous Sweet Poppy stencils.

Oh well .... as much as I'd love to stay and chat the 'To Do' list is calling.  Lot's to get done this week ..... and there's only 4 days!!!

Thanks for popping by ..... enjoy the rest of your day.

Cheerio until next time