Saturday 23 May 2020

Sweet Poppy ..... part 2

Welcome to the weekend! .......

It's a long one too!
Before we head off for our weekend away, I just want to share with a couple more ideas for using your Sweet Poppy Stencils
Did you manage to see Lucy on the TV yesterday ....... there must have been a few of you watching because they were busy shows.  Glad you like the stencil designs.

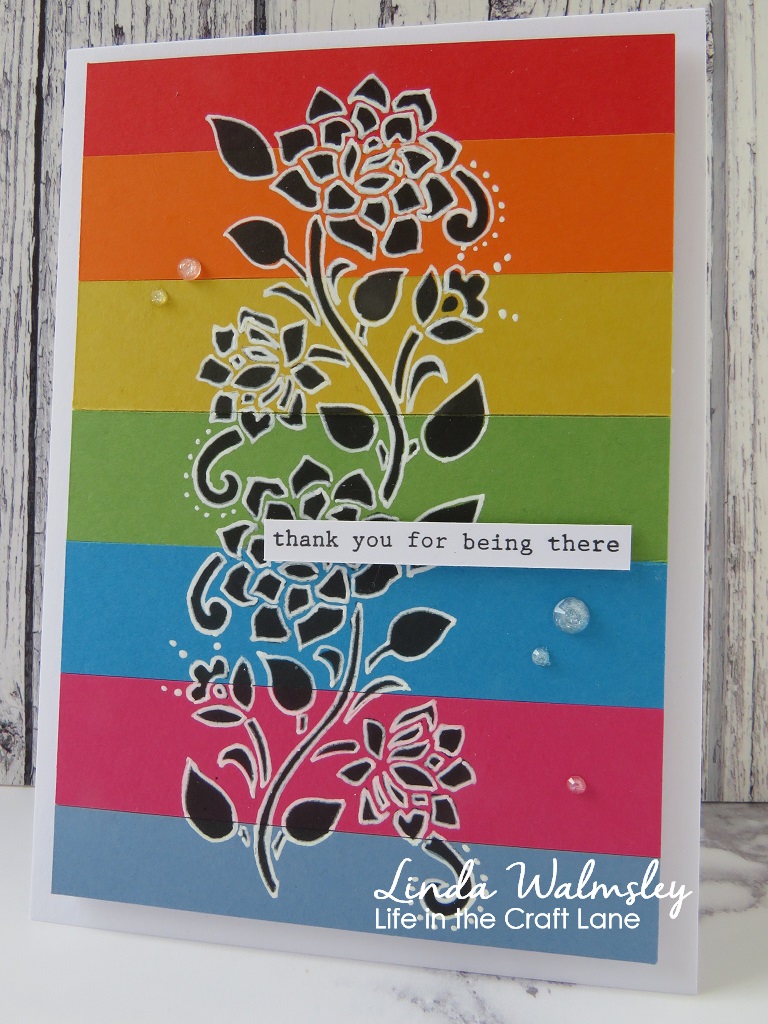
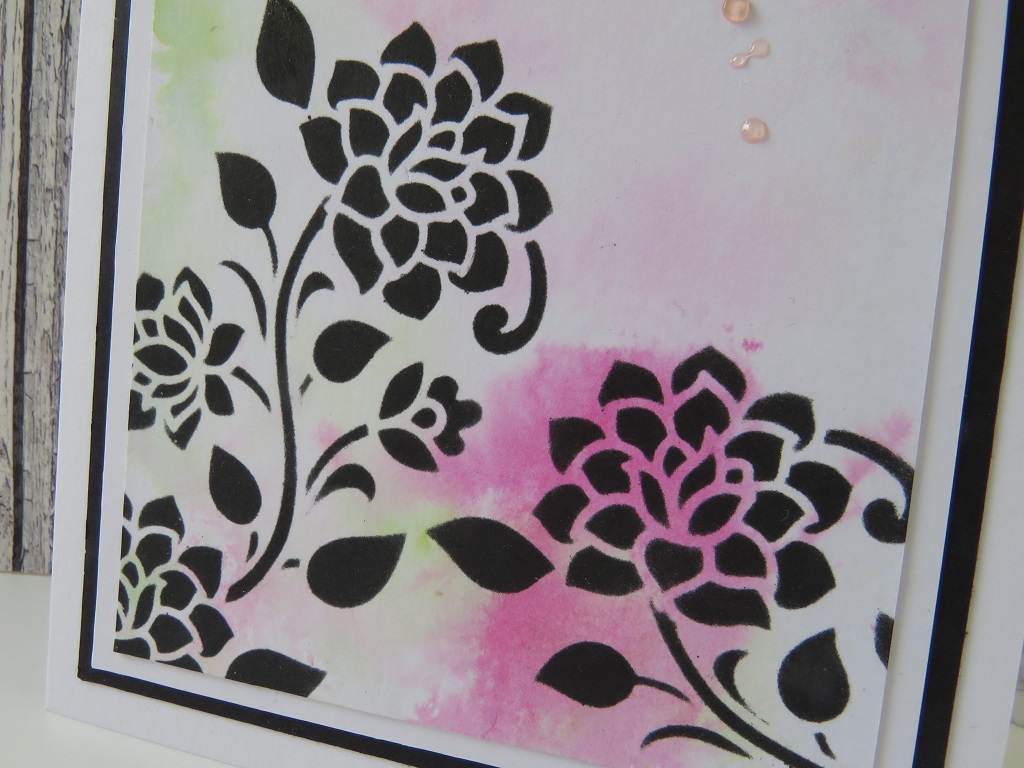
The brand new one from the show was the pretty Dahlias ....... I love this new design.  How pretty does it look as a background ........


I painted a piece of white cardstock using a couple of different shades of blue acrylic paint to create a sort of weathered look (I used PaperArtsy's Fresco Finish paints ...... they dry really quickly and give a lovely matt finish)

I then stenciled the Dahlia over the top using an Archival Ink  (I think the colour was Cornflower Blue).  By simply rotating the stencil in different directions, I was able to cover the whole piece of card  to create this pretty, tone on tone background


I then used one of the Sweet Poppy word dies to cut out part of my sentiment ..... once from the stenciled card and three from a piece of plain white card


I then inlaid one of the white die cuts back into the stenciled piece and layered the rest on top, finishing with the coloured one.  This adds a little dimension to the die cut and camouflages it a little .... I do love this technique! The rest of my sentiment was stamped and added underneath.

Why not use your stencils to create pretty pieces of home decor .......


Again, acrylic paints to create the background ...... a bit more colour this time


Stencil the Dahlia over the top using white paint ......


Once it was dry I drew around the edges using a white gel pen ......


added a few paint splatters and a simple sentiment


I then painted a larger canvas with black paint.  To add a bit more detail and to frame my centre piece I stenciled the Dahlia top and bottom using a Black Archival ink.  Because the black paint is a matt finish and the ink dries slightly shiny, you get this pretty delicate tone on tone look .... very subtle.  It's there, but it's not, if you know what I mean ..... I love it!


Well that's it from me today.  I hope I've given you a few ideas for using with your stencils. 
Enjoy the Bank Holiday weekend.

I'm off now to finishing packing up the van, then we're off up north!  Ballaugh to be exact. 
Because of the lockdown this is our first real adventure in the motorhome.  We'll probably forget something and no doubt make a few mistakes but hey! it'll be fun!  I just hope the weather brightens up a bit.  It's a little windy out there at the moment so we won't be putting the awning out!  And I think the forecast is for showers later but, tomorrow looks OK.  Plus, the weather always seems to be better in the north of the island.   And I suppose if it does get really bad, we can always come home!

Thanks for popping by ....... enjoy the rest of your day.

Cheerio until next time ......

Friday 22 May 2020

We're having a weekend away ....... social distancing of course

Happy Friday .......

How are you? ..... Are you doing OK?
It's a Bank Holiday weekend again here ...... and guess what ..... we've booked the weekend away, in the van!!!!  More about that later.

Did you get to see the lovely Lucy from Sweet Poppy Stencils this morning?  She was back on Hochanda with some fab stencil designs.  Don't worry if you missed the show, she's back again at 1pm so set a reminder.

One of the stencils on the show, and one of the latest designs, is a beautiful Dahlia ......... if you love your florals then this will be perfect for you.
Lots of ways to use it too ........


Use the design in full ........


For an easy rainbow look, cut strips of coloured cardstock (also a great way to use up scraps of card) and attach them onto a piece of white card ...


I then used the Dahlia stencil over the top with black archival ink.  Once the ink was dry I drew around the edges with a white gel pen to make the design stand out more ......


A simple sentiment was all it needed.


Another way of using the full design ....... this time I went across my card


I masked off a strip across my card (Sweet Poppy Stencil tape was the perfect width for this) giving me a space to add a sentiment .....


I then placed the stencil along the top edge, overlapping the tape slightly, and inked the design using Distress Oxide Inks.  I did the same along the bottom edge ........


and finished with a sentiment.

As I always say with stencils, you don't have to use the whole design.  Change things up a little and  just use part of the design ........


I found this pretty mop up piece of card in my stash ...... I do love pink and green together


I used the dahlia stencil, with black ink, randomly over the top, and off the edges leaving a space in the centre for some words


I love the look of black ink through stencils. Just remember that less is more ..... build up the depth of colour gradually.  You can always add more ink ..... you can't take it away! 
Plus, if you only use small amounts of ink, and build up the layers by pouncing the ink through the stencil you will get a much cleaner finish to the design ........ more ink means more chance of it seeping underneath the stencil.

I heat embossed my sentiment across the centre using gold embossing powder .....


and added a few Nuvo Crystal Drops to finish.

There's still a couple more ideas to show you but I'll leave those for another day.

Grab a cuppa, or even an early lunch, and watch Lucy at 1pm for more fabulous ideas for using your Sweet Poppy Stencils.

Hochanda ...... Sky channel 673  Freeview 85  Freesat 817

Thanks for popping by .... enjoy the rest of your day and have a lovely long weekend.

We're finally getting out in the motorhome ..... whoo hoo!!
Campsites on the island have been allowed to open so we've booked a couple of nights up in the north of the island.  We're off to Ballamoar Campsite in Ballaugh. 
The weather forecast isn't great but hey! we're just happy to be able to take the motorhome out finally ......... sticking to social distancing of course.

Cheerio until next time .........

Friday 15 May 2020

A Happy Hello and Birthday Balloons .......

Happy Friday .......

The weekend is here again!  Although I thought it was Friday yesterday, and then today has felt like Saturday so, my weekend is almost over!
  
It's time to give you a little reminder about this month's CAS challenges.
First up ....... the CAS Mix Up Challenge.

I'm Hosting this month and the theme is Gesso Resist


This is just another fun way using gesso.

If you're still not sure about the technique, check out the CAS Mix Up Blog for links to some really useful videos.

Gesso is great for stamping with, especially when doing the resist technique.  You just have to remember to clean your stamps straight after use .... don't let the gesso dry on there.

I've used an old Penny Black, wooden stamp here. 


I simply put the gesso onto a craft mat, brushed it out to a thin layer and then used it like I would an ink pad to ink up the stamp. 
I then stamped the image randomly over a piece of watercolour cardstock ......


Once the gesso was dry, I spritzed over the top with Distress Ink sprays and let the colours sit for a while.  I then mopped up the excess and the stamped images started to show through.
I repeated the sprays until I got the depth of colour I wanted.

Once that was dry, I used a circle die to make my topper.  I stamped a sentiment, added a touch of pen work using a white gel pen and a few sparkly gems


To add a bit more interest to the card, I used the same floral stamp to add the design to the actual card.


CAS Stencil challenge next ......


This month is all about Layering your stencils ........

Again, if you need to know more, check out the CAS Stencil Blog for links to some great videos

I've gone for a really quick and easy design here, using just one stencil but, layering the balloons over the top of each other .......


I used various colours of Distress Inks, applied through the stencil with blending brushes, across the bottom of my cardblank


I added a simple sentiment above ......


And finished off with a few ink splatters


The CAS Challenges are open until the 24th of the month so there's still lots of time to join in the fun.

Just to let you know that from next month (June) there's going to be a few changes to the CAS Challenges. 
Three of the challenges are coming together to make up a new CAS Mix Up Challenge which will include Mixed Media, Stenciling and Watercolour.  More details will be in June's CAS Mix Up post.

Thanks for popping by ..... enjoy the rest of your Friday and have a great weekend.

Cheerio until next time .......


Products used:
CAS Mix Up
Stamps: clique (Penny Black); Happy Mail (Gina K)
Inks: Distress Ink Sprays - Picked Raspberry, Mustard Seed, Spiced Marmalade; Versafine Clair - Nocturne; Catherine Pooler inks - Party Dress, Tiara, Tiki Torch
Others: White Gel Pen; Nesting Circle Die; Clear Gemstones

CAS Stencil
Stencil: Balloon stencil (Uniko)
Stamps: Tiny Words - Birthday (Mama Elephant)
Inks: Distress Inks - various colours: Versafine Clair - Nocturne; Gold and Silver Delicata inks for the splatters
Others: Black gel pen

Thursday 14 May 2020

Perfectly CAS Challenge ......

Happy Thursday evening ......

How's your week going?  It's flown by here, although I don't seem to have done much!
I did spend two days obsessing over another jigsaw puzzle until I got it finished! It had far too many pieces that all looked the same.
I've got a nice new vaccum cleaner to play with ........ oh no! I think I have lockdown fever.  I'm getting excited about housework!
Oooh! and I dyed my hair.  Cutting is what it really needs ....... I look like something from the eighties when big hair was in, but since the hairdressers are not allowed to open yet, I don't mind doing the colour but I'm not going in with the scissors!   

It's time for another Blog Challenge ........ this month's Perfectly CAS (using one third or less) Challenge


Is Clean and Simple (CAS) your go to style ....... or do stay well clear of all that white space?
Me ..... I love it, although CAS designs are not always that easy to create.
Keeping to the one third rule does help though ........


Imagine your card is divided into sections like in the diagram above ...... three across and three down.
Simply choose one set of three and keep your design in your chosen section ...... does that make sense?
Stick to one main focal point, minimal layers and embellishments, lots of white space and you're good to go.

This month's theme is ....... Animals.
I couldn't decide on just one so, I used a stamp that has a whole bunch of different ones on there ..... how cute are these guys!


I lined everything up on my MISTI and stamped the image and sentiments all in one go ...... what did we ever do without a MISTI!
I heat embossed everything with a clear, fine detail embossing powder, and then I used ZIG markers to add the colour ..... easy!


Doing the heat embossing makes it a little easier when colouring in the images ....... helps to stop the ink from going outside the lines!


Keeping to just one third of the available card space, or there abouts, means that the finished card is Perfectly CAS!

Go on, play along.  I'd love to see you in the gallery.

Thanks for popping by ....... enjoy the rest of your day.
Hubby and I are about to settle down and watch another of our lockdown obsessions ...... the TV drama series The 100.


We've binge watched the first three series on Amazon, only 3 more to go!

Cheerio until next time .......


Products used:
Stamps: Critter Crowd (Simon Says Stamp)
Inks: Versafine Clair - Nocturne
Others: Clear Embossing Powder (WOW!), ZIG Clean Color Brush Markers

Monday 11 May 2020

Time for a change ...........

Good morning .......

It's Monday again ...... another week of lockdown.  Although there are a few changes coming here on the island.
Our borders are remaining closed but, I think garden centres are opening to the public again from today, with social distancing measures in place.  And I think they're also looking at possibly opening some non essential shops soon.  Not that we can go anywhere, not until the end of the week anyway.
We've been in 14 days of strict isolation after hubby got tested for Covid the week before last.
He's fine now, the test came back negative, but he had me worried there for a while.
We haven't been in contact with anyone for weeks so we've no idea where, whatever it was he had, came from ...... it was weird!
That, on top of a whole load of other stuff that's going on at the moment, it's not been an easy couple of weeks.  Onwards and upwards though!

One big decision I've made is ..... I'm standing down from the Uniko Brand Ambassador Team.
It wasn't an easy descision to make, but I think I've done the right thing .... for me anyway!
I've loved been part of the Uniko family ...... can you believe it was back at the start of 2018 when I did my first post on their blog ..... how time flies.

It's been so much fun working with Bev and the rest of the Uniko Brand Ambassadors and I'd like to send a big Thank You to them all for giving me the opportunity to be part of such a fabulous team.

It's always a pleasure to work with the Uniko brand.  Here's a few of my favourite makes from the past couple of years ........

There's fabulous stencil designs ....... the leaves are a particular favourite of mine!


And a whole load of beautiful stamps .......


It's definitely been a fun two and bit years, and I wish Bev and the team all the best for the future!

Thanks for popping by ..... have a great week.
Stay safe and well.

Cheerio until next time ........