Showing posts with label PaperArtsy Fresco Finish paints. Show all posts

Wednesday, 21 April 2021

A rainbow of colour ........

Happy Wednesday .........

How are you? 

It's all good here at the moment ........ fingers crossed!
Our latest lockdown restrictions were all lifted on Monday (yeah!)  A new exit plan for opening our borders was published yesterday (whoo hoo!!) ....... roll on the end of June!  We've booked a family holiday Staycation, and a long weekend away in the van.  And ..... we're off out this evening for the first time in what feels like FOREVER!!  It's nice to be getting back to normality!  
I say fingers crossed because, I've just heard on the local news that there are new unexplained cases of the virus on the island that have been detected overnight ........ lets hope that further investigation doesn't bring bad news!! 

Anyway, the reason I'm here is  .......... I'm playing along with the CAS Christmas Challenge again ....... sneaking in another festive card before the deadline.


The theme is ...... Rainbow.  Not something I would normally think of for festive designs but ..... it works


Who doesn't love pretty fairy lights, and these would brighten up any Christmas tree!

I stamped and heat embossed the fairy lights onto a piece of white cardstock, and then coloured them using ZIG Clean Color Brush Markers and a waterbrush


I added a touch of fine crystal glitter to each of the bulbs for a little added sparkle,


 and used a silver gel pen and my waterbrush to colour the tops


I used a fancy stitched edge die to add extra detail to the bottom, and trimmed my stamped image to match 


A simple sentiment, stamped underneath and heat embossed, adds the finishing touch.

I've enjoyed creating the rainbow designs for this challenge but, I think I'm still more of a traditional girl when it comes to my festive cards!

Speaking of rainbows, here's a colourful idea for this month's CAS Mix Up Challenge .......


It's not the usual form of paper piecing but I think it would pass.  
I haven't actually stamped an image and paper pieced it, instead I've cut the petals from an old book page and then pieced them together to make my flower ...... could be a daisy, or a sunflower maybe.


I took an old book page and coloured it using various colours of acrylic paints.  
I used my finger to smoosh small patches of colour but you could use a brush ........ I've done a few too many workshops with the lovely Tracy Scott I think, she loves to finger paint!  It's such an easy way of applying colour, and you don't have to be too careful either for this technique. 

I stamped on top of the painted page using a few background stamps to add some more detail and interest ...... another technique picked up from Tracy


I then cut myself a template for the petal shape ...... you could cut your petals freehand if you prefer. 
I concertina folded my painted book page to fit my petal template, drew around it across the width of the paper and then cut out the petals. 

I arranged the petal shapes to form the flower on the edge of a piece of black cardstock.  Once I was happy I glued each one into place, trimming off any excess.


For the centre of the flower I cut a circle from another book page and glued it over the top. 

I added some white gel pen around the edges of the petals to make them stand out,  and finished with a few splatters of white paint


A simple heat embossed sentiment was all it needed on the bottom 
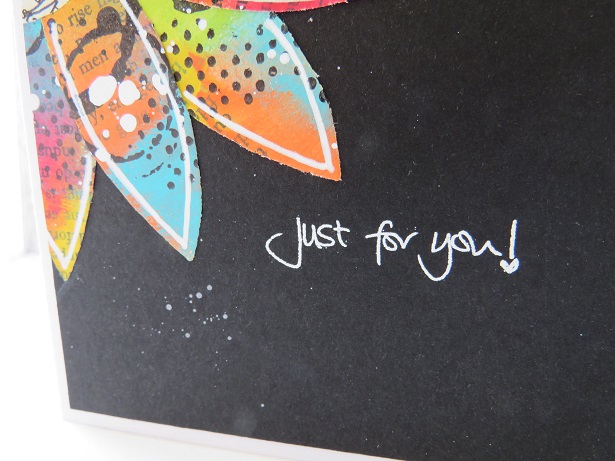


Both challenges close on April 24th so there's still a little time left if you fancy playing along.

Thanks for popping by ...... enjoy the rest of your day.

Cheerio until next time .......


Products used:
CAS Christmas card
Stamps: Outline Christmas Bulbs (Simon Says Stamps); Sentiment was a freebie I think
Inks: Versamark ink;
Other: Metallic Platinum Embossing Powder (WOW!); ZIG Clean Color Brush Markers; Quickie Glue Pen; Fine Crystal Glitter, Silver Sparkle Gel Pen; Fancy Stitched Edge die (not sure of the make)


CAS Mix Up card
Stamps: Various background stamps from my stash; Sweet Daisy stamp set (Julie Hickey Designs) - for the sentiment
Inks: Versamark ink;
Other: Old book pages; PaperArtsy Fresco Finish Acrylic Paints - various colours; White embossing powder (WOW!); White gel pen

Tuesday, 30 March 2021

Journaling is keeping me sane ......

Hello again ........ Happy Tuesday!

Just taking a quick break from cleaning the craft room, so I thought I would share some recent pages from my art journals.

I've been catching up with some online workshops again, getting messy with paints and inks and learning some fun techniques.
The following pages are from Tracy Scott workshops, done via Facebook.  I know I keep saying this but, if you haven't tried one of these yet you need to sign up! 
The workshops are done as Facebook Lives but, you don't need to watch live.  If you'd rather play along and work at your own speed then the videos are always going to be there on replay so you can watch, and rewind as much as you like.

The first two were monthly journaling classes ......  Fresh as a Daisy (which I think was March)


Done in one of my large Dylusions journals, so the flowers are very big and bold ..... love it!


And this one, which I finished yesterday (it's only taken me about a month!!) was from back in February ...... Autumn Leaves


Another large Dylusions journal, across two pages this time.

The tree is hand drawn and painted ..... I surprised myself there!  
And then the leaves have all been cut from a sheet of hand made collage deli paper (another first!) and attached over the top ...... really pleased with this one!


But, I think my favourite workshop done recently has to be the gorgeous Geisha ........ (still can't believe I drew this!!)


This was a three day workshop and worth every minute!  Tracy makes the whole process so easy by breaking it all down into simple to follow step by steps.  
OK, the finished one is not exactly the same as my practice sheet but, she's still beautiful!


Now she is big ...... I used my Dina Wakley Large Media journal for this one ..... it's about 10 x 14.25 inches, so lots of space to work on.  I got a bit carried away and did another double page spread, with a little inspiration from a JOFY project.  


The fan was part of the workshop with Tracy, and is attached with Velcro so it can be removed ..... clever eh!


Thanks for popping by ..... enjoy the rest of your day.
It's the last day of March tomorrow ...... a quarter of the year done already!  A new month means new blog challenges so I'll be back again later in the week.

Cheerio until then ........

Friday, 7 April 2017

Wish upon a Star .......

Good morning and a very Happy Friday to you .....

It's the weekend again .... whoo hoo!
Not only that, it's the first Friday of the month and we all know what that means ....... yes it's new challenge time over on the Craft Stamper Blog.
As always the theme is Anything Goes .... as long as there's rubber stamping on there somewhere.

I've got a little 3D project for you today ........ using the Mini WhimsyGirls stamps, designed by Craft Stamper's very own Trish Latimer.  How cute are these little ones!!


I've had this block of wood sat on my desk forever, waiting for inspiration to strike.  It was thrown into a box when we moved house ........ finally got unpacked again and sat back on my desk waiting to be altered.
Well ...... here it is finally.  These little stamps were just the perfect size.  Actually, they're called minis but they're not that small ...... the block is about the size of an ATC (9.5cm x 6.5cm and it's about 4cm thick so a nice size)

I gave the block a quick coat of gesso then painted it using PaperArtsy Fresco Finish Paints ......


and then added some splatters of pearlescent paint in silver, blue and gold.

I stamped the Whimsy Girls onto white card stock and coloured them using Zig Clean Color Brush pens

There's two little cuties in this set and I used both ......


The girls were fussy cut and attached onto the block using foam pads ....... how cute is this little angel


I finished off the block with some crystal stars to the sides


and white rub on's to add the words


The feet are actually old wooden beads given a coat of white pearlescent paint and attaxche dto the bottom of the block


And I added an old wooden drawer handle on to the top


As always we have a challenge sponsor, and this month it's the fabulous Visible Image


And guess what ..... the challenge winner's prize is an amazing 3 .... yes THREE!!! sets of Visible Image stamps ..... WOW!!

Don't forget there's a Design winner too .... chosen by the DT.  The prize up for grabs there is ....

  • their winning project will be published in the Craft Stamper magazine
  • they will be invited to be a Guest Designer on a future challenge ..... and
  • they get a Winner's profile on the Blog!
What are you waiting for ...... create something fabulous!

Thanks for popping by ..... enjoy the rest of your day and have a great weekend.

I'm off to the old craft room to put the finishing touches to a workshop for tomorrow.  I'm surprisingly bright this morning considering ..... we had a great time at the IOM Beer Festival yesterday and then a fantastic meal out with a group of friends.

And guess what .... we're doing it all again this evening.  No beer festival ...... just a birthday!

Cheerio until next time .....

Tuesday, 10 January 2017

Pages 5 ..... 6 .... AND 7!

Happy Tuesday ......

Hope you're enjoying your evening.  Just had dinner which was delicious, even if I do say so myself, so hubby and I are chillin now ..... he's going after bad guys on his latest computer game so I thought I'd spend time with my blog buddies .....  we're also finishing off the bottle of red we opened ..... or is this the second one. It's been a long day!

It's also been a busy few days in the old craft room .... DT stuff to do, I've been playing around with a canvas, more about that later, and I've even found time to mess around in my journal.
Pages 5, 6 and 7 are done and number 8 has been started. Still not caught up completely but it's fun trying .....  we'll get there!

Page 5 ....... the prompt for the day was 'pinkish' ..... think I covered that one


Quite a simple page.
I painted both sides of my journal page spread using the same colours (PaperArtsy paints again) ........ this makes things easier I think.
I then used the Wendy Vecchi Heart stencil ....... both the outside piece, to ink the heart in the centre (I used Worn Lipstick Distress Ink for this) and also kept the stencil in place whilst I stamped the script onto the heart to give it a bit more interest.


I then covered up the heart in the centre with the inny part of the stencil whilst I added some detail to the background


 The words were stamped and heat embossed in white .....


And I finished off by 'splatting' distress stain straight from the bottle on the journal page .... love doing this!

Page 6 ..... the other half of the pink spread


Back to using old book pages again (something else I love doing!).

Stamped my blooms onto the book pages and fussy cut them ..... love these flowers from PaperArtsy!


I also used more of the stamps from the set to add some detail to the background


The large word is also on the set too ..... perfect finishing touch!


Pages 7 and 8 were coloured together, this time using Brushos


Before I started with any colour I used my stamps first, directly onto the journal page, with a Versamark ink and then heat embossed the images with a white detail powder (page 8 isn't quite finished so you'll have to wait a little longer to see that one)


I then sprayed the right hand side of the journal with water, sprinkled shades of blue Brusho on the top and then closed the book and let the pigment and water do it's thing.
This was repeated a few times until I got the colour and the coverage I wanted ..... mopping up any excess in between with a piece of kitchen roll.
Love how the white embossing acts as a resist to the colour ......

The paint brushes are a stencil, with white embossing paste, applied once the Brusho background was dry


And then I finished off with some more of those Distress Stain splatters ......


Hmmm ...... what shall I try next?!?

Thanks for popping by ...... enjoy the rest of your evening.
Apparently we've been forecast snow for the end of the week. On high ground that is, with a chance of it falling lower.
Not only that, the ferries may be cancelled again tomorrow due to bad weather ....... gales I think, so things could get a little exciting here towards the end of the week.  If the boats don't go then everyone will be panic buying again ..... the supermarket shelves will be empty.  Time to stock up on the essentials I think .... more wine?

Cheerio until next time .....

Saturday, 7 January 2017

More from my journal .......

Happy weekend .......

What a nice, quiet relaxing day we've had here.  The weather's still a bit grey and damp so we decided to chill at home.   A lazy morning with my new Stampin Up! catalogue .......  more things to add to the wish list! I did pop into town briefly this afternoon ..... I had a few bits to pick up and I also managed to grab a couple of bargains in the sale ..... not like me at all!!  And we've had the little man today,  so lots to keep me busy there ........ I'm getting quite the dab hand with Meccano!!
I even managed to sneak a little time in the old craft room too ..... so all in all, a very productive day.

If you read yesterday's post you'll have seen that I've made a start in one of my Dylusions Art Journals ..... I've finally plucked up the courage to get some ink and paint in the small one and I'm loving it!
In the past I've always done things on loose pieces of card or paper .... I didn't want to 'spoil' my journals but ..... enough is enough.  It's time to get over it .......  and just do it!!
 
It's all thanks to the lovely Jennie Boxall who has started up Creative Journaling 365 on Facebook. A group dedicated to journaling 365 days of the year ..... not sure I'll manage that but hey, I'm giving it a go!
There's no rules to follow, you can do as much or as little as you like and you can share your pages in the group.  There's already lots of fabulous artwork on there ...... great ideas from everyone, and if you get really stuck then Jennie does give a prompt each day when she shares her artwork, but you don't have to use it ..... you can just do your own thing.

Here's pages 2, 3 and 4 .... still haven't finished number 5 yet!

Page 2 ....... stencils


This is the ARTplorations Happy Flowers stencil from STAMPlorations.
The background was already coloured .......... see yesterdays post for products used  - I did both pages in one go!  The only difference is I didn't use the texture paste in the background, I used it through the main stencil instead.
White texture paste ..... then once it was dry, I put the stencil back in place and used Distress Inks to add colour


The words are form a JOFY set stamps, simply stamped onto white card and then cut and arranged over the page


I finished off with some black gesso splatters  across the page and added a few lines in the corner using some white paint applied with the edge of an old credit card


Page 3 ........ my current favourite ...... using scraps of paper


How cute are these guys ..... JOFY's lovebirds
I've used old book pages for the birds, coloured with Distress Inks ......


and scraps of designer papers found in my bit box for the bird house .....


and the leaves ....


The branch (another JOFY stamp) was stamped and embossed, and then coloured using Distress Ink


and the words are one of my favourite phrases from a set of Dylusions stamps.


You can see I've cut the individual lines and arranged them over the whole page.


Page 4 ....... large and small


Still keeping on the subject of wings I went for butterflies this time ..... lots of them, in different sizes.

Before I started stamping I stuck in a couple of bits of torn bookpage and painted over them, not too much as I still wanted to see some of the text in the background.
When this as dry I started the stamping.  First up I stamped the largest butterfly and embossed it using Ranger's Liquid Platinum EP .... love this! Then using simple masking to create a bit of depth, I stamped the rest of the butterflies across the page


I added in a touch of stenciling to the background ......


And finished off with some words ..... you never know I may just hand the words at some point, but for now my stamps are doing the work (my hand writing isn't that good to be honest!!)


That's 4 pages done .... and 5 is nearly finished.  Not sure it'll get done over the weekend though.

Thanks for popping by ..... enjoy the rest of the weekend.
I think a nice glass of red is on the cards for this evening .... it'll go well with the chilli con carne .... cheers!

Cheerio until next time