Showing posts with label mica sprays. Show all posts

Saturday, 4 November 2017

Fancy a festive challenge ........

Happy weekend folks .......

I hope you're having a good one.
I think the festive season has started early here ........ I was out last night at a lovely event ..... a bit of a girlie evening.  It's not often that Lauren and I get to go out together so it was extra special. We had a great time ..... cocktails and canapes at the event, then we met up with hubby and his crew for pizza and pasta, and we finished the evening off in Chris's place.
And ..... this is a scheduled post as I'm out again this evening ....... party animal or what!  I'll suffer for it tomorrow no doubt!

Anyhow .... enough about my galavanting, it's time to get November's Happy Little Stampers Christmas Challenge underway (only a little over 7 weeks to go until the big day .... just saying!)


It's an Anything Goes theme with the optional twist this month of ....... TAG!

Now you know me .... I do love my tags.  And I do really need to get started on my festive makes so here we are ...... a cute little gift tag (just need to make a start on buying the gifts to put it on now!)


A simple black tag spritzed with Perfect Pearls Mica spray to create the wintry sky


I then cut two pieces of white cardstock for the snowy hills, stamped my greeting onto one of them and attached them to the bottom of the tag ....... I did use foam pads to add some dimension


The trees have been stamped onto some coloured card from my stash and then fussy cut and added to the tag to create my little winter scene ......


A few glitter glue baubles to decorate the trees ....


And some holly alongside of the sentiment to finish off .....


All the stamps I've used are from the HLS Christmas Joy set.

Now it's over to you ...... happy Christmas crafting!
And don't forget, there's a prize for the challenge winner ..... a $20 gift certificate to spend in the HLS store

Thanks for popping by .... enjoy the rest of your weekend.
I'm currently at one of my favourite bar/restaurants on the island ..... The Seven Kingdoms.  We're out with some friends so it'll be good food, nice wine and great company ........ with the odd G&T no doubt. Well it is a gin distillery after all!!

Cheerio until next time ......

Saturday, 15 July 2017

The Art Project 2017

Happy weekend folks .....

I've got special little project for you today ........ can't believe I haven't blogged this before, it's such a long time ago!
Last year ..... yes that's right .... last year, I was told about The Art Project that was taking place to raise money for the Manx Cancer Help charity.

The event was island wide and open to anyone.  Over 500 small canvases were distributed to all those who expressed an interest, and the idea was that you decorated it, however you liked.  It could be any design, using any techniques ..... your own personal style.
They would then be showcased and sold to the highest bidders to raise money for the charity.

Now you know me, I'm not normally one for pushing myself forward for anything but I decided to give it a go.
It was way before last Christmas when I first heard about it and to be honest I'd forgotten until the guy got in touch with me to say that he had the canvases and was I still interested, as he would drop one off for me.  Of course I jumped at the chance and here's what I created .......


I couldn't resist using one of my favourite, Finnabair inspired techniques to create this little piece of artwork ..... it's very Me!
It's a cute 5x5 inches in size and I named it Love Life. 


It's full of all my favourite bits and pieces ..... lots of metal embellishments, pretty flowers, gorgeous butterflies ........


Stencils and pastes, shimmery mica sprays, rich metallic waxes .......


 and of course lots of texture, texture, texture!


These canvases are now being showcased at the Hodgson Loom Gallery at Laxey Woollen Mills and I believe it's the last day of the exhibition today.  I might just have to pop up there and take a look.

Thanks for popping by ..... have a great weekend.

Cheerio until next time ......

Monday, 26 September 2016

It's going to be a busy one .......

Happy Monday folks ......

I've got a nice short, but busy week ahead.  Fingers crossed, everything seems to be going according to plan ..... the old craft room is a complete mess, multiple projects are on the go at once but hey .... the To Do list is getting shorter .... slowly!

Hubby and I are off on a trip across to the UK ..... he's booked a few days away up in bonnie Scotland. We're taking the car, sailing across on the Friday morning ferry, and then driving up there.
Yes .... I know it's nearly October, and the weather isn't brilliant ....... and yes I did say we're on the ferry!!  Apparently there are two storms on their way to the UK which are going to collide before they get there ..... sounds like fun!!! But, I'm sure we'll have a great time whatever the weather.  Already packed the travel pills!! 

It's almost 30 years ago exactly, that Stephen actually proposed to me .... whilst we were up in Scotland.  We'd only been seeing each other for 10 days when he took me on a weekend away and swept me off my feet ..... how romantic is that!  As I said .... that was 30 years ago (sigh!)

Anyway .... lots to get done before we go.
Let's start the week with Saturday's workshop ....... a multi media canvas using texture pastes, stencils, paints, lots of lovely embellishments and finishing off with gorgeous mica sprays .... all inspired by the fabulous Finnabair.    
Everyone had a great day ..... we always have such  good time on our little get togethers ..... although they're not as little as they once were.

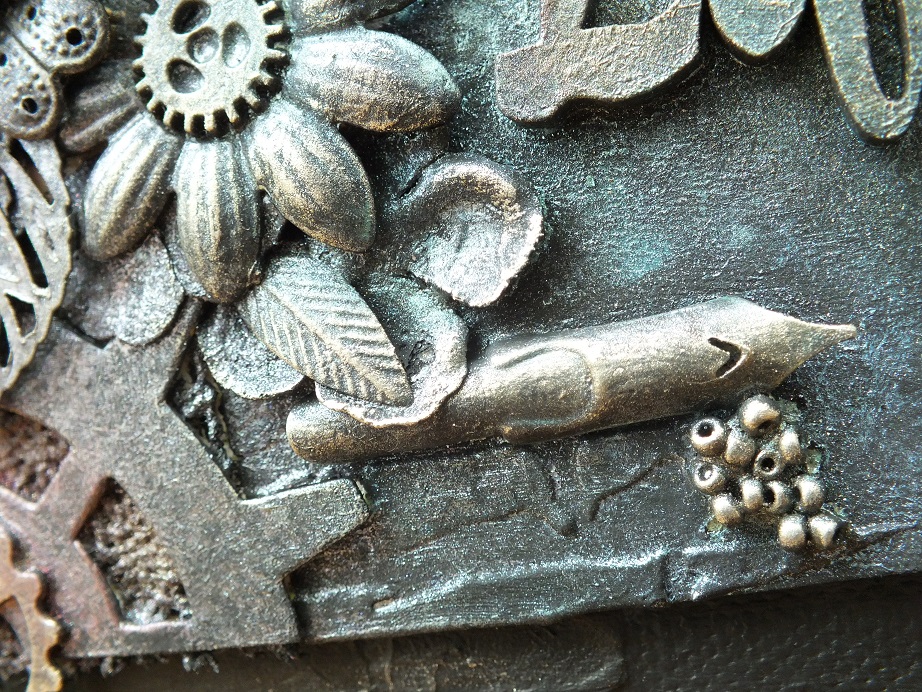
They had two options to choose from ..... a black gesso base for the centre canvas (full details on this project can be found here)


I do love this technique .... can you tell! ....... personally the black is my favourite .....


Again this was something I did a few months ago, but if you missed it you can see how it was done by clicking the link here

Then the second option was a white gesso base ...... totally different look

 
Basically everything's the same to begin with for both options.  Texture paste and stencils for the background, although I did throw in a bit of tissue paper on my inspiration piece for something a little different


Once all that's dry ....... arrange your embellishments on the top and then once you're happy with it glue them all into place with some heavy gel medium


As you can see I like to keep my focal point towards the centre more or less, and then build it up a little for dimension and trail it off towards the edges.
I used paper flowers, metal flowers and leaves, cogs, wooden embellishments, little trinkets, buttons, seed beads .... you name it you can put whatever you like on there.
Just bear in mind if you're going for a black gesso base it doesn't really matter what colour of flowers and buttons etc., you use as you'll be covering them up and black gesso covers most things.
If you want to try the white option then keep the colours of what you put on there quite neutral .... you need to cover the colour with white gesso so things may need more than one coat.


Once the glue starts to dry you can speed things up a little by using a heat tool .... just remember that there's metal on there, so it will get hot ..... and there's paper so not too long with the heat, you don't want to burn anything.

Once you're happy that everything is stuck down, give the whole thing a good coat of gesso, making sure to get in between all the layers.   Let this dry naturally or you can help it along with a heat tool, then the fun begins ..... the mica sprays.  This is where some of the ladies were a little nervous to begin with and were a bit shy with the spraying.  My advice is don't think about it too much, just spray and get some colour on there.  I would advise drying off each colour before changing to another one .... you don't want them to mix and make a muddy mess.
Just keep spraying until you're happy with the result.

Obviously the colours will look different on the different bases .... the black will be more vibrant whereas the white will be a bit more pastel


I went in and added more colour here and there using mica powders and then finished off with a touch of Treasure Gold here and there .....


Everyone was so pleased with the results ....... most of them went for the black option, one did both (there's always one!) used black and white, which turned out fabulous ..... how bad am I though I didn't get any photos!!!
I will try and get some though ..... it would be nice to show off what they created.
We did have one lady go with the white option and she has sent me a picture and given me permission to share her finished project  ....... this was Carol's,  how pretty does this look


Well done everyone .... another fabulous, fun filled day.
Need to get planning the next one now ..... add it to the list!!!

Thanks for popping by ....... enjoy the rest of your day.

Cheerio until next time

Wednesday, 6 July 2016

Time for a change ......

Happy Wednesday ......

WOW!  this weeks going fast!!!  Just wish I could keep up!

Time for another challenge ..... it's the Happy Little Stampers Mixed Media Challenge today, and this month it's all about ........ RECYCLING


Using up all those bits and bobs saved from old projects ........ making use of that gorgeous box/jar/bottle that we just can't bring ourselves to throw away ....... or just giving something a makeover because we no longer like the colour or design.

I've given an old mirror a bit of a facelift ....... and had so much fun doing it!


It was a plain, wooden mirror that I'd basically started to decorate some time ago, using decorative papers, and then just left it .... it sat in the old craft room, unloved, not even hung on the wall!!! (I didn't even take a picture of it as it was .... but trust me it was plain!)
Not any more though ...... it's anything but plain!

I started by adding some detail and texture to the mirror (over the top of the paper that was already on there) using stencils and texture paste.  My favourite brick wall ......


The beautiful blossom stencil from Tim Holtz ......


And a few random stripes here and there .....


Next ...... inspired by the very talented Finnabair ...... I played around with paper flowers and metal embellishments ......


chipboard shapes, buttons, cogs and keys ......


Tiny seed beads,  that beautiful laser cut MDF word ......


and basically any other bits and bobs I could find in my stash.


Once I was happy with the arrangement I attached everything using a heavy gel medium and left it all to dry. 
I masked off the mirror in the centre and then everything was given a good coat of black gesso. 
Next came the fun bit ...... adding the colours. 


Lots of mica sprays ....... pinks, purples, blues and turquoise.  A touch of gold in there too.   love how the colours change in the light, and they blend so well.


Even the metal shapes take on the colour, because of the coat of gesso ...... love it!! 


Just keep adding more colour until you're happy with the result ..... drying in between each layer to really bring out the colours.  I love how all the texture really comes through .....


This was so much fun to do ..... but, if you're not really into the darker shades and using the black gesso scares you just a little bit,  then why not try white gesso as a base, use the same mica sprays over the top, and you'll get a completely different look.  Give it a go!

As always the challenge is sponsored by the Happy Little Stampers store


And the winner will receive a $15 discount to spend in the store


Thanks for popping by ..... enjoy the rest of your day.

Cheerio until next time


Wednesday, 18 May 2016

Finishing touches .......

Happy Wednesday ......

Another week is flying by.
Things are starting to get busy over here with preparations for this years Isle of Man TT ..... only 10 days to go before it all gets underway with the start of Practice Week .... whoo hoo!! And when it all comes to a close we're off to the Cotswolds again for our little family week away .... can't wait!

Things are busy in the old craft room too ...... DT stuff to do, workshop to prep, an SU party to organise at mine ready for when the new catalogue launches, and a few bits and bobs to do just for me ..... because I can!!

I've just finished off adding the final touches to my project from one of the workshops I went on whilst I was across in the UK.  Here's what we got up to with the lovely Maria Simms ...... based on a workshop done by a talented lady named Debbie Rock (I think all the workshops have been done now so I'm safe in showing this  ....... I hope I am anyway!)


We had great fun getting all inky and covered in paint, creating the centre panel on the actual day of the workshop.  And then I've since mounted mine onto the larger canvas, and added more background detail with a stencil and some texture paste.

There's a bit of everything on here ..... stenciling (my favourite Brick Wall), texture paste (love it!!), paint, mica sprays, and lots of embellishments.


There's lace, paper flowers, lots of metal trinkets.  Die cuts, beads and I even added an old piece of chain on there


Everything was held in place with gel medium and dried off with the help of a heat tool.  The gel medium lets you create layers with the embellishments giving lots of depth and texture to your projects


Once we were happy with the layout everything was painted over in either black or white (as you've probably guessed .....I went with black)
Next came the fun part .... lots of spray inks and mica sprays to give the colour and sheen to the finished panel. More mica was brushed over in parts to give more depth of colour


And then I finished everything off with a touch of Treasure Gold Gilding Wax, just here and there to give more shine


Not sure the colours come across well in the photos ...... they're much more intense in real life.
I used a pink shade and touch of purple down the left hand side blending into turquoise and blue shades with just a touch of green on the right.  Then to highlight in places, I spritzed over with Perfect Pearls in the Heirloom Gold shade and finished with White Fire Treasure Gold.  Really pleased with how this turned out ....... very Finnabair-esque I think.


I wanted to mount it onto something bigger so, I used the brick wall stencil again onto a 12x12 canvas board to add some background detail and texture.  Painted the whole thing black and then added just a smidge of the White Fire Treasure Gold here and there, to bring out some of the detail of the brick wall


Thanks to Maria for another fabulous workshop and thanks to Debbie Rock for the inspiration.

Thanks for popping by .... enjoy the rest of your day.
I've got to tidy the old craft room .... again!!! and then a little bit of reading to do later.
A friend and I popped to the book/art shop over in Port Erin yesterday, and along with stocking up on some watercolour card, a new canvas and some new paintbrushes, I found this on the shelf ...... (I only went in for a look!!!)


I do like a nice G&T as you all know ....... and I'm gathering quite the collection now


 so I thought I'd try and learn a little more about Mother's Ruin


Cheerio until next time ......