Sunday 30 January 2022

Brand new from Sweet Poppy Stencils ........

Happy weekend ........

I hope you've had a nice week and that you're enjoying your Sunday.

If you're a Sweet Poppy Stencils fan then you've probably seen that the first release of 2022 went live on their website at the start of the week.  If you've missed it, then check out the link below to see the fabulous brand new stencil designs and, some gorgeous new stamp sets.  


I've been busy in the craft room, playing with the new designs, so over the next week or so I'll share some of the samples I've made.  If you follow the Simply Sweet Poppy Stencils Facebook page then you may have already seen some.

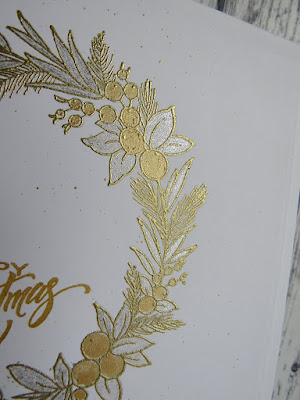
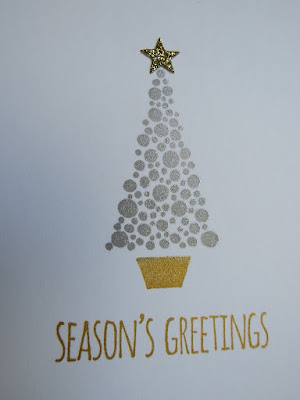
There's something for everyone I think in the new collection ...... gorgeous background designs, beautiful apertures/frames, stunning florals and, one of my favourites .... the new Tree of Life Circle

At 140mm x 140mm it's the perfect size for creating cards but, from the minute I saw it I thought it would make a gorgeous piece of artwork to frame ..... what do you think?


Really easy to do, some simple mat and layering and you have a beautiful piece of home decor.

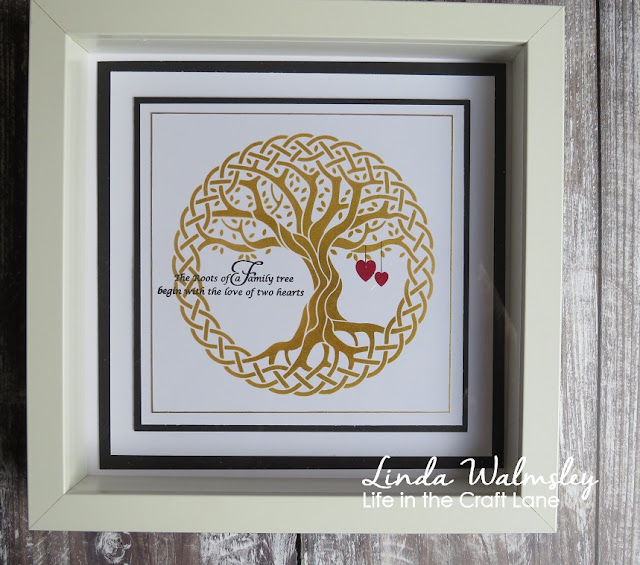
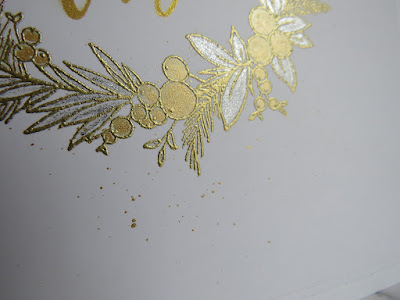
I placed the stencil on a piece of white cardstock, and gently sponged gold metallic ink though the design.  I added a little bit of Gathered Twigs Distress Ink here and there to add some shading


I then stamped the two hearts in red, and made it look as though they were hanging from the tree using a black fine liner.

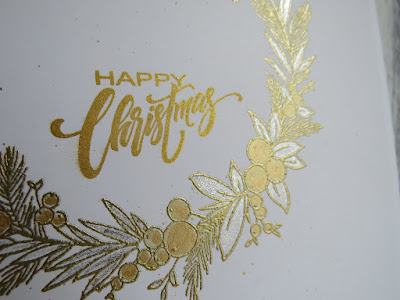
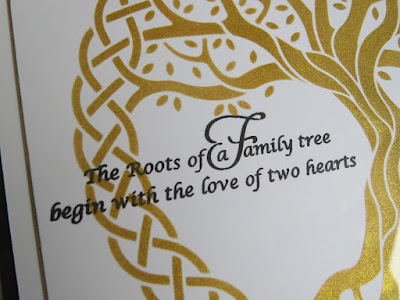
I added the perfect sentiment from the Sweet Poppy stamp set Friends (the hearts are from the same set) and then framed the finished piece, first by edging the design using a gold leafing pen,


and then matting and layering with black and white card.  A box frame from that well known, inexpensive homeware store that we all love turns it into a beautiful piece of home decor.

It's been a busy week here, what with birthday celebrations starting it all off, Burns Night on Tuesday at our favourite restaurant and then this evening we've got friends coming round for a poker night.  We've ordered shushi too which means I don't have to cook which is even better.

Thanks for popping by ...... enjoy the rest of your day.

Cheerio until next time ..... 


Supplies:
Stencils: Tree of Life Circle (Sweet Poppy Stencils)
Stamps: Friends A6 stamp set (Sweet Poppy Stencils)
Inks: Delicata Metallic Ink - Golden Glitz; Distress Ink - Gathered Twigs; Versafine Clair - Nocturne; Adirondak Dye Ink - Cranberry
Other: Black Fine Liner pen; Black and white cardstock, Gold Leafing Pen; White Square Box Frame

Saturday 22 January 2022

More Silver and Gold for the CAS Christmas Card Challenge .......

Welcome to the weekend! .......

This one is going to be pretty much like last weekend ..... more birthday celebrations!  I told you January was a busy month!

It's been a busy week too ..... most of it spent in the craft room, working with a new release coming soon, from Sweet Poppy Stencils.  New stencil designs and new stamp sets ...... you're going to love it! I'll be back with lots more details on that soon.

I did make time to play along at CAS Christmas again, before the challenge closes on the 24th  ....... well, all my festive stamps are still to hand so it would be a shame not to use them!


The theme is Silver and Gold ....... I love this combination!  Perfect for all sorts of cards, but works so well for festive designs ...... not easy to photograph though!!


I used the pretty Christmas Circlet from Penny Black ....... stamped and heat emobssed in gold, slightly off the edge of my card.


I then used a sparkly silver gel pen to colour in the leaves on the wreath, and Paperartsy's Gold paint for the berries ..... so pretty


A few gold paint splatters ....... to use up the paint ........ and a simple Christmas sentiment stamped in gold, inside the wreath to finish off.  


So clean and simple but very elegant I think ........ will definitely be making more!

Here's another very quick and easy card, and about as CAS as you can get .......


Stamped in silver and gold inks, and a tiny die cut star on the top ...... done!


Again, another one perfect for batch making!

More birthday celebrations this weekend, it's Chris's turn on Monday.  Won't be quite as busy as last weekend ......... this one was 30!!!!


There was lots of food and wine ...... dry Janaury was put on hold for the weekend!


At least I didn't have to cook .......


Things were a little quieter on her actual birthday .......  a meal out at our favourite place.


My little girl is growing up!!

Thanks for popping by ..... I hope you have a lovely weekend.

Cheerio until next time .......


Supplies
Stamps: Christmas Circlet (Penny Black); Berry Sprays (Woodware) for the Merry Christmas sentiment; Eclectica stamp set ELB10 - Lin Brown (PaperArtsy) for the tree;  Scribbly Christmas (Tim Holtz) for the Season;s Greetings 
Inks: Versamark; Gelicata Metallic ink - Golden Glitz, Silvery Shimmer
Others: Gold Embossing Powder (WOW!); Sparkly Silver gel pen; Fresco Finish Chalk Paint - Gold (PaperArtsy); 

Saturday 15 January 2022

Loose watercolouring for CAS Mix Up ........

Happy weekend to you .......

Have you got anything nice planned?
The weather's not been very good here today but hey! I suppose it is January. 
Can you believe we're already half way through the month ...... crazy I know!
  
Mid month always means there's a reminder for the CAS Mix Up Challenge.  
Jenny is our host for January, and the theme is .......... Loose Watercolouring


This is a really fun technique, it makes watercolouring easy.  You don't need to be too careful putting your colours down, and the effect can be quite arty looking.


It's a great technique for keeping things CAS too ....... and a perfect way of colouring flowers!

I stamped the pretty florals randomly over a piece of white cardstock, gthen used the technique to add the colour


First, I painted the flower with clean water, then added a touch of colour using a ZIG marker to the centre and let the water spread the colour around.  I helped the process along a little using a paintbrush to make sure the colour covered the whole flower.
Once this layer was dry I did the same again, using the same markers to add some depth of colour and  shading to each of the flowers.

A few ink splatters in the background add a bit more interest


I die cut the bottom of the card to give a fancy edge, added a layer of black card for contrast and  stamped my sentiment underneath.   I also added a few sparkly gemstones to finish off


I even remembered to do the inside ........
                     

The closing date for the challenge is 24th January so there's still plenty of time to play along.

Thanks for popping by ........ enjoy the rest of your weekend.
We've got a dinner party for 10 this evening and the best part of it is ......... I don't have to cook!!!!

It's Lauren's birthday on Monday, and to celebrate she's invited a few friends round and we've booked the amazing Leela's Kitchen to come and do the cooking for us. 
This is a company on the island that makes delicious indian food,  has their own range of spices and sauces, which are amazing!  They do a delivery service with take aways thalis, cookery classes, and tailor made dinner parties, which we thought would be something a little bit different.  
I'm really looking forward to it ........ it's always nice when someone else does the cooking!
I'd better go and get the kitchen ready for him!

Cheerio until next time ......


Supplies:
Stamps: Painted Flowers (Altenew); Happy Birthday Sentiment (Happy Little Stampers); Sentiment inside the card (Penny Black)
Inks: Versafine Clair - Nocturne;
Others: ZIG Clean colour Brush Markers; Self Adhesive Gem stones

Thursday 13 January 2022

Happy Birthday Mum! ..........

Happy Thursday ........

I hope you've had a lovely week. 
It's been a quiet one here but, thankfully we can all start getting back to normal again as slowly one by one, we are all now COVID free again ...... yeah!!  
Just as well really, because birthday celebrations start at the weekend.

January is always a busy month for us ...... both kids have January birthdays, there's a couple from my my crafty friends this month too, and starting things off is my mother-in-law, it's her birthday today ......  Happy Birthday Mum!  
I don't think she reads my blog but I do know that she has received her card, so I'm safe sharing it with you


I kept things nice and simple ....... a pretty embossed background using one of the folders from Simon Says Stamp (Blossom Field)


The stamps are from Altenew (Ruffled Flowers), watercoloured using ZIG Clean Color Brush Markers (just got my hands on 30 brand new colours and they are gorgeous!), and then the flowers were all die cut using the matching dies ....... no fussy cutting needed!


A simple Happy Birthday sentiment added on strip of cardstock, strategically placed to hide the join on my embossed background ........


The finished card size was A5,  and the embossing folder wasn't quite big enough so, I simply embossed two pieces of white cardstock, cut them down to fit,  and joined them in the centre, hiding the join with the sentiment ..... simple!

And look ...... I did the inside too!


Well that's one birthday card done ...... better get back in the craft room to make some more.

Thanks for popping by ....... enjoy the rest of your week

Cheerio until next time .......


Supplies ......
Stamps: Ruffled Flowers (Altenew)(also matching dies); Sentiment stamps from my stash - front of card; Better with Age stamp set (Penny Black) - sentiment inside
Inks: Versafine Clair - Nocturne; Delicata - Golden Glitz
Other:  Blossom Field Embossing folder (Simon Says Stamp); ZIG Clean Color Brush Markers

Thursday 6 January 2022

Starting early .........

Happy Thursday .........

Here we go again ....... New Years resolutions and all that!  Have you made any?  
The diet starts tomorow ........
I'm not going to leave my Christmas cards to the last minute this year ........
I'm going to get fitter ........ 
I'm making my Christmas cards early this year ........
I'm not going to buy any new craft supplies until I've used up some of what I've already got ......
HaHaHa!!!! .......... as if that's going to happen!  Not a chance.

I have made a Christmas card though ..... whoo hoo!!
Only because I'm playing along with the CAS Christmas Card Challenge.  
It's the perfect excuse to make a start on filling up the festive box again.

The first challenge theme of the year is ....... Silver and Gold 


All the decorations have been put away, apart from the ones still on my craft desk ..... the stamp variety!


This was really quick and easy to do. I used the Merry Christmas Color Layering set from Hero Arts.
I used the bold words from the set to create the bauble ...... stamped on black cardstock, and heat embossed with WOW's silver and gold embossing powders


I added a few silver and gold ink splatters to the background, and finished off with a bow made from a piece of gold thread.


Well that's the first one for the festive box done!

I haven't actually made any New Years resolutions this year, except I'm trying to have ..... I won't say completely alcohol free January because it is Lauren's 30th birthday on the 17th, so there will be a few celebrations then but, other than that, I'm going for a dry(ish) month!

I did make this though ........ again in silver and gold but it's not really a Christmas card.
I used some of that stash that's been mounting up in the craft room ...... you know, the stamps we have to have then when we have them we don't use them ........ yes those!


Heat embossed and splattered as before, with a little touch of silver gel pen


I'm going to link this up to Darnell's NBUS Challenge
Hmmm ...... maybe that's something else I should try each month ...... use something from the NBUS pile.   I'll kep you posted on that one.

Somerthing I hadn't planned for in the New Year was this .......


Yep! It's finally got me!  Hubby too.  He was first on Dec 30th (luckily we had nothing major planned for New Years Eve), and then me on Jan 3rd. 
We're both double jabbed and boostered thankfully, so it's not too bad.  I feel like I've got a bad cold, and I'm easily tired but other than that I'm fine  .......... it has taken me three days to get the Christmas trees and decorations down and away though!!!  
Hubby's not too bad either, he's actually working, from home of course.
We're currently in our 10 day isolation period.  Think I'll spend mine in my craft room.

Thanks for popping by ...... enjoy the rest of your day and stay safe!

Cheerio until next time .......


Supplies:

Stamps: Merry Christmas Color Layering stamp set (Hero Arts); Happy New Year Clear stamp set (Whimsy Stamps)
Inks: Versamark ink;  Delicata Golden Glitz and Silvery Shimmer inks
Other: Gold and Silver embossing powders (WOW!); Gold thread; Silver Metallic Gel Pen  

Saturday 1 January 2022

Happy New Year!!! .........

Happy New Year's Day! ......

Well here we are again, the start of another brand new year ...... it's 2022!!!  

I hope you all had a lovely Christmas, and that you enjoyed some New Year celebrations. It was pretty quiet here ....... good food, nice wine and a bottle, or two, of bubbly to see out the old and ring in the new.

So, it's the first of January ......... and after our festive break, the CAS Mix Up Challenge is back ...... whoo hoo!!


We're starting this year off with a Watercolour Challenge, hosted by Jenny.

The theme is ......... Loose Watercolouring
Now, if you're like me, you might be thinking ........ what is loose watercolouring?  Well, if you are,  check out the CAS Mix Up Blog where you can find an introduction to this technique from Jenny, lots of ideas and inspiration from the Design Team and, links to some great videos showing different ways of using this fun technique.

It's all about making watercolouring easy ......... here's my take on the challenge


I used a pretty new stamp set which arrived in my craft room just before Christmas ...... Blooming Branch from Pinkfresh Studio.  It's such a pretty stamp, and there's some nice words in the set too. I can see me using this one a lot.

I stamped the image onto a piece of white cardstock, using a black Versafine Clair ink pad.  You can see in the picture above, I also stamped part of the image on the inside of my card (something I'm trying to do with all of my cards this year ...... complete the insides too!!)

For the watercolouring I used a mix of ZIG Clean Colour Brush Markers (leaves and centres of the flowers) and a Picked Raspberry Distress re-inker (for the flowers) 


To create the loose, sort of sketchy look to the colouring I painted the images with clean water first, one flower/leaf at a time.  I then put a drop of re-inker, and scribbled a little ink from the pens onto a craft sheet and then used a waterbrush to pick up the ink and drop it onto the wet petals and leaves, allowing the colour to move with the water.  To create the shading, I let the first layer of ink dry then repeated the technique again ....... easy!


I love the imperfect, sort of arty look ...... it also means that you don't have to be that careful, it doens't matter if the colour comes out of the lines!

I stamped my sentiments in gold, and then a few ink splatters onto the background using the same colours I did for the main image


I'm so looking forward to seeing the gallery for this challenge.

We have a fabulous Guest Designer this month too ....... Karen (Ransdom Reflections) is joining in the fun, so be sure to pop by and say hello!

Thanks for stopping by ......... enjoy the rest of your New Year's Day, and here's to a fun filled, crafty 2022!

Cheerio until next time ........


Supplies:
Stamps: Blooming Branch (Pinkfresh Studio)
Inks: Versafine Clair - Nocturne; Picked Raspberry Distress Ink Re-inker; Delicata - Golden Glitz
Other: ZIG Clean Colour Brush Markers; Waterbrush; Ink-Me cardstock (Hunkydory)

Out with the old and in with the new ........


A new year means a new chapter.
Make 2022 an incredible part of your story.

xx