Showing posts with label My workshops. Show all posts

Tuesday, 19 November 2019

The last workshop of the year .......

Happy Tuesday .......

Oh well ..... I think the festive spirit is finally kicking in.  I maybe a little on the early side even for me but ...... I've just put the first of the Christmas decorations up.  Ho! Ho! Ho!
We're having a family get together this evening so I thought it might be nice to have a few sparkling lights .....


Speaking of Christmas, it was the last workshop of the year at the weekend. It was Christmas sweaters, mince pies and chocolates, and Mr Buble playing in the background ...... yes you've guessed it, it was the Christmas one!

This year's project was a pretty 3D MDF Sledge.
A beautiful decoration for the window maybe, a centrepiece for the festive table to hold a Christmas candle, or even something to hang on the wall.

Just look at the finished results .......


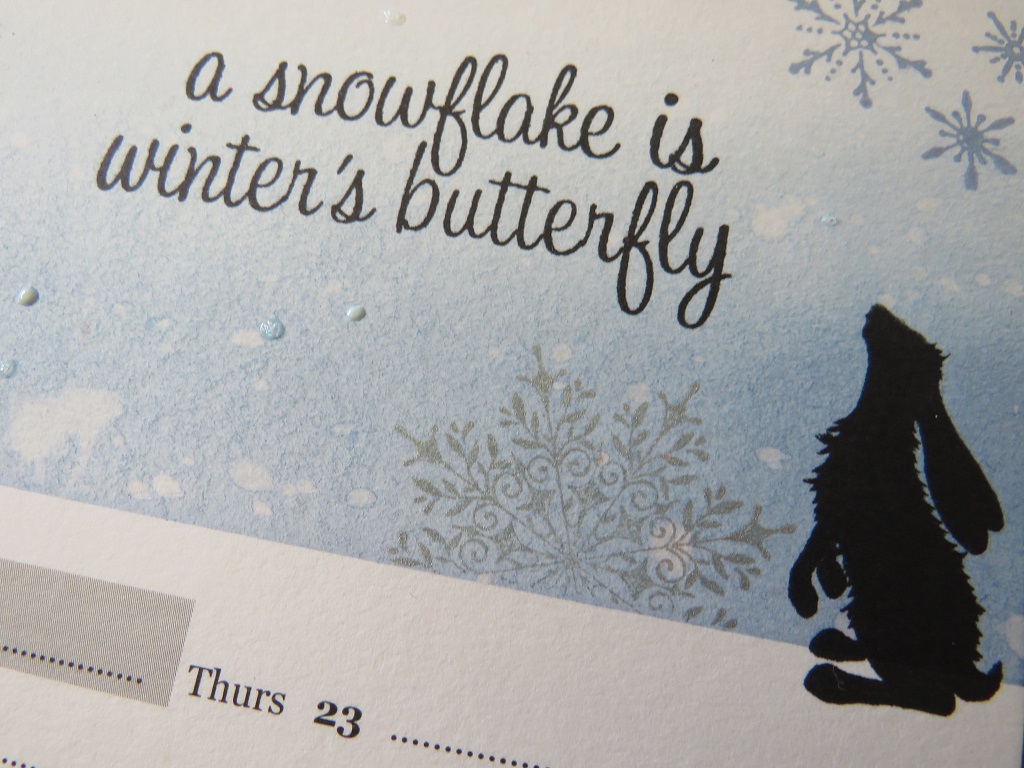
Here's a few close ups ......


They were all painted with acrylic paints, with a little bit of rubber stamping here and there


And then decorated with lots of festive greenery, sparkle and snow


Berries, baubles and pine cones .......


We even had a festive robin ......


It was a nice way to end the workshop year, although it's not our last get together of 2019, we have our little Christmas party to come yet.  I need to go hunting for a Secret Santa gift now!

Speaking of parties we had a great one on Saturday night. 
Lauren had arranged a secret party for her other half, Robbie, to celebrate his BIG birthday!


Hubby and I had arranged dinner for them at our favourite place ..... although that did mean that we had to go somewhere else (it was OK for Dad to foot the bill, we just couldn't be there!) ...... it was his birthday I suppose!!
Then it was on to the Bath & Bottle in town where everyone was waiting for the birthday boy to arrive ...... cocktails all round!


Happy Birthday Robbie ...... old enough now to know better, but still young enough to get away with it!

Thanks for popping by ...... enjoy the rest of your day.
I suppose I'd better get tonights dinner on, they'll all be here soon ........ it's not going to cook itself!!

Cheerio until next time .......
Products used:
Large 3D MDF Sledge from Anna Marie Designs
All other products from my stash

Thursday, 26 September 2019

We're nearly there ........

Happy Thursday .......

How's your week going ....... fast if it's anything like mine!

It's been busy in the craft room ...... I'm trying to get ahead with all my DT stuff as we've got a crazy few weeks coming up.  Would you believe our next free weekend is the beginning of November!!!  Hubby's away this weekend, then we're away on holiday next weekend.  We're back on the island for a few days then we're off to the UK for another weekend. 
Then it's workshop weekend .......that's going to be a busy one.  And then hubby's off to Blackpool for a weekend for a Poker Tournament.  It's all go around here!

Speaking of workshops, here's a little look at the last one.
We used Lavinia stamps to create beautiful moonlight scenes, in Autumn and winter shades. 


Easy scene building using masks with Distress Inks and Oxides ......


Pretty Lavinia fairies .....


Trees and foliage, and simple embellishments .....


We also went a little bit festive with the gorgeous Sweet Poppy Poinsettia stencil ....


Distress inks and oxides again, a little bit of the gesso resist technique, and LOTS of glitter


And of course a touch of my favourite festive product .... chunky white embossing powder


Another popular colour way was a green and gold version ......


Gold ink through the stencil on a delicate Distress Ink background and then covered with glitter


We were all a little bit sparkly by the end of the afternoon!

There's just three pages left to complete and  now, and we're doing them all next month! 
Not sure what's going on them yet but I'm sure I'll figure it out ...... suggestions on a postcard please!

Thanks for popping by .... enjoy the rest of your day.
You can also find me on the Uniko Blog today with a little bit of DT Inspiration.  That's on a festive theme too.  Simple Christmas card ideas using stencils, pastes and different finishes.


Right back to the craft room ..... it's magazine stuff today.
Cheerio until next time .......

Wednesday, 19 June 2019

Time for a Twofer .... which turned into a Four-fer!!!

Happy Wednesday ........

This week is flying by ....... I've been busy in the craft room though.  It's almost time for our annual family holiday so I'm trying to get organised!!
Two weeks on Friday you'll find me on a boat on the Norfolk Broads.  Well actually two weeks on Saturday ..... two weeks on Friday we'll be on a slightly bigger boat, sailing across to the UK, but more about all that some other time.

Last week was workshop weekend.   We took a break from the calendars and had a great time creating cards with Jennifer McQuire's Floating Die Cut Frames technique.
I must say I am hooked on this at the moment, and I think a few more ladies are after last Saturday.

It was a busy day, with lots of stamping, a whole load of colouring and plenty die cutting of course.
We did find time for cake though .....


I used Altenew stamp sets that had matching dies, and ZIG markers for my all of my colouring

I even did a little bit of heat embossing


Stamped sentiments to finish off ......


And a few little gold ink splatters here and there.


I love how you get a twofer everytime .......


Change things up and use different shapes to create the apertures ...... this was my favourite pair from the day


I love this stamp set ...... it's Ruffled Flowers from Altenew,  and of course the matching dies make it so easy to cut them all out


I added a die cut sentiment on this one ......


And of course, another pretty little twofer


In fact ....... from this set of die cuts I actually made FOUR cards, that's 2 sets of twofers!!
These were made from all the cut off pieces from around the edge of the original panel ...... they  just too pretty to throw away


I added the little bees so that I can link these two cards up to this month's Twofer Card Challenge ......


First up ..... a little Thank You card


Smaller than I usually make ..... this is 6x4 inches, but I was using up leftovers.

I arranged the left over die cuts over a panel of white card cut to the size of my card front.  I then covered them with some Glad Press & Seal ...... if you're not familiar with this it's a bit like cling film, but sticky. and then
I ran this through my Big Shot to die cut the centre panel.  The Press & Seal holds everything in place ....... it's fab!  Check out Jennifer McGuire's video it explains everything.

Once you've die cut the centre out, remove the white card from the back, turn over the remaining piece of Press & Seal and put foam pads on the back of all the die cut pieces making up the frame. This then goes onto the front of your card ..... the Press & Seal holds everything in the right place .... clever eh!


Once the die cuts are stuck down, carefully peel off the Press & Seal, and your die cuts will look as if they are floating ...... I love it!!!
The little bees are from a Stampin Up! set called Dragonfly Dreams ..... I'm not sure if it's still a current set.

And here's the twofer ......  a Birthday card made using that die cut centre panel


A simple frame around the edge, and a sentiment banner to finish off


You have to give this technique a go ..... it's so much fun!

Thanks for popping by ..... enjoy the rest of your day.
It's lovely here today, the sun is shining and it's warming up nicely.  It's about time though, it is June afterall!
No sitting in the sun just yet though, it's back to the craft room for me and I'm about to go all festive!
Don't worry, its for a magazine later in the year so I'm not going all Ho! Ho! Ho! just yet!!!

Cheerio until next time .......


Products used:
Stamps: Ruffled Flowers, Leaf Canopy (both with matching dies ) Altenew; Dragonfly Dreams (SU) Penny Black sentiment stamps; Birthday Messages (Mama Elephant)
Inks: Versafine Clair - Nocture; Versamark; Delicata Golden Glitz;
Others: Hello Die (Altenew); Nestabilities die - circles, rectangles, ovals: Gold Embossing Powder (WOW!); ZIG Clean Color Brush Markers; Pearl Drops (Nuvo); Small crystal gemstones

Wednesday, 17 April 2019

Calendar Girls .......

Happy Wednesday .......

And Happy World Malbec Day for all you red wine lovers!!


We're off out this evening for a special dinner to celebrate (any excuse!)  Our favourite little restaurant is hosting a five course tasting menu, all paired with the perfect Malbec wines ...... there's even a Malbec ice cream ....... we had a cheeky tasting on Monday and it's delicious!!

Enough about food and wine ........ Last Saturday was out first crafty get together of the year, it was so nice to see everyone and we had a lovely day.  We made a start on creating calendars for next year.  A little bit early but, we're planning to do about three pages each month, and then decorate the covers so it's a work in progress.

Inspired by the very talented Eileen Godwin, we'll be using different inks, different techniques with stamps and stencils and just generally having fun.

We're using the Create-a-Calendar from PaperMill Direct ...... the quality is amazing and the pages take the inks really well. 

Here's a quick look at how mine are coming along ...... I have one calendar that I use to plan the pages and then another one to re-create on the day, with the ladies.  When I say re-create I don't mean copy exactly.  Each page is slightly different, the inks don't always go on the same, and I might use different stamps etc.

Pretty snowflakes for the start of the year .....
The one on the left was my sample .... the one on the right is the one I did on the day ..... see hwat I mean about them being different, I've used exactly the same inks but I've been more heavy handed on the second version


Simple ink blending using Distress Inks ....... three shades of blue applied with a brush, working from the top down to the centre, and the bottom up leaving some white(ish) space in the middle


A few splatters of water then some rubber stamping, finishing with some heat embossing on the large snowflake.
And I decided to add some words to this page ..... a simple sentiment stamped in black and a cute little silhouette which I'm going to continue through the calender if I can .....


More ink blending for the second page ..... Memento inks this time


This was one of Eileens designs ...... again see how the second version is so different from the first.  I've used more ink on the background and splattered it with water ......


I changed the colours of the foliage slightly too .....


Finally, inspired by Eileen again we tried the Gesso Resist technique with stencils


This was so much fun ...... and my two pages ended up completely different. Same techniques, gesso through the stencil,  ink applied over the top and then carefully wiped away from the gesso. 
I changed my ink colours slightly, and I only did a small area of stenciling on the second one .....


Love the look of these coloured inks for the foliage ...... but I also like the black


We all followed the same techniques but didn't always do the same months so each of the calendars will be completely different when they're finished ....... we are going to try and do another three pages next month!

Thanks for popping by ..... enjoy the rest of your day.
It's beautiful here, the sun is shining and it's finally warming up out there.  Let's hope it lasts for the Easter weekend.

Cheerio until next time ......


Products used:
January
Stamps: Snowflakes - Tim Holtz, Hero Arts, Stampn Up!; Sentiment - Hero Arts; Bunny - Lavinia
Inks: Distress Inks - Stormy Sky, Faded Jeans, Chipped Sapphire; Distress Oxide Ink - Stormy Sky for the small snowflakes;Silver ink (Deliata); Versafine Clair - Twilight, Nocturne
Other: A4 Create-a-Calendar(PaperMill Direct); Nuvo Drops - white; Stickles Crystal Glitter Glue; Low-tack stencil tape

February/March
Stamps: ELB30 from PaperArtsy; Cat and the mouse are both from Lavinia
Inks: Memento - Nautical Blue, Potter's Clay;  Versafine Clair - Twilight, Chianti, Nocturne; Archival - Orange Blossom, Red Geranium; Dandelion
Other: Low tack stencil tape

March/May
Stamps: Leaf Sprig - Stampendous; Wildflower, Hare - Lavinia
Inks: Memento - Pear Tart, Morocco; Versafine Clair - Nocturne; Archival Rose Madder, Leaf Green
Other: Heavy White Gesso, Stencils - JOFY; Funky Fossil, White Posca pen