Showing posts with label Uniko stamps. Show all posts

Friday, 13 October 2023

Coral and Blue for the Color Hues Challenge .......

Happy Friday the 13th .........

The weekend is almost here ... yeah!!  Not that we've anything planned, it's very quiet around here at the moment.

today I'm playing along with another Blog Challenge, on the last minute again! (I think it closes today so I'd better get a move on) 

It's the Color Hues Challenge, and it's a colour combination that I don't use very often but, I must admit I quite like it


What do you think? ......


I used Distress Oxide Inks ...... Prize Ribbon (blue) and Abandoned Coral,


The stamps I used are Background Blocks Layered Modern Floral from Uniko ....... a really cute little two step stamping set, that looks great whatever colours you use.

I used a piece of low tack masking tape across the bottom of the card to give me the diagonal edge while I stamped the flowers and leaves. 


I did attach a thin strip of blue card along the edge though, just to give it a more finished look.

I used the blue Distress Oxide to colour the die cut 'happy' and stamped the rest of my sentiment underneath with the coral oxide ...... I do like this colour combo.

Whilst I was in the craft room, I noticed that the pretty Darcy Bouquet Embossing Folder from Simon Says Stamp was still out on my desk.  Hmmm ..... I wonder what that would look like if I used blue cardstock for the background, and tried out the matching dies with some coral card .....


Not bad!
The detail on this embossing folder is gorgeous, and the dies were easy enough to use.
I slightly off set a  couple of the die cut flower heads to add a bit more depth, and then attached my sentiment banner over the top.


Pretty navy pearls finish everything off nicely!


Thanks for popping by, I've enjoyed my time in the craft room this week.  Lets hope it continues.

Have a lovely weekend.
I think on Sunday it's just 10 weeks to Christmas ..... eeek!!  I think I might have to start on some more Christmas cards next week.

Cheerio until next time ......

Friday, 4 February 2022

Wishing Uniko a Happy 10th Birthday ........

Happy Friday ........

I hope you've had a great week.  Any plans for the weekend?  It's looking like a quiet one here, thank goodness!

I am celebrating another birthday though ...... 


Uniko is 10 years old this month ....... WOW!!!  

Happy Birthday Bev and the team!

In true Uniko style, celebrations are going on for the whole month of February, so check out the Uniko Blog for all the details, and maybe even join in the birthday fun.

If you've been following my blog for a while you'll know that I had an amazing two years on the Uniko Design Team, as one of their Brand Ambassadors.  It was so much fun, working with the Uniko range of  stamps, and stencils.
You can imagine how thrilled I was when Bev asked me if I would like to join in the 10th Birthday Celebrations, along with other past DT members, for a fun feature on the blog during their birthday month.  
Of course I said yes! so today it's me on the Uniko Studio Blog for the CASE Yourself feature.

The task was ....... to choose a favourite make from my time on the DT (hmmmm .....not an easy decision), and then CASE it using a newer Uniko product.

It took a while but,  in the end I chose this one ......


A pretty all over design, made for Uniko's Birthday back in 2020 ...... it was the colours in this one that caught my eye.

I do love an all over design, quick and easy when it's just a single stamp but,  it's a look that is so easy to do with individual stamps.  Florals work extremely well .......the ones I used for the card above are from the stamp set Kindness Blooms

However ....... I did go for the easy way for my CASE'd card .......


I decided on the same colour combo, florals again, and of course that pretty all over look.

The border around the edge gives it a real clean, and up to date look I think.  I did this by using low tack masking tape around the edges of my card, BEFORE I did any inking or stamping.

With the tape in place, I used a blending brush to apply a little Distress Ink around the edges of the tape, just to define the frame a little


The floral design is the pretty Background Blocks stamp - Layered Modern Floral  A lovely background stamp that I've actually stamped twice, to fill the card ....... masking tape still in place by the way!  
I used Distress Oxide ink for the flowers, and my MISTI, so that I could build up the depth of colour.

The leaves are also from the same stamp set and are cleverly laid out so that when you position the stamp correctly, all the leaves are in the perfect places ....... clever or what!


I finished off with a sentiment, stamped on a simple die cut circle, just to make it stand out a little. I also added a few gems here and there for a touch of birthday sparkle!


Once everything was finished, I carefully removed the masking tape from around the edges and Voila! .... one framed piece.
I really love how this turned out, and just think of all the different colour combinations that could be done, the possibilities are endless.

Thanks again to Bev and the team ..... it's an honour to be part of your 10th Birthday celebrations.
Congratualtions on such a fabulous milestone ....... here's to the next 10 years.

Thanks for popping by ...... enjoy the rest of your day and have a great weekend.
Why not join in the birthday celebrations too!

Cheerio until next time ......


Supplies
Stamps: Layered Modern Floral,
Inks: Distress Ink - Squeezed Lemonade; Distress Oxide Ink - Salvaged Patina, Squeezed Lemonade (for the sentiment) Versafine Clair - Nocturne; 
Other: Self adhesive gemstones; Small stiched circle die; Low Tack Masking Tape

Friday, 14 May 2021

Ink, stamp, repeat ...... ink, stamp, repeat ........

Happy Friday evening ........

I hope you've had a good week.  
The weekend is just around the corner .... have you got anything nice planned? 
There's not much in the diary, so I think it's going to be a quiet one here.

It's time for a new challenge over at Perfectly CAS, and the prompt for this one is ..... Repeat Stamping


This is a nice and easy one ..... simply pick your favourite stamp, ink it up and stamp away.  Remember to keep to the challenge rules though ......
  • keep your cards CAS (clean and simple)
  • follow the challenge theme
  • and only use one third, or less, of your card space.
I've gone for a rainbow of colour but, your repeat stamping could all be in the same colour, or maybe  different shades of one colour ....... the choice is all yours.


I'm loving rainbow colours at the moment and the Distress Oxide inks are perfect for stamping with ...... nice bright shades, great coverage, and they layer beautifully over the top of each other 


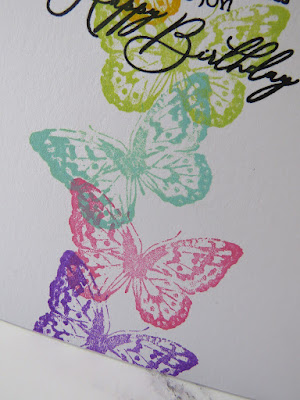
I stamped the butterfly down the centre of my card, changing the position of the stamp each time to add a bit of movement to the design.


I used a black ink for the sentiment and stamped it in the centre, over the top of the butterflies 


A really quick and easy, CAS, one layer card.

Here's another option ....... how about some birthday candles


Again, stamped using various colours of Distress Oxide inks ........


and this time I used two sentiment stamps for my greeting .......


and added the flame to just one of the candles 


Check out the Perfectly CAS Challenge Blog for more fabulous repeat stamping ideas.

Thanks for popping by ..... enjoy the rest of your day, and have a lovely weekend. 
I'm hoping for some nice weather then we can spend some time in the garden.

Cheerio until next time ........


Products used:

Butterfly card
Stamps: Tim Holtz Watercolor stamp set (Stampers Anonymous); Better With Age sentiments (Penny Black)
Inks: Distress Oxide Inks - Candid Apples, Spiced Marmalade, Mustard Seed, Twisted Citron, Cracked Pistachio, Picked Raspberry, Wilted Violet; Versafine Clair - Nocturne

Birthday Candles
Stamps: BIG & BOLD Wish (Uniko); Better With Age sentiments (Penny Black); Happy Birthday from a Happy Little Stampers stamp set which I think is now retired
Inks:  Distress Oxide Inks - as above; Versafine Clair - Nocturne

Saturday, 10 April 2021

I do love a rainbow .......

Happy weekend .......

I couldn't resist playing along with this months CAS Christmas Challenge, they have such a fun theme going on for April ........


I do love a rainbow but, I must confess I've never thought about using all those colours on a Christmas card .......... but hey! don't they look fab.


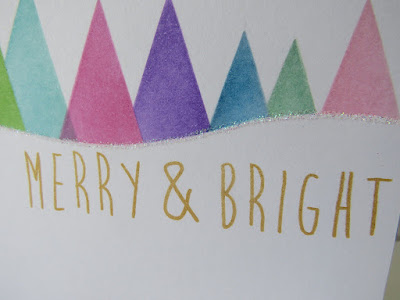
This is definitely Merry & Bright!  And it was so easy to do.

I cut myself a simple mask from a piece of copy paper to cover the bottom half of my card.  With this in place I then used various colours of Distress Ink, and the tall triangle aperture stencil from Sweet Poppy, to create the line of rainbow trees.


The stencil is quite a large aperture as a whole, I only used the top part and varied the height slightly as I went along the card ......


I stamped my sentiment underneath in a gold ink .......


and added some sparkle with a touch of fine crystal glitter along the tree line.  

A tiny star on top of one of the trees finishes off the card ......


What a fun theme .... I love it!

I've also got a little more inspiration for April's CAS Mix Up challenge.  I'm hosting this month, and the theme I've chosen is ........  Paper Piecing


This is such a fun technique, especially if you're not a fan of colouring in.  
OK a bit of fussy cutting is required, and I know that's not everyone's favourite thing to do but, if you keep your images simple then cutting them out isn't going to take that long.  And just think of all those bits of patterned papers you can use up!


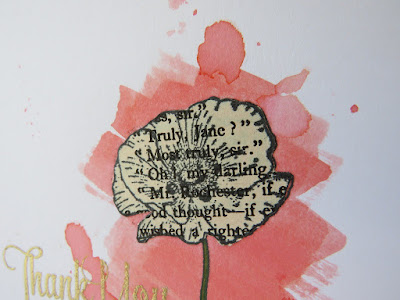
I like to use old book pages to paper piece, I think the text gives a little more interest to your designs.

I brushed some colour onto my background using Distress Ink ..... I smooshed the colour onto a craft mat first, spritzed with water and then used a paint brush.


To give a bit more interest I added another layer of ink, this time using a piece of acetate to pick up droplets of ink from my craft sheet and then smooshed them onto my card.

I then stamped the single poppy onto the inked background, coloured the stem with a ZIG Marker and paper pieced the head of the flower .....


I used two sentiment stamps to complete the card .... one heat embossed in gold,the other simply stamped in black


Both challenges are open until the 24th of the month so if you fancy playing along with either, or both, of them there's still lots of time.

Thanks for popping by ...... enjoy the rest of your day and have a lovely weekend.

Remember the yacht I told you about sitting in Douglas Bay well, it's still there.  Lauren and I were out and about yesterday ...... we had a little trip to the garden centre now that they're open again, so we decided to drive along the prom and take a look at this boat.
OMG!  it's BIG!!!!
We managed to park somewhere quiet and take a few photos .......


It's really hard to appreciate the size of it as there's nothing else in the bay to compare it to, but trust me, it's huge!  I bet when those sails are up it looks amazing.

It did look nice in the sunshine though .......


It's the Grand National at Aintree this weekend.  I'm not normally a horse racing person but, there's something about the National.   
One of the runners is owned by a guy on the island so it would be rude not to have a flutter now wouldn't it. Trouble is, I can't win an argument never mind a bet on a horse race ..... wish me luck!

Cheerio until next time ......... 


Products used:
CAS Christmas
Stamps: sentiment was from Uniko but I think its now retired 
Inks: Distress Inks - Festive Berries, Spiced Marmalade, Mustard Seed, Mowed Lawn, Tumbled Glass, Picked Raspberry, Wilted Violet, Broken China, Cracked Pistachio, Kitsch Flamingo; Delicata - Golden Glitz
Other: Tall Aperture Stencil (Sweet Poppy); Fine Crystal Glitter; Quickie Glue Pen

CAS Mix Up
Stamps: Happy Watercolor (Stampin Up!) for the flower; Sentiment Collection, Heartfelt (Penny Black)
Inks: Distress Ink - Festive Berries; Versafine Clair - Nocturne; Versamark
Other: ZIG Clean Color Brush Marker (for the stem); Gold embossing Powder (WOW!)

Saturday, 4 April 2020

CAS Stencil Challenge ......

Happy Saturday to you ........

I hope you're having a good day.

It's time for another Blog Challenge.   Are stencils your thing?  Fancy doing something a little bit different with them?  How about joining in the fun on the CAS Stencil Challenge
We've got a great prompt for you this month .........


Cathy's  our Host for the April challenge,  and she wants us to use ........ Gilding Flakes

Possibly not the first thing you think of when using your stencils but ..... they do work so well.
If you're not familiar with using Gilding Flakes then check out the CAS Stencil Blog.  On there you'll find lots of inspiration from the Design Team, and our fab Guest Designer this month ...... Mac (The Sweetest of Peas).  There's also some links on there to some fab videos to give you some ideas on using gilding flakes.


I've used Gilding Flakes to add a touch of shimmer and shine to the background, using one of my favourite stencils ..... I do love this honeycomb design.

I started by using the stencil with Distress Ink directly onto my card.
I then took a piece of Cut n Dry foam and applied a light touch of glue, over the ink, through parts of the stencil ....... remember if you're using any kind of glue through your stencils clean them thoroughly asap after use.


I placed my Gilding Flakes onto the sticky surface, rubbed over the top with the flat of my hand to make sure I'd covered everything and then gently rubbed over the flakes using a sponge to take away the excess and bring out all the detail of the stencil again.

I stamped the pretty sunflower onto a seperate piece of cardstock and heat embossed the image with a clear powder.
I coloured it using Distress Inks, and fussy cut.


 I stamped the bee and my sentiment onto the card ......


The sunflower was added using foam pads to give a bit of dimension, a bit of colour onto the bee, and I finished off with a touch of shimmer on his wings ......


I'd forgotten how much fun Gilding Flakes can be ..... enjoy!

Thanks for popping by ..... enjoy the rest of your weekend.
I've got another night off from cooking this evening ....... we're having a little treat (again!)
A lot of the restaurants on the island have had to rethink ways of keeping their business going during this crazy time.  A lot of them, our favourite little place (Wine Down) included, have been offering take aways and delivery service for food, and wine.
Wine Down have also been doing their special menus ..... week before last was Greek week, which was delicious.  Last night we had a special Lebanese menu, which was amazing!  And when we saw the menu for this evening we couldn't resist so, we've ordered in again!
We've got Beef Wellington tonight.  It's all arrived, beautifully prepared, with full instructions on how to cook it and all I have to do is put the oven on and open the wine ....... sounds good to me.

Stay safe everyone ......... cheerio until next time


Products used:
Stencil: Texture Honeycomb stencil (MemoryBox)
Stamps: Sunflower Bee (Julie Hickey Designs; Bee Happy Clear Stamps (Uniko)
Inks: Distress Ink - Wild Honey, Scattered Straw, Tea Dye; Versafine Clair - Nocturne;
Other: Clear Embossing Powder (WOW!); Chariot of Fire Gilding Flakes, Flitter Glue, Scoochy Sponge (IndigoBlu); Yellow Watercolour pencil; Wink of Stella pen

Friday, 3 April 2020

Uniko Challenge #58 ...... Spots and Stripes

Good morning .....

Well we've made it to Friday again.

I've got a little reminder for you this morning about the current Uniko Challenge.  If you want to join in the fun then there's still plenty of time to play along.


It's Challenge #58 and we would like you to include Spots and Stripes.  As always there's an optional twist ....... for this challenge it's to use a stencil, or stencils if you like.


I haven't included the twist, instead I went for a nice CAS design but, I have used the spots and stripes.

The stripes (Background Block - Pinstripe) were stamped onto a piece of white card and then die cut using a nesting circle die.


I used a matching scalloped circle die to add a decorative layer behind, and then attached this using foam pads onto the front of my card.

I then stamped the flowers (Pure Florals - Cosmos) onto a piece of white cardstock and also onto a snippet of dotty patterned paper.
The ones on the white card I fussy cut around the image in full, and the ones on the patterned paper I just cut around the flower heads, paper piecing these on top, and then I attached the flowers to the side of my circle


I added a simple sentiment,  and finished off by adding some dots of Black Enamel Accents around the scalloped edge of the circle


Don't forget to check out more inspiration from the rest of the Uniko Brand Ambassadors and, we also have a fabulous Guest Designer too ...... the very talented Mac Mable is joining us for this challenge so be sure to pop by and say Hello.
Full challenge details and a list of prizes can be found on the Uniko Studio Blog.

Happy stamping!

Thanks for popping by ......  enjoy the rest of your day and have a nice weekend.

Cheerio until next time ......


Products used:
Stamps: Background Blocks - Pinstripe, Pure Florals - Cosmos, Simply Said Blocks II (Uniko)
Inks: Versafine Clair - Nocturne
Others: Double Dot Patterned Paper (BoBunny); Nesting Circle Dies; Scalloped Edge Circle Dies; Green coloured pencil, Black Enamel Accents, Gold Glitter Glue.