Happy Thursday .......
How is everyone? Safe and well I hope.
Sorry I haven't been around much these last few weeks ...... things just got a little on top of me I think, and blogging was the last thing on my list!!
There's been a lot going on, including a trip across to the UK which wasn't the best!
June wasn't a good month. My father-in-law sadly lost his battle with cancer, and we made the trip across to attend the funeral and spend some time with Stephen's mum.
It was lovely, in the circumstances, very personal with only 15 people allowed to attend ....... but I think Les would have approved.
Because our borders here in the Isle of Man are still closed, before we left the island we had to get permission from the government so that we could actually come back. And, once we arrived home we were checked in by the border police and have had to quarantine ourselves for 14 days.
So even though our little island is all back to normal, we're back to video calling the kids and the furthest we can go is into the garden. And we can't actually do much of that because the weather is rubbish!!
We're currently on Day 9, and counting. It's not too bad ..... hubby is working from home, I'm baking or trying too, the jigsaws are out again, and I have ventured back into the craft room.
We have a table booked at our favourite restaurant for the day we're out of quarantine (can't wait!) ....... we had to cancel the one we had booked for hubby's birthday this Friday!
And once the quarantine is done we're off out in the van again. We've booked a campsite for the weekend after next ....... don't care what the weather's like!!
So, what's everyone else up to? Fancy a bit of Sweet Poppy Stencils?
Lucy is back on Hochanda tomorrow (Friday) ...... two shows, 10am and again at 2pm. New stencil designs, some festive favourites and ....... remember that gorgeous new snowflake that sold out really quickly from the last shows ........
well ....... it's back, with a brand new matching die!!! So many more possibilities.
Here's a couple of ideas using the stencil and the die together ........
Very clean and simple ..... great for batch making.
I used the stencil first, with my new favourite Distress colour (love the Speckled Egg!) onto a piece of white card.
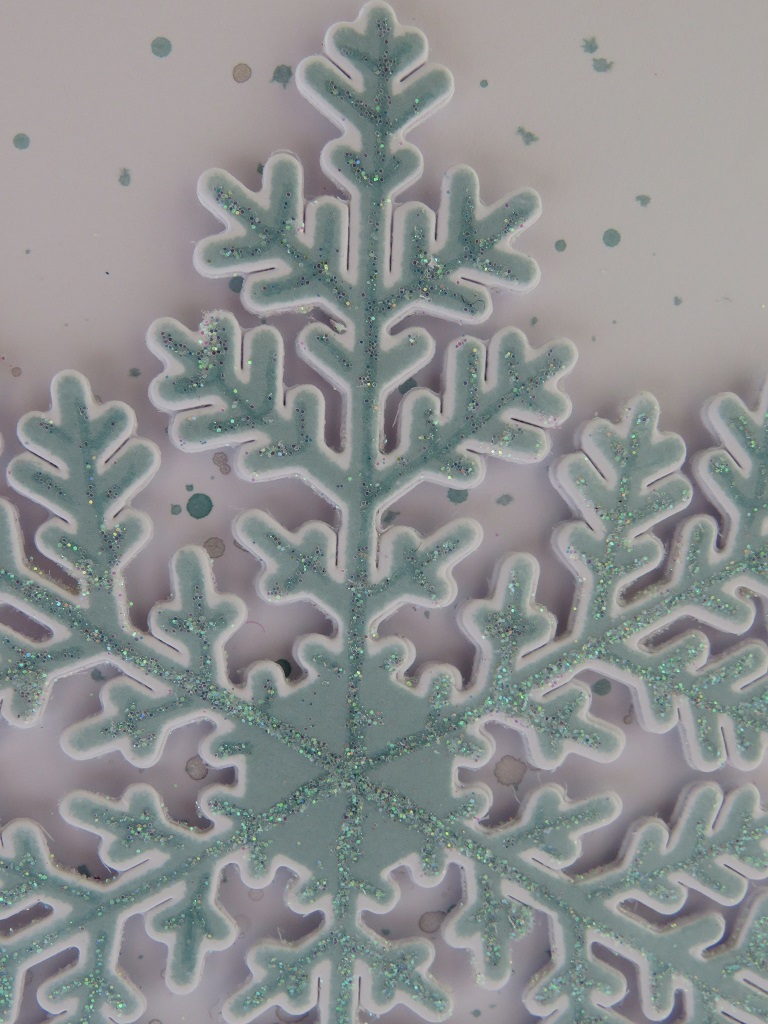
I then used the matching die to cut out my snowflake ..... just love the detail, and the die cuts beautifully. I did pass it through my machine two or three times, just to make sure all the detail cut properly
I also cut two more snowflakes just from plain white card and layered them all together to give it a bit of dimension
A few ink splatters on the background, and a sentiment ......
and of course a little sparkle to finish off ......
The die on it's own makes a beautiful snowflake ......
I simply used the die to cut three snowflakes from plain white card, layered then together and added a touch of glitter to the top ......
To do the background I took a piece of white cardstock (6x6 inches) and scored it at 3/4 inch intervals. Using a damp baby wipe I then applied Distress Ink (Speckled Egg) to the debossed side of the card, swiping in the direction of the embossed lines ...... top to bottom. This gives a sort of weathered wood look to the card .......
I used the snowflake stencil to add more detail to the background using the same colour of Distress Ink ...... I do like tone on tone!
I added some white paint splatters, a sprinkling of Chunky White embossing powder, and of course a sentiment ......
The pretty snowflake was then attached over the top using foam pads and a sparkly gem to finish
So .... use the stencil on it's own, or just the die, but they do work great together.
Tune in tomorrow to see more fabulous ideas from Lucy and the Design Team. Mine won't be on the TV this time ....... unfortunately due to being in quarantine I couldn't get to the post office!! I still had fun with the new stencils though. Check out later for a couple of ideas using two of the brand new designs.
Thanks for popping by .......
Cheerio until next time ......
Products used:
Stencils: Snowflake stencil (Sweep Poppy)
Stamps: Noel stamp set (Sweet Poppy)
Inks: Distress Ink - Speckled Egg; Versafine Clair - Nocturne; Delicata Metallic Ink - Silvery Shimmer
Others: Snowflake Die (Sweet Poppy); Crystalina Fine Glitter (Sweet Poppy); Chunky White Embossing Powder; White Acrylic Paint (splatters)
Showing posts with label Sweet Poppy Dies. Show all posts
Thursday, 9 July 2020
Friday, 2 August 2019
I guess it had to happen at some point ........... only 145 days to go!!
Happy Friday folks! ......
Welcome to August!
As always, the beginning of a new month means new blog challenges. And, as it's the first Friday of the month, that means it's the new Craft Stamper Take It Make It Challenge.
The theme is Anything Goes ...... as long as there's actual rubber stamping on there somewhere.
(NO Digi images please!)
I've got a little festive idea for you today. Oh yes it's started ........ the Christmas countdown.
It had to start sometime, and seeing as I've been full of the Christmas spirit all week creating samples for the Sweet Poppy Stencil shows on Hochanda today, I thought I'd share one of them with you.
Very CAS ..... using stamps, dies and stencils.
I used one of the large Back Plate stencils along with the Glossy White stencil paste onto a piece of white cardstock. I sprinkled the Crystalina Glitter over the top whilst the paste was still wet.
Once the paste was dry I used the Sweet Poppy Nesting Bauble Dies to cut the two smallest sizes of bauble, inking around the edges lightly with some Distress Inks
I created another bauble using one of the stamps from the new Sweet Poppy Christmas Blessings set
Stamped and heat embossed on plain white cardstock, once in gold and once in silver. I then used punches to cut around the different circles ...... the outer one from the gold version and the centre from the silver one. I used a foam pad to layer them together, to add a bit of dimension.
I used a piece of acetate to smoosh some Stormy Sky Distress Ink onto a piece of white card, cut to fit the front of my cardblank (finished size is 7x5 inches) I added some gold and silver ink splatters, and then I attached the baubles over the top.
I used a Stardust Gel Pen to add the hanging chain detail, and then finished off with a die cut holly leaf.
You can see this, and more on the Sweet Poppy Stencil shows on Hochanda today at 10am and 3pm.
As with all the Craft Stamper challenges there'll be two winners.
The Design Winner ....... chosen by the DT.
They get their winning project published in the Craft Stamper magazine, a winner's profile and an invitation to be a Guest Designer on a future challenge.
We'll also have a Challenge Winner ..... randomly chosen, and this month their prize is ....... FOUR mini stamps, designed by Seth Apter for PaperArtsy (ooooh!!)
You can enter the challenge up to THREE times. Each entry must have it's own blog post that includes a link to the Craft Stamper challenge.
Entries/blog posts must include ONE PROJECT ONLY! A set of cards, or a set of ATC's etc., counts as more than one project, and won't be eligible to win the prizes.
Happy Stamping!
Thanks for popping by ..... enjoy the rest of your, and have a great weekend.
I'll be back later with another blog challenge for you but for now, I'm off to grab a coffee and get ready to watch Lucy and Sweet Poppy Stencils on the TV. The first show is at 10am this morning with another one at 3pm.
Cheerio for now ......
Products used:
Stamps: Christmas Blessings Clear stamp set (Sweet Poppy)
Inks: Distress Inks - Stromy Sky, Festive Berries, Peeled Paint; Versamark,
Stencils: Knit & Stitch Back Plate Stencil (Sweet Poppy)
Other: Glossy White Stencil Paste; Crystalina Glitter, Nesting Bauble Dies & Holly Trio Dies (Sweet Poppy); Gold and Silver embossing powders (WOW!); circle punches; Stardust Gel Pen
Friday, 18 January 2019
Smile ....... it's time to get those stencils out
Yes, it's me again ....... Happy Friday evening
This is a scheduled post, as I'm currently sat at the airport waiting to board a plane. At least I hope I am ...... unless the weather has taken a real turn for the worse.
I know some places in the UK have had snow. And whilst I'm typing this (lunchtime Friday) I believe snow is falling here up on the mountains. The TT course apparently is quite treacherous.
Where I am it's cold, it windy and it's raining ...... lets hope that it doesn't get any worse, we need to get off the island ....... we have a wedding to go to tomorrow!
It's time now though for a little reminder for the new CAS Stencil Challenge ...... have you played along yet? Don't worry there's still time to join in.
All you have to do is create a card in the Clean and Simple style, using stencils. You also need to follow the theme each month, which will be based on either a technique or a particular product.
This month the challenge is hosted by Loll, and we have a nice easy theme for you ....... one of the basic stenciling techniques ...... Sponging
I've used one of the brand new stencil designs from Sweet Poppy Stencils ...... the gorgeous Sunburst
I simply sponged shades of blue and green Distress Inks through the design onto a piece of white card. The stencil is a nice large design but, you don't always have to use it all, You can see above that I've gone over the edges of my card, keeping the design to one corner.
I die cut the centre circle and added a die cut stitched frame around the edge.
On the circle cut from the centre I stamped my little monster (Concord & 9th's Monster Love) and coloured him using Distress Ink and a little water .......
If you like the look of the die cut sentiment ...... you'll have to wait a little while longer (sorry!) I'm teasing you with something that is hopefully coming in March from Sweet Poppy ..... watch this space!
I love it cut in the sparkly glitter card don't you! I've layered it up a little with plain white ones just to give it a bit of dimension.
Don't just keep your stencils for the front of your cards .... why not add some of the design inside
Check out the CAS Stencil Blog Challenge for more Sponging inspiration from the rest of the DT. On there you'll also find all the challenge details, rules etc. There's also some great links on there, to videos showing how to use the sponging technique if you're not familiar with it.
Happy stenciling!
Thanks for popping by ...... enjoy the weekend. And if it's snowing where you are ..... stay warm and cosy. We're back on the island on Sunday ...... unless we get snowed in whilst we're in the UK!!!
Cheerio until next time .....
Subscribe to:
Posts (Atom)