Happy Monday .......
I do hope your week has got off to a great start.
I seem to have had one of those days ...... I've been busy, but haven't achieved much!
I've just popped by to remind you about this month's CAS Stencil Challenge ......
Our host this month is Julia and the theme is ....... Ghosting
There's some fabulous entries in the gallery so far, but don't worry, if you want to play along there's still time to get your entries in.
If you're not familiar with the Ghosting technique then there's links on the CAS Stencil Blog to some really easy to follow video tutorials ..... go on, give it a go! Just remember to keep your cards in the Clean and Simple (CAS) style
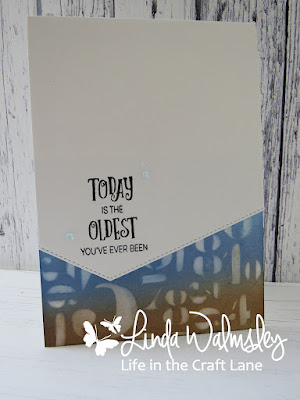
I've gone for a bit of a masculine look today ..... well with the colours at least!
I blended Distress Oxides onto a piece of smooth watercolour card, then placed my stencil over the top.
Using a damp baby wipe I gently rubbed over the stencil design, removing some of the ink from the design
The stenciled panel was then attached to the bottom of a 7x5 inch cardblank.
I cut a piece of white card slightly smaller than the length of the card blank and then die cut a fancy edge along the bottom
I added my sentiment and then attached this to the front of my card blank, overlapping the stenciled panel.
To finish off I added a few drops of Nuvo Jewel Drops around the sentiment.
We've also got a lovely Guest Designer this month ...... Ishani is joining us, so please pop by and say Hello.
Happy stenciling!
I'm also linking this card up to this month's Country View Crafts Challenge where the theme is Letters and/or Numbers
Thanks for stopping by ..... enjoy the rest of your day, and have a lovely week.
We haven't much in the diary this week, it's a bit of a quiet one for a change. Lots to do in the craft room though.
Cheerio until next time .....
Products used:
Stamps: Birthday Love (T for Transparent set by Penny Black)
Inks: Distress Oxides - Faded Jeans, Gathered Twigs; Versafine Clair - Nocturne
Other: Numeric Layering Stencil (Tim Holtz); Stitched Fancy Edge cutting die; Nuvo Jewel Drops - Sea Breeze
Showing posts with label Ghosting technique. Show all posts
Showing posts with label Ghosting technique. Show all posts
Monday, 18 March 2019
Monday, 4 March 2019
Celebrate today! ........ it's the CAS Stencil Challenge
Happy Monday .......
I hope you all had a good weekend.
The weather's changed again here .... it's cold! And we had snow yesterday ..... what was all that about!!? We also had a family gathering for Sunday lunch which was nice.
No snow today though ...... well not where we are anyway. Let's hope it stays that way.
It's time to get this month's CAS Stencil Challenge underway.
Our host for March is the lovely Julia, and she has a great technique for you to use with your stencils. Have you tried ....... Ghosting?
Ghosting is a real fun technique to use, where you start by colouring a panel of cardstock using inks, or paints etc., place your stencil over the top, and then use a wet wipe or a damp cloth over the stencil to remove some of the colour, leaving a 'ghost' of the stencil design ...... cool or what!
If you've never tried this before, check out the CAS Stencil Challenge blog where you'll find links to a couple of great, easy to follow, video tutorials, and then give it a go!
Just remember to keep your cards Clean And Simple!
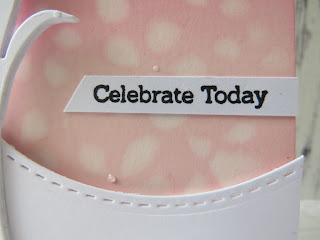
I've used a PaperArtsy stencil for my design (PS107), to create this pretty floral background.
I blended Distress Oxide inks onto a piece of Bristol Smooth cardstock ....... Spun Sugar and Picked Raspberry
Placed the pretty floral stencil over the top, and then used a damp baby wipe to remove the ink
I cut a piece of white cardstock to fit the front of my cardblank, die cut a partial circle from it and then placed my stenciled panel behind, using foam pads to give a bit of dimension.
I die cut the flower three times from plain white cardstock, using one of the new Wildflower Stems #1 from Tim Holtz. I then layered these together and added a touch of colour to the top layer using one of the pink Oxides inks
I attached the flower across the circle, added a few dots of glitter glue here and there and a simple sentiment
We have a fabulous Guest Designer on the challenge his month ..... the lovely Ishani (Quillish) is joining us so please pop over and say Hi! And don'f forget to check out what the rest of the Design Team have been creating.
Thanks for popping by ..... enjoy the rest of your day.
Did I mention it's my birthday tomorrow. I shall be 29 ...... again!
OK ...... who am I kidding!? I've lost count how many 29th birthdays I've had! Let's just say, I'm old enough to know better, but still young enough to get away with it!
I'm off out tomorrow ...... a spot of birthday shopping in town, and a nice lunch out with hubby and the kids. Then in the evening we're meeting up with some friends, and we're off for a night at the theatre, to see Les Miserables. Looking forward to that.
Cheerio until next time ......
Thursday, 2 June 2016
A little ray of sunshine .......
Hello again ........
Hope you've had a good day. I've got another Blog challenge for you ...... yeah!!
This time it's the Happy Little Stampers CAS Challenge and the theme this month is all about ......
Hope you've had a good day. I've got another Blog challenge for you ...... yeah!!
This time it's the Happy Little Stampers CAS Challenge and the theme this month is all about ......
GHOSTING
So .... what exactly is Ghosting, and how do we go about it?
Well .... if you pop over to the HLS Blog you'll find some links to some fabulous tutorials on this really fun technique along with a whole load of inspiration from the rest of the HLS Design Team and our Guest Designer for this month ..... the very talented Julie Beech
As always the challenge is sponsored by the Happy Little Stampers store
and the winner will receive a $15 Discount Voucher to spend on HLS goodies
OK ...... on to the challenge. I've gone for spritzing with water through a stencil to create my 'ghost image'.
I masked off the top section of my card using low tack tape, then I inked the background using shades of Distress ink.
I placed the Sun Rays stencil over the top, spritzed with water through the stencil, and then removed some of the ink by mopping up the water using kitchen roll ..... leaving behind a faded/ghost image ...... simple!
I embossed a line underneath the inky part and then stamped the words using HLS Bold Birthday Sentiments and Everyday Sentiments (the 'Birthday' bit)
To finish off I punched part of a circle from white cardstock and coloured it using Distress ink .... Mustard Seed with a touch of Spiced Marmalade ...... and attached it to the front of my card to form the sun
I've used the stencil again on the inside ......
and added the sun as before
Now it's over to you ....... I look forward to seeing all your fabulous ghosting creations in the gallery.
Happy stamping!
Thanks for popping by ..... enjoy the rest of your day.
Cheerio until next time
Subscribe to:
Posts (Atom)


