Happy Friday folks!
It's the first Friday of the month again ..... I can't believe we're in September already! ..... only 16 weeks until Christmas
(yikes!!!)
It's also time for a brand new challenge over on the
Craft Stamper Blog.
Speaking of Craft Stamper ..... have you seen the new look to the magazine?
How fabulous does that look!!! And not only have we got a new look on the outside ..... there's a few new faces on the inside too! Grab yourselves a copy of the brand new issue .... you're in for a treat!
This month on the challenge, it's the turn of
Take a Stamp ......... you can create whatever takes your fancy, all we ask is that there's some rubber stamping on there somewhere
(no digi images .... sorry!)
Remember ...... link your entry post back to the Craft Stamper blog, only ONE project per post please and, you can enter up to 3 times. Fancy giving it a go ..... you could win one of the two great prizes up for grabs .....
First up ..... our sponsors prize ..... randomly chosen. This month the challenge is sponsored by the fabulous
and the prize is .....
Boxed Blooms and
Bold Sentiments stamps sets and .......
Leaf Print and Bold Florals stencils too!
Not only that ..... STAMPlorations have been very generous and have supplied us with a Coupon Code for Craft Stamper Challenge players to take advantage of a FREE SHIPPING offer from the store. All you have to do, is use the code CSTAKEITMAKEIT on all orders over $20 (approx. £12.90) to get the free shipping (even to the UK!!) The code is good for the whole of September and can be combined with any other STAMPlorations coupon.
Next ....... the Design Winner prize ....... chosen by the DT. They will get their winning project published in the Craft Stamper magazine, be invited to be a Guest Designer on a future Craft Stamper Blog Challenge, AND .... get their own Winners Profile published on the Craft Stamper Blog ..... WOW!!
For more details and full challenge rules, check out the
Craft Stamper Blog.
Right .... now that's out of the way, time for some inspiration I think.
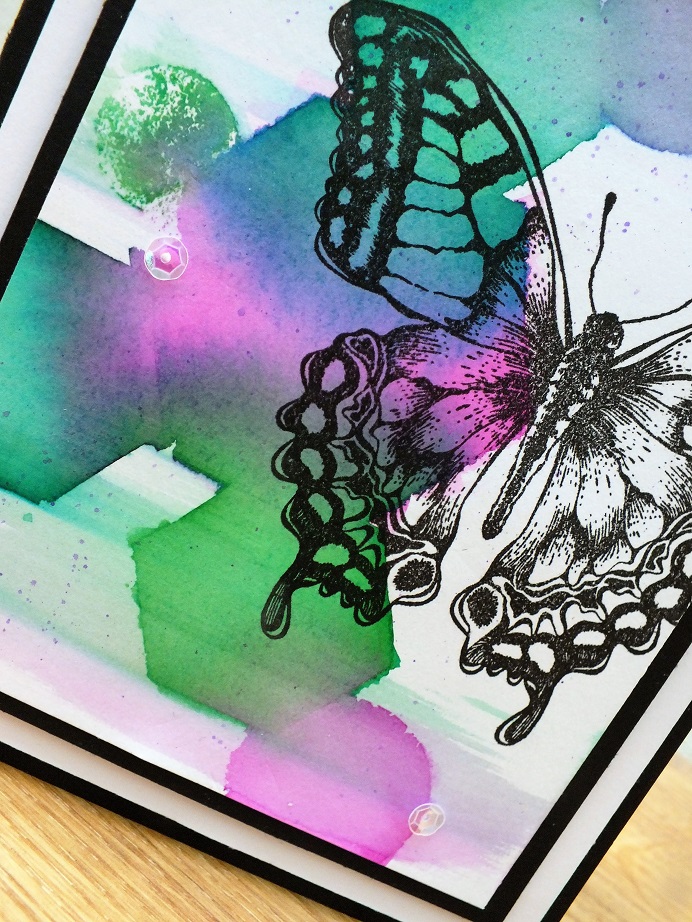
I love my rubber stamps! and at the moment I'm loving making pieces of home decor. This started out as as small 6x6 canvas board but as you can see ...... in true Barbara Gray style ...... it's ended up as a 12x12!!!
Sorry about the picture quality ........ bad light!! The colours look very pastel but actually they're a lot more vibrant in real life.
Anyway ..... I started out by playing around with the 'bleeding art tissue' technique on a blank white canvas board. I first saw this on the the very talented
Eileen Godwin's blog some time ago ..... she's also done a video on YouTube too .... check it out
here
It's so easy to do and it's one of those techniques where you'll never get two results exactly the same.
All I did was cut out some shapes from the coloured tissue paper ..... which by the way you can buy from Amazon and ebay etc., and it's not expensive. I used dies and punches but you can just as easily tear it.
I then placed the tissue shapes onto my canvas and brushed over the top of each one with some clean water..As the water soaks through the tissue you can see the colours transferring to the canvas and they also mix with each other where the tissue overlaps, which is quite cool!
Once all the pieces of tissue were in place and I was happy with the design, I put the canvas to one side and let it dry naturally.
In the meantime, using a Black Archival ink, I stamped one of my current favourite stamps onto a piece of regular white tissue paper ......
(I say 'current favourite' as this does change quite regularly!!) I do love this butterfly from Tim H's
Perspective stamp set
.......
I added some colour to the image using Spectrum Noir pencils ..... colouring on the back.
Once the canvas was dry, I carefully removed the tissue shapes and voila!! ...... the background was taking shape!
Using a paint brush, I splattered a little ink over the top to add a bit more interest, using colours to match the butterfly.
When this was dry I pasted the stamped butterfly over the top using a thin coat of Glue and Seal. I love the translucent effect you get when stamping onto tissue paper, and once it's all dry you can hardly see the edges. I also added a sentiment to the canvas in the same way
To finish it all off I took some white acrylic paint along with some black gesso, and used an old gift card to add the painted lines around the edges
I decided to hang this on the old craft room wall but, I felt it wasn't big enough .....
So ..... I took a 12x12 canvas, and gave it a coat of black gesso. Still wasn't 100% happy with it, so ....... out came the brick wall stencil, a little bit of texture paste here and there and another coat of black gesso. Now I'm happy!
Right ..... it's over to you. What will you create ..... I can't wait to see!
If you still need inspiration though pop over to the
Craft Stamper Blog the rest of the Design Team have created a stunning collection of pieces for you this month!
It's been a busy old week here .... hubby's had the week off work and we've got quite a bit of stuff done. Had the odd day out here and there, a couple of nice meals, coffee with friends you know what sort of thing I mean. We're off out again tonight ... nothing fancy just a few drinks with his work buddies to round off the week nicely. Then next week's going to be a big one .... the little man has got his first day at school
(noooooo!!) Both me and his mum will need the tissues that morning I'll bet!
Thanks for popping by ..... enjoy the rest of your day and have a fabulous weekend!
Cheerio until next time
Linda
xx