Tuesday 26 April 2022

Blogging from the van ........

Happy Tuesday ........

Hello from Herefordshire.  
We're on our latest adventure with Remi the motorhome.  We got the morning ferry from the Isle of Man across to Heysham on Sunday then we drove down to Hereford, where we had a lovely one night stopover on the Hereford Campsite.


A really nice campsite, very peaceful and it's a part of the UK we've never been to before, so it's all new.

Today we're just a few more miles down the road in a nice little corner spot on the Lucksall Campsite.  


We arrived yesterday and we're here until Friday then we're off again.    
Hubby is actually working from the van this week but we are finding time to explore.  We popped into the village of Fownhope (I think that's right!) this morning.  We went to the local butchers and got some rather nice steaks to go on the BBQ this evening ...... it's hubby's turn to cook!

Anyway, the real reason for today's blog is to share a couple more of my Sweet Poppy show samples with you ....... the stamp sets this time.

Here's the cute little hedgehog .......... I love this set!


It's a great sized image and easy to colour too.  I simply stamped it onto white card, heat embossed with a clear powder, and used Karin markers to colour.  


I then fussy cut around the top edge of the stamped image, cutting down the width of the card slightly too, so that it would fit nicely across the bottom my cardbase. 


I inked another piece of white card using Distress inks, splattered a little bit of water over the top to add a bit more detail to the background and then stamped my sentiment, before attaching it on the front of my cardbase


Before adding the hedgehog over the top, I wrapped a piece of natural twine around the bottom, and then used foam pads to raise this panel from the background ....... cute or what!


These stamp sets are so detailed and are perfect if you love to colour but, on the other hand, if you're not happy colouring in with markers or pens and pencils, then these stamps still look fabulous with just a touch of colour


Why not use one of the fabulous Sweet Poppy Aperture stencils to create some shape and colour in the background


I used the circle here with Distress Inks then simply stamped the hedgehog over the top in a black ink .... easy.
I added a little more detail with a few ink splatters, and stamped one of the sentiments from the set using a gold ink


Here's a similar design using the Squirrel stamp set this time ........  how about this for a masculine card?


The Sweet Poppy Oval aperture stencil, with Distress Inks, onto Kraft card.
I then stamped the squirrel, slightly off the edge of the card and over the inked aperture


A few ink splatters add a bit more detail onto the background, and I hand doodled a frame around the edge.  
I decided to add my sentient in two halves ..... one simply stamped at the top in black ink


and the other on a little kraft tag at the bottom, stamped and heat embossed in gold and attached using a foam pad


I also used the squirrel stamp for the detail around the edge of the bottom layer of my card ......  just the foliage part stamped repeatedly around the edge.

Here's a fun idea for using just the foliage part of the stamp .......... another design for those men in our lives maybe


I stamped the acorns and leaves twice onto black cardstock,  heat embossed in gold, and then coloured them using pearlescent paints


I repeated this twice again, concentrating just on the acorns this time.  I then fussy cut everything.

Onto a square of black cardstock, I used the same pearlescent paints to add some splatters and create the background


I attached the leaves and acorns onto my background forming a circle shape in the centre and layering up the acorns to add some more dimension


I then stamped the sentiment, die cut it with circle dies and attached it in the centre using a wobbler so that it acutally moves


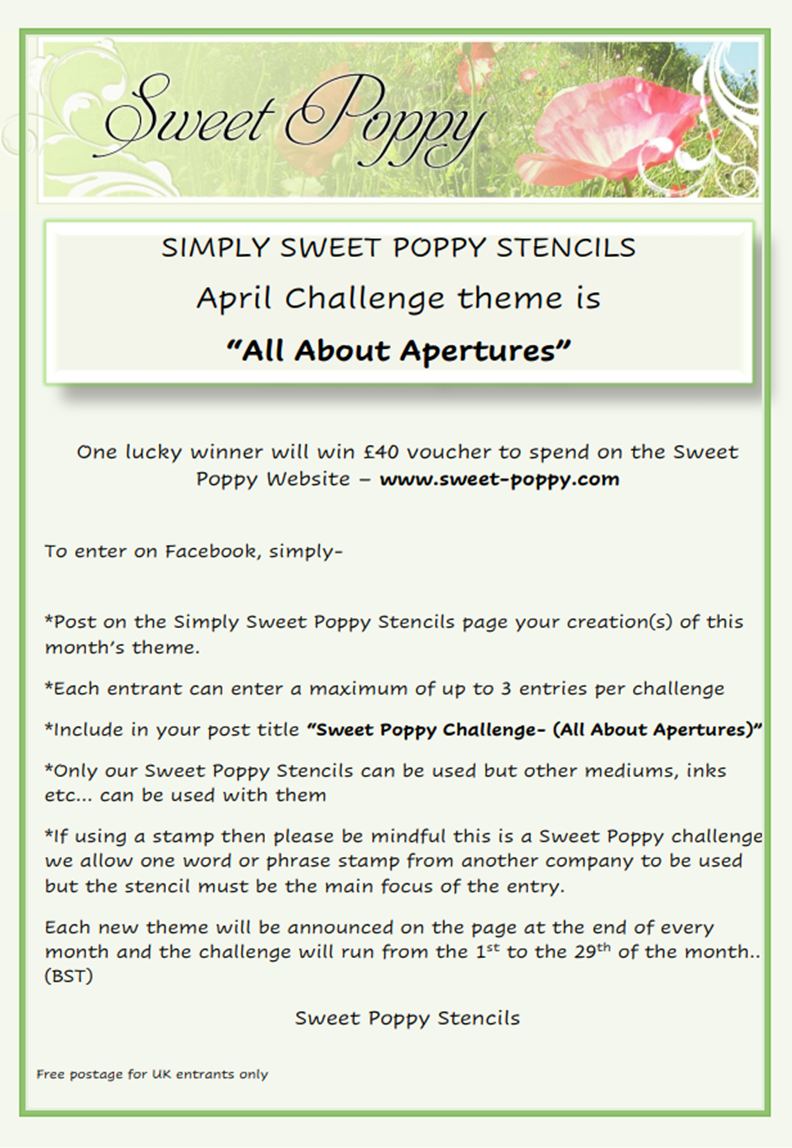
All of the new stamps can be found in the New Products section on the Sweet Poppy website.  

And guess what ..... not only are this months new release on there but ..... you can find details of NEXT MONTH'S  Sweet Poppy release too.  
Brand new stencil designs, more new stamp sets and ....... gorgeous new colours of Mica Powders too.  And you can order them all now!!!

Happy crafting!

Thanks for popping by ..... enjoy the rest of your day.
It's time for a glass of wine I think ....... it's 5 o'clock somewhere!

Cheerio until next time ........


Supplies
All stamps and stencils are from Sweet Poppy
Inks:  Various colours of Distress Inks; Versafine Clair - Nocturne; Delicata - Golden Glitz

Friday 22 April 2022

New release from Sweet Poppy Stencils ......

Happy Friday ........

This week has flown by ...... it has been a busy one though 
We're off on another adventure this weekend, so I've been getting all the stuff ready and checking that Remi (the van) is all set to go.  We're on the morning boat on Sunday .......... early Sunday morning!! there we're heading down towards Hereford ...... it's going to be a long day!!!!  

I forgot to mention that Lucy was back on the TV yesterday (ooops!) with a brand new release from Sweet Poppy Stencils.  So sorry if you missed the shows.  I must confess I didn't see them live but, they are available to watch on Rewind on the Create and Craft Website.  So if you did want to see them you can (phew!) 

If you love your Lavinia stamps then the new stencils might just be for you.  
There's two stunning new, large fairy designs ..... Guardian and Wisdom, and a pair of cute little hares called Companions.  All designed by Tracey Dutton, and available on the Sweet Poppy website ..... check out the New Products section

Here are a few of my samples that I did for the shows .........  this is Guardian


Isn't she beautiful!  She is quite big but, I say this everytime ....... you don't always have to use all of the stencil.  If you want to make smaller cards, just use part of the design.
The card above is A5 (8x6 inches ish) and you can see I've chopped the design down slightly by stecniling off the edges of the card.


I've also used both sides of the stencil.  I used Distress Inks ........ Chipped Sapphire with a touch of Black Soot for one of the fairies, then flipped the stencil over and used, I think it was Dusty Concord on the other.

I added the Cherry Blossom on the top (an older Sweet Poppy stencil) and then did a little ink blending around the edges ......


A few splatters of water onto the Distress Ink add a little bit more detail to the background, and I also added a touch of sparkle onto the fairy's wings .....


and finished off with a sentiment


Here she is again ....... still only using part of the stencil design


Next, meet Wisdom ......


Another gorgeous design from Tracey.  
I did the background first using the Oriental Cherry Blossom, released last month from Sweet Poppy and Spun Sugar Distress Ink.


I then blended around the edges with the same colour and added in a touch of Picked Raspberry and Wilted Violet.
The fairy is simply stenciled over the top using a black Versafine Clair ink.  I like to use a sponge with black ink and build up the depth of colour gradually so that it doesn't bleed underneath the stencil.


The little hare and the flowers are part of the new Companions stencil ..... I simply masked of the bits I didn't want to use .......


Here it is in full ...... how cute are these!


I used a background from my stash ...... done with Brushos I think.

I stenciled the hares over the top using Distress Inks .......


and the Glossy White Stencil Medium for the flowers


Whilst the medium was wet I sprinkled over with fine crystal glitter to add a touch of sparkle.

For the sentiment, I stamped and heat embossed onto a torn strip of vellum and attached it across the bottom of my card ....... I forget how nice vellum looks on cards!


All the sentiments I've used on my cards are from the brand new Sweet Poppy stamp sets that were also on the shows.   You can find details of those on the Sweet Poppy website.  I've used the Hedgehog set and the Squirrel.  I'll be back with some samples of those later.

Thanks for popping by ..... enjoy the rest of your day.

Cheerio until next time ........


Supplies
All stamps and stencils are from Sweet Poppy
Coloured Inks are all Distress Ink 
Black is Versafine Clair - Nocturne
Gold Embossing Powder - WOW!

Monday 18 April 2022

All about Apertures for the Simply Sweet Poppy Challenge .........

Happy Easter Monday .......

I hope you're having a lovely long weekend.  The sun is shining, we had a nice family get together yesterday and, so far I've managed not to eat my bodyweight in chocolate but, that may all change today!!  Well, it is Easter!

This month's Simply Sweet Poppy Stencils Facebook Challenge is well underway.  The theme for April is ........ All about Apertures. 

When we say 'aperture' we don't mean all that complicated photography stuff, what we're looking for this month is ......... a nice definite open space, or the look of a gap, or a hole that something can be seen through, whether that be a stenciled shape in the background or maybe an actual hole cut into your card with something behind it.  Does that make sense? ..... I hope so. 

Sweet Poppy have a fabulous collection of aperture stencils ........ a whole range of shapes, perfect for creating that open space on your cards.   
Here's a few ideas for you, and my take on this month's challenge ..........


This is using the pretty Blooms Apreture Circle stencil, released last month from Sweet Poppy, with one of the brand new designs launching on the TV next week ......... more about those in a few days.

I simply inked through the stencil with Distress Inks, making sure to take the ink over the open circle in the centre, fading it out as I got to the middle


I then used the gorgeous new Guardian stencil, designed by Tracey Dutton from Lavinia.   She's a beautiful tall, standing fairy, but I didn't want the bottom part of her to show, I wanted to make it look like she was coming through the floral circle (through the 'aperture') so with a bit of masking tape in place so that I didn't ink her legs, I placed the stencil over the Blooms circle and used a Black Versafine Clair ink


A touch of sparkle onto her wings ........ a sentiment, ink splatters and a few dots of glitter glue to finish.


Another pretty circle aperture stencil is the Lace design .........


Used just like before, to create the look of an aperture in the background ...... taking a little of the ink onto the open centre circle


This time, no masking, I just stenciled my image directly over the top .....


How about using your aperture stencils in a different way ....... 


Same stencil as before only this time I only used half of it, to create a cute little rainbow .......


Another way to create an aperture in your cards is to cut an actual hole ........


For this one I used the Sweet Poppy Sunburst stencil.  Distress inks again through the whole of the design, then I acually used a die to cut out the centre


I stamped my sentiment on the die cut circle, attached that onto my card front and then used foam pads to attach the sunburst  over the top adding dimension.

I used another die to cut a frame, coloured that with Distress inks, and attached that around the sentiment ...... simple but very effective.

Just before I go, remember this ........ another fun way to use of one of the aperture stencils .......


Use the Tall Triangle to make a Christmas Tree ....... how cute is that!

There's still plenty of time to join in with the challenge.  Go on ....... follow the simple rules, create something fabulous, and you never know, you could be the next winner of the massive £40 voucher to spend on Sweet Poppy goodies .......


Thanks for popping by ...... enjoy the rest of your day.

Cheerio until next time .......

Friday 15 April 2022

Finished ........ I think!

Happy Friday .......

Happy Good Friday actually ......... I hope your Easter weekend has got off to a great start.

It's been a bit of a lazy day here ...... a late start, then a spot of lunch in town.  Good food and a cheeky glass of wine or two to get the weekend started.  
I'm hoping the weather gets a little better as the weekend goes on ...... we're having a family BBQ on Sunday.  I want to try out the new garden furniture, fingers crossed we'll need the brolly to keep the sun off, and not the rain!!! (Probably shouldn't have said that ...... oh well!)

I've been busy in the craft room this last week ...... Sweet Poppy are back on TV next week so I've been having a play with some of the new stencils for the show ........ if you love Lavinia stamps then there's something for you in the new releases.  Watch this space ...... I'll show you what I've been up to next week.

In the meantime, I've also been playing in my journal again.  I'm trying to get my desk tidy, and finish off things that have been lying around for ages.  We're also off on another adventure in the motorhome next weekend, so I'm trying to get my crafty calendar organised before we leave ...... as if that's going to happen!!!

One thing I've kept going back to time and time again, and never been able to get very far with, are two pages in one of my journals.  
Well .......... I've finished them (yeah!) ..... I think!


They started out as mop up pages, oooh, absolutely months, and months, and months ago!  
I've no idea whats on there, as far as product information goes, lets just say there's a little bit of everything gone on at some point!   
They were somewhere I used to clean brushes off,  put left over ink or paint, or even try out new colours of paint. 

I do remember having an idea of putting ink or paint in the centre of the pages, and then closing the book to see how it spread ....... I did like that!  I've no idea what colours, or inks I used ..... it's definitely pink though!
I can see I added some left over pieces of washi tape, old book pages and a little bit of embossing powder here and there .........


There's some texture paste on there, used with my favourite brickwall stencil.  A bit more ink and paint over the top, maybe even some gilding wax, and thats how the pages sat for such a long time.

But ....... a quick scroll through Pinterest whilst having a morning coffee, and I was all inspired again.  
I found some die cut hearts in my bits box and set about trying to match the colours


With the help of some scraps of old book pages again, music paper and washi tape, heat embossing and a whole load of distress colours, I think I got there in the end


I added a little bit of stamping onto the background using an old script stamp, and finsihed off with some paint splatters and a couple of chipboard sayings from Tim Holtz


I'm saying it's finished but, who knows I might go back to it again at some point!
That's the fun of journals ..... nothing is ever finished, there's always room for little extras!

Thanks for popping by ..... enjoy the rest of your day, and have a lovely Easter break


Cheerio until next time ........