Showing posts with label canvas. Show all posts

Friday, 11 August 2017

Good Friends .......

Happy Friday folks ......

The end of another busy week ....... let the weekend start now!

Have you played along with this month's Craft Stamper challenge yet?  No .... well there's still plenty of time.  And ...... if you have already entered don't let that stop you joining in the fun again .... you can have up to three entries, just as long as they all have their own blog post!


The theme is Anything Goes ..... as long as there's rubber stamping somewhere on your project.

Here's an idea for you ....... a pretty little wall hanging


I spotted this idea of using black ink with this type of stamp, and stamping onto Kraft card and I LOVE IT!!!  Thanks to Heather Hoffman (one of the Penny Black DT) for showcasing such a fab technique, I'm hooked.

I simply stamped the image onto a piece of Stampin Up Crumb Cake cardstock, using an old Black Versafine ink pad. I used my MISTI so that I could repeat stamp the image (Penny Black's dancing daisies) until I got a good depth of colour ......


Even though you're using a black ink you still get all the shading on the stamped image ..... love it!

I then stamped and heat embossed in gold, the sentiment ....... you can see I've gone slightly over the top of the flowers with this as it's a lovely large stamp (from Stampin Up's Lovely Friends clear set)


A little tip for you ...... make sure that the black ink is completely dry first, and use an anti static bag over the card before you stamp the words .... this way when you sprinkle on the embossing powder it will only stick to the stamped sentiment, and not on the flower image too. Why am I telling you this ..... I've no patience so the first attempt saw gold powder everywhere!  Oh well .... it's only a piece of card.

I added a few splatters of Black Soot Distress Oxide ink onto the background and a few dots of glitter glue to the centres of the flowers.


I then mat and layered using black and white card and edged the white layer using a gold leafing pen to create the look of a pretty frame.

To mount the design I used an 8x8 square canvas ..... I added a little texture paste here and there using my favourite brick wall stencil


then I painted the whole thing black with a couple of layers of black gesso .... I love the matt finish.


I finished off with a touch of gold wax ..... gently rubbed over the brick wall texture to bring out the detail.

As always we have a challenge sponsor .... this month it's Keep On Crafting


And the prize for the challenge winner is ....... 2 fab stencils along with 2 great stamp sets (see the picture below)

All the challenge info can be found over on the Craft Stamper Blog, along with full details of the prizes ... don't forget we have a monthly Design Winner too!!
You'll also find more inspiration from the rest of the Design Team too ..... Happy Stamping!

Thanks for popping by .... enjoy your Friday and have a great weekend.

I'm keeping my fingers crossed that the weather holds out ..... we've got a whole load of friends coming round for a BBQ this evening, so guess where I'll be this afternoon ..... yep! in the kitchen ..... prepping!  Hubby does have these great ideas. At least I just have to get everything ready ..... he'll be doing all the cooking!

Cheerio until next time ....

Saturday, 15 July 2017

The Art Project 2017

Happy weekend folks .....

I've got special little project for you today ........ can't believe I haven't blogged this before, it's such a long time ago!
Last year ..... yes that's right .... last year, I was told about The Art Project that was taking place to raise money for the Manx Cancer Help charity.

The event was island wide and open to anyone.  Over 500 small canvases were distributed to all those who expressed an interest, and the idea was that you decorated it, however you liked.  It could be any design, using any techniques ..... your own personal style.
They would then be showcased and sold to the highest bidders to raise money for the charity.

Now you know me, I'm not normally one for pushing myself forward for anything but I decided to give it a go.
It was way before last Christmas when I first heard about it and to be honest I'd forgotten until the guy got in touch with me to say that he had the canvases and was I still interested, as he would drop one off for me.  Of course I jumped at the chance and here's what I created .......


I couldn't resist using one of my favourite, Finnabair inspired techniques to create this little piece of artwork ..... it's very Me!
It's a cute 5x5 inches in size and I named it Love Life. 


It's full of all my favourite bits and pieces ..... lots of metal embellishments, pretty flowers, gorgeous butterflies ........


Stencils and pastes, shimmery mica sprays, rich metallic waxes .......


 and of course lots of texture, texture, texture!


These canvases are now being showcased at the Hodgson Loom Gallery at Laxey Woollen Mills and I believe it's the last day of the exhibition today.  I might just have to pop up there and take a look.

Thanks for popping by ..... have a great weekend.

Cheerio until next time ......

Monday, 6 February 2017

It's the little things ........

Happy Monday evening ........

What happened to the weekend?  Mine seems to have gone by way too quickly ......  one good thing though, the boxes are piling up nicely, and we've already had one car load go to the re-cycling centre! Yes, the packing is well under way .... I've even made a start on the old craft room today.  That's going to take a while so we'll say no more about it!

It's time to get the Happy Little Stampers Mixed Media challenge underway this evening.  This month the theme is ......


I quite like tearing paper and card, depends on the project of course but it does give a nice sort of shabby chic look to your designs. Add a bit of ink to the torn edges and you get a nice worn look.

For my inspiration piece this month I've made a little fridge magnet from a tiny 4 inch by 4 inch canvas that I found in my box of  UFO's (unfinished objects!)


The canvas had previously been coloured using Brushos and I wasn't that happy with the result so .... I covered the canvas with a scrap of decorative paper, tore the edges a little and pulled them back so that the colour underneath just peeps through ...... adds that little bit of extra interest.


I then stamped the pretty butterfly from the HLS Especially For You stamp set directly onto the paper and then again onto scraps of coloured card from my stash.  These were then fussy cut and over laid onto the canvas ....... stamping the butterflies onto the paper first means that you have the antenna already there ....... no need to spend time fussy cutting around them ..... way to fiddly.


I added a few rub ons around the edges to add a bit more detail .......


And splattered a little bit of black paint here and there ......


To finish off I stamped the words onto a piece of vellum and heat embossed them in white.  I then tore around the edge and attached it to the front of my canvas


A piece of magnetic sheet glued to the back and you're good to go .... a cute little fridge magnet!


Don't forget the challenge is sponsored by the Happy Little Stampers store


And the winner will receive a $15 discount to spend in the shop .

Check out the HLS Blog for all the challenge details.  You'll also find more inspiration on there from the rest of the Design Team.

Happy stamping!

Thanks for popping by ..... enjoy the rest of your day.

Cheerio until next time .....

Friday, 5 August 2016

Dream BIG! ...... it's the Craft Stamper challenge

Happy Friday folks ......

It's almost the weekend again ..... are you doing anything nice?

Let's finish the week with another Blog Challenge shall we.
Today see's the start of this month's Craft Stamper Take It Make It Challenge and it's the turn of Take a Technique for August ........
STENCILS and  MASKS

Easy .... just use a stencil or a mask (or both) somewhere on your project .... and don't forget to include some stamping on there too ...... very important!

Our sponsor this month is GioGio Craft

And the winner (randomly chosen) will receive a bundle of 4 fabulous stencils (designs are in the picture below)


Don't forget there's also the Design Winner, chosen by the DT.
They get their winning project published in the Craft Stamper Magazine, they're invited to be a Guest Designer on a future challenge and they get a Winners Profile on the Craft Stamper Blog ..... fancy any of that .... then get creating!!

So .... stencils and masks .... we all have them but do you use them?
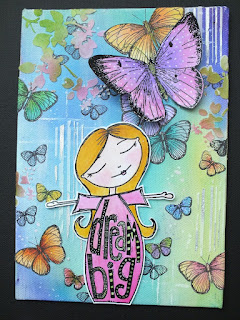
I've used two stencil designs on my project today, to help add detail to the background


Stencils are great for adding extra detail, creating layers and giving depth on your designs.  Use them with inks, or paints, texture pastes or gels ... the choice is all yours.

I coloured the canvas background using Brusho Pigment powders and LOTS of water to blend the colours together.  Once I was happy with it and it was totally dry, I stamped the butterflies randomly over the canvas using a black Archival ink and different sizes of butterfly stamps (Flutters 2 by Inkylicious)


I then stamped the butterflies again onto white cardstock, coloured them using Distress Inks and fussy cut them.

Next I added in some more detail to the background using two Tim Holtz Layering Stencils along with texture paste ....... Stripes (one of my favourites!) 


and the very pretty Blossom, to which I added some colour using my Distress Inks once the paste was dry.
I haven't use the full stencils, just parts of them here and there to fill in the background


I attached some of the fussy cut butterflies over the stamped ones on the canvas, and using a Molotow Liquid Chrome marker I highlighted parts of the stencil design .....


The focal point on the canvas is the super cute little WordGirl 3 designed by the very talented Trish Latimer (aka the Editor of Craft Stamper magazine and also 'The Boss' of the Challenge DT)


How cute is she ..... and she's available, along with a whole load of little friends from Trish's Etsy shop
She was stamped using black Versafine ink and embossed with a clear powder, coloured with Distress Inks and then fussy cut before attaching her onto the canvas.

As she says ..... Dream BIG.   And why not ...... she's certainly doing just that .......


This beautiful large butterfly (Inkylicious again) .... has been stamped onto white card, coloured using Distress Inks and fussy cut before being added as the finishing touch on the canvas .... that's one big butterfly!


I mounted the canvas, which is approximately 6x8 inches, onto a larger canvas board that had been given a couple of coats of black gesso ..... doesn't it make the whole thing just pop!  I love the bright colours.


Now it's your turn .... what will you create using your stencils and/or masks ..... can't wait to see them all in the gallery.

Thanks for popping by .... enjoy the rest of your day and have a lovely weekend.
Mine starts this evening .... the usual Friday night drinks after work with hubby ..... or rather not the usual it's going to have to be soft drinks.  We've decided that August is going to be an alcohol free month at Walmsley Towers!!!  It's going OK so far .... but it is only the 5th! We haven't had a weekend yet.
Oh well .... at least I get dinner out ..... but hang on ....... does a red wine sauce with my steak count!?

Cheerio until next time ....

Sunday, 29 May 2016

Mixed Media ...... the less is more approach

Happy Sunday .......

Happy Bank Holiday weekend too ...... and isn't it a nice one!  Sorry I've been AWOL for the last week or so ...... not really sure where the time went but hey! life gets in the way sometimes.
Everything's good though ... the old craft room door is open, projects are .... underway shall we say. Although I think Mr Mojo has had a little too much sun .... he's just not playing ball!!

This years Isle of Man TT is underway ....... practice week started yesterday.  Lets hope this beautiful weather lasts for the whole two weeks.
It's going to be a busy fortnight .... both of the kids are working all hours for most of it ...... goes without saying, the hospitality industry on the island gets a little hectic this time of year!
Not sure Lauren is looking forward it all, and Chris showed me the rota he's done for his place ....... he was down as working everyday for the whole fortnight (well he is the landlord) ..... as AFD ????   I won't tell you what it stands for ..... you can probably guess.   And if you're in the hospitality business you'll probably know what it means!!!!!  Let's just say he'll be ready for his holiday at the end of it ...... we all will!!

Anyway ..... enough about the TT.  My long weekend got off to a great start ...... a lovely workshop yesterday with a great bunch of ladies.
I introduced them to a little bit of Mixed Media ...... out of the comfort zone for a couple of them I think, which ..... is not a bad thing.  By the end of the afternoon they had all created beautiful pieces of art work that they were really proud of .... well done ladies!!

Here's a few samples I'd done to give them a bit of inspiration and maybe a starting point ...... mixed media but with a little bit of a less is more approach

We started with a card ..... to get them used to using different products, and layering to give texture


They each worked on a small panel of card .... adding colour first using Distress Inks, a little water, and a piece of acetate to apply the colour.  I'm loving this technique at the moment, it's such an easy way to get a nice watercoloured background


Next we added a bit more interest to the background using texture stamps ...... the ones I used here are from Stampin Up ....... Gorgeous Grunge and Timeless Textures ..... they also turned out to be favourites among the ladies on the class.

Next came the main images .... stamped directly onto the inked card to get the placing of them and then stamped also onto a separate piece of card, which they were then coloured and fussy cut


Both the beautiful poppies and the butterfly I used are from Inkylicious.
Before adding the coloured images, I applied some texture paste through a stencil, randomly onto my design to add in a touch of texture ......


Whilst the paste was wet, I sprinkled on some embossing powder ..... a mixture of white and gold detail powders ,,,,,,,, and then I used a heat tool as normal.  This is so cool .... when the EP melts and the paste gets hot it starts to bubble adding even more texture ..... you have to be careful though not to over heat it as it will burn .... how do I knows that ..... hmmm!!!
And I had to add a little something on the inside too ......


Another example I showed them was a card I made for a Blog Challenge earlier this year .......
same sort of thing ..... mixed media but very CAS.  Inks, stamps, texture paste .... only this time I used gilding flakes to add a bit more interest.  You can find more details on this one here if you'd like to take a look


Then we moved on to a canvas .......... a favourite look of mine ...... small canvas board mounted onto a larger one (in true Barbara Gray style)


They used all the same techniques only this time onto a 7x5 inch canvas board


Started with the colour ..... added the texture stamps, and the main images.  Added in some texture paste  ........


Overlaid the coloured images, and finished with a touch of gilding flakes here and there.


For the larger canvas we added some texture paste first and then painted over the whole thing in either black, as I've done here ..... or a colour to compliment the centre piece


As you can see I finished off mine by adding a bit of white paint dry brushed over the texture paste to bring out some of the detail.

Another design I showed them was a little something I did just for me ....... another canvas, this time one of the boxed style .....


Exactly the same techniques as before, same stamps, just different colours


I used a honeycomb stencil this time with the texture paste ......


Added plain white embossing powder over the top and heated it ....... look at how it raises up more ...... I love it!


Once it had cooled down, I applied a touch of Flitter Glu over parts of the raised areas and added some gold gilding flakes, then finished off the whole thing by adding some words.


The whole afternoon was fun and I think I'm safe in saying that they're not scared of mixed media anymore.  It doesn't have to be all dark and grungy, with lots of paints and pastes and metal everywhere .... you can do as much or as little as you like.

I always love the end of the afternoon .... not because I've talked and laughed too much, haven't sat down for nearly 4 hours, eaten far too much cake and biscuits and the class is over but ...... because it's nice to see how everyone took the same information, saw the same samples, used the same products but came up with completely different results and they're happy with what they've created. Look at this fabulous display ....... well done ladies, you deserved those glasses of wine!


Thanks for popping by ..... enjoy the rest of your day and have a great Bank Holiday!

Cheerio until next time ......
xx