Monday 30 January 2017

Back to basics .......

Happy Monday folks .....

I hope you had a good weekend.  Ours seemed to be over in no time, we got quite a bit done though.

My little workshops got underway again on Saturday...... first one this year and the ladies were all dying to get back into their crafting.
I'd had a couple of requests to cover the basics again so I decided to go right back to the beginning and do some simple cardmaking.  CAS designs with some easy stamping techniques to make really pretty cards.

We started off with basic rubber stamping ..... and adding a touch of colour.  How cute is this little guy ..... you don't get any more CAS


I like to work on diagonals ..... always a good layout.  Stamp the main image in one corner, sentiment in the opposite one.

The little frog is from an SU Hostess set from last year and I think he's great for mens cards, kid's, all sorts of occasions.
I've simply coloured him using Distress Inks with a bit of water and grounded him with a touch of grey just underneath him ..... so that he doesn't look like he's floating.

The sentiment is an old Magnolia stamp and is the perfect match for this little guy ..... (I've kissed a few frogs in my time ...... I found my prince in the end!!)


I pulled the whole thing together by drawing a square frame onto the card joining up the image with the sentiment.
You can use a ruler to do this or if you're feeling brave go for it free hand.  I did actually use a ruler but only as a guide, no measuring was done! You can see there are a few bits that are not so straight which is how I wanted it.  I then finished off by adding a few dots of glitter glue.

You all know how I like to put something on the inside ...... well I couldn't resist this little face again!


We then moved on to a little bit of heat embossing ..... stamping with Versamark and using gold embossing powder .......


I can't take the credit for this beautiful design I came across the idea on Pinterest, unfortunately I didn't save the exact pin so I can't name check the person who did it originally.

I used the Altenew Painted Flowers ..... love this set.  Stamped the image randomly onto a piece of white card, and embossed with gold.
A great tip when heat embossing is to always use an anti-static bag before you start stamping.  I tend to always use it when stamping onto black card ...... I'm now trying to get into the habit of using it when embossing on white.


A simple sentiment stamped and embossed onto black card, cut down to size and attached using foam pads ..... such a clean, classic look which could be used for any occasion ..... even wedding stationery I think


Of course there had to be something on the inside too ....


Next up we tried stamping with coloured inks .......


We all tend to stamp our images with black, or brown inks, sometimes grey even and then add colour to the images with pens or pencils etc.  Well why not just stamp the image in a coloured ink instead.

I used various colours of Memento ink to stamp my new favourite butterfly ...... from Penny Black's Butterfly Trio ..... and don't they look pretty


I love the bold sentiment over the top ....... this is where the MISTI came in ..... I inked and stamped the word happy until I was satisfied with the depth of colour


You can see that I finished my sentiment by stamping the second part onto a piece of white card, cut it out and attached it with foam pads for a bit of dimension.

I added a few dots of glitter glue here and there, in co-ordinating colours  to the inks .... pink, green blue etc., and finished off the inside with another butterfly


To finish off the class  we took things a step further and added in a bit of stenciling to create more of a background, and then instead of a card they made a little desk calendar


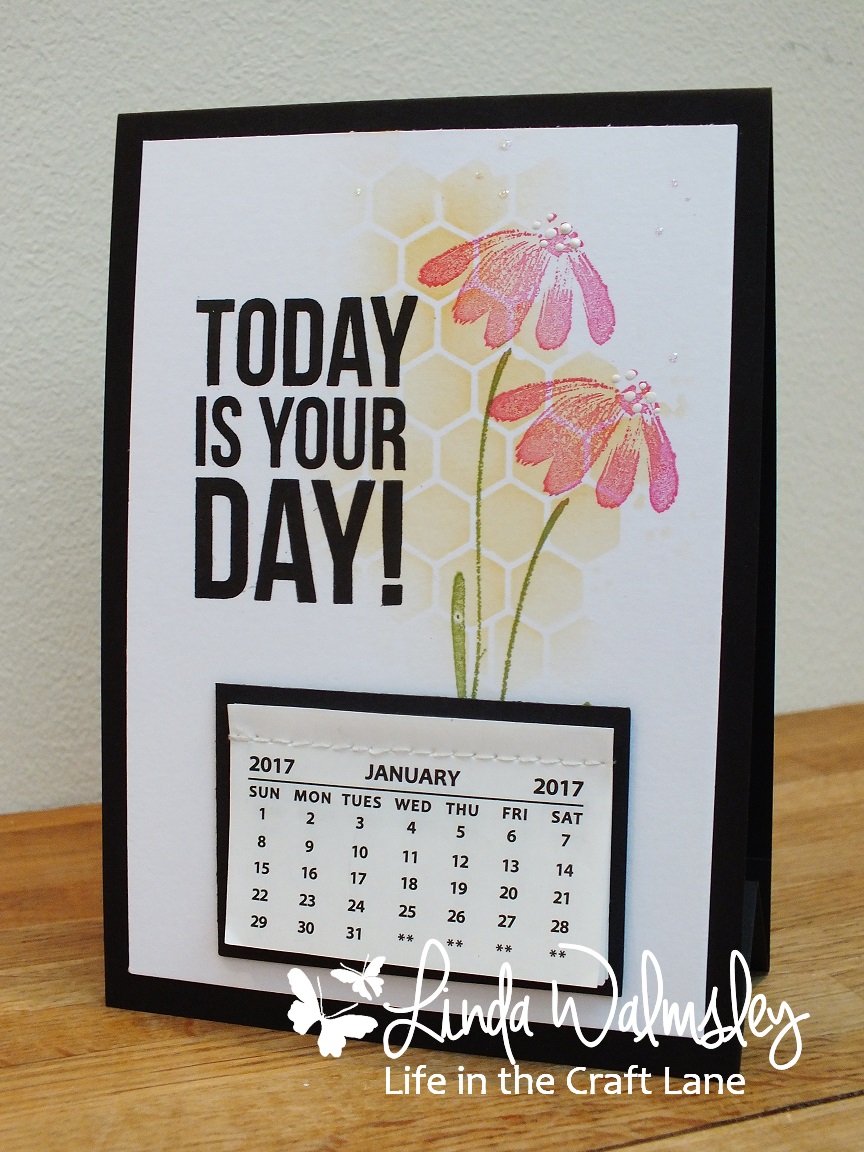
So simple to do .... and they still fold flat to fit in an envelope.


It just an extra piece of card scored and folded and attached to the inside to hold the front and back together so that the calendar stays stood up

A pretty design on the front stamped using coloured inks again ......


And some inspirational words stamped using the MISTI again ......


I think we're going to be playing with dies next time, but that will have to wait until after the house move.

We made a start this weekend to get ready for the move.  We've been making lists ...... lots of lists. Tidying rooms, buying storage boxes, oh ...... and possibly a new dining table!!! Just what we need!
We only popped into the furniture place because we were passing and there it was ...... a beautiful solid oak table ..... not that much different to what we have now but, a better size.  And, it was a great price!!!

I love the table we have now, we've had it for years and I always thought it would stay in the family forever. But I've always wished it was just that little bit wider.  It's fine when there's only 4 of you but over the years the gatherings have got bigger and the more people you have round the table, the less space there is down the centre to put serving dishes etc.
This new one would be perfect ...... and hubby has set his heart on it I think!  We just need to decide what to do with the one we have ..... decisions, decisions!

Thanks for popping by .... enjoy the rest of your day.

Cheerio until next time .....

Thursday 26 January 2017

NBUS number 9 ........ wasn't that a song title !?

Happy Thursday .......

Sorry ...... for the song that's now going around your head ....... mambo number 5!!!
Another late night post .... you can tell hubby's away!  Not for much longer though ..... he's back tomorrow night.

Before he gets home, and the weekend gets underway I'm playing along with Darnell's NBUS Challenge #9.

This week one of the optional themes is Hidden Word ...... or Camouflaged Word
What do you think .......


It's not that well hidden ....... but it is camouflaged at least.

I stamped the pretty butterfly ..... which by the way is my NBUS item.  It's the smallest image from the Penny Black set ..... Butterfly Trio and I love them all!
You know how it is, new flutterby stamps are released, you decide you're not going to buy them because let's face it ..... how many butterfly stamps do you need! You always use the same ones. Well, if you're anything like me it's about twice as many snowflake stamps and I have loads of those (again ...... always use the same ones!)  So ..... this gorgeous set found its way into my stash but it's only just seen ink ......... it'll be seeing a bit more I think, the large image is stunning!

Anyhow .... I stamped the butterfly in various colours of Memento ink ......


I then die cut the word 'happy' from the stamped card (using the CUTplorations happy die) and again from a piece of plain white card so that I could layer it up and add a touch of dimension


I love using this inlaid die cutting technique and I think it looks fab when the die cut is part of the main image.
I added the rest of my sentiment underneath ........


And finished off with a few dots of glitter glue for a touch of sparkle

  
I've really made the most of the time I've had while hubby's been away ....... the house is spotless and tidy! Well .... apart from the old craft room that is, but we won't go there! I can keep the door closed. I've been busy ....... catching up with DT stuff, trying to get ahead of myself a little bit before the move next month.
I've also had a workshop to prep ...... the lovely ladies are back this weekend for our first workshop of the year.  We're going right back to the basics ........ as requested.  So, simple stamping techniques creating beautiful CAS cards ..... with a few tips along the way for adding those special little touches. And ....... one of the finished cards can sit on a desk all year round ..... hmmm, wonder what that can be!
Here's a little sneaky peak .......


Easy layering techniques, and stamping with different coloured inks


Simple heat embossing for a really elegant look.

More of those butterflies again ....... I loved my challenge card so much that I recreated it with a different look .....


And, there's a little bit of cute in there too ....... for a really quick and easy design


Oh well ..... it's getting late.  Another busy day tomorrow then we're out for dinner when hubby gets home.  Apparently he's had fillet steak and lobster this evening .... it's alright for some!  Wonder where he's taking me tomorrow night .......

Thanks for popping by.

Cheerio until next time ......

Tuesday 24 January 2017

Let's get some catching up done .......

Happy Tuesday, what's left of it .......

Thankfully I think the lergy is finally on it's way out ........ yeah!!   I feel so much better today.
Thank you for all your kind wishes ...... I know this thing has done it's rounds, I'm not the only one to have been knocked for six. I hope that everyone is feeling better now!

We've had quite a busy few days here what with one thing and another.  We've not been very far but we've got a lot done.
Remember I mentioned we were hoping to move again soon ..... well we are. Very soon!  I tell you ..... life is never dull here!
Fingers crossed we're looking to get the keys to the new place around the first/second week in February ..... eeeek!!!!  There's a number of things that all need to come together first for that to happen but, they all seem to be falling into place (let's hope I don't regret saying that!)
I'll need to start on the packing again soon.  Oh well ...... we could do with a good old clear out.

But enough of all that ...... what's been going on in the old craft room?
Well ...... not a lot really.  There's been the odd birthday card or two ..... it was Chris's turn today, he's 27 (that makes me feel old!)


I've been busy with some Design Team stuff ..... Sweet Poppy have got some new stencils out and you're going to love them!  If you follow the SPS page on Facebook you'll have already seen some of the fabulous work from the rest of the DT.  I'll share a few of my samples with you later in the week.

I've been planning the first workshop of the year ...... my group of ladies are all chomping at the bit to get back to their crafty sessions which get underway again at the weekend.
By request, we're going to be taking everything back to the beginning.  Nice CAS cards with easy stamping techniques, and a few clever ideas for adding those extra little details.

I've also managed to finish 2 more pages in my journal ...... whooo hoo!  I've fallen sooooo behind with that but don't worry ....... I'm not giving up!!

Here's pages 15 & 16


I've finally got around to playing with Distress Crayons.  I know I'm a little late to this party ...... but better late than never! To be honest I thought before I buy another set ....... I think it's set 10 that I've got to have ....... I thought I'd better use some of the ones that I already have!!

They are so easy to use and react beautifully with water ....... love how they drip!


I simply spread some of the colours onto the journal pages, spritzed with water  and then used a paintbrush to blend the colours over the pages.
I scribbled some crayon onto the top of the page, spritzed more water then lifted the journal and let the colour drip down the page


I added more detail by placing a stencil onto the page and then I wiped over the top with a wet wipe to remove some of the colour leaving the design behind.


A bit of stamping here and there ....... using the PaperArtsy set EKD01 from Kim Dellow
and then a touch of silver and white gel pens to highlight some of the dots


I stamped the trees directly onto the journal page, and then again onto old book pages and paper pieced them


And the little birds were stamped onto white cardstock, coloured and fussy cut before adding them to the scene ......


The words are from Inkylicious and before I stamped them into my journal I painted over the coloured page with some white gesso so that they would stand out a little


So that's two more pages done and I have a list of prompts and ideas for some more.  Just need some time ..... before the packing starts!

Thanks for popping by ..... enjoy what's left of your evening.
I'm off for an early night ..... well early ish I suppose.
I've got the house to myself for the next few days .... hubby's gone to London this evening on business until Friday.  Another reason why we've been rushing around ..... we've been trying to get as much of the house/moving stuff sorted before he left.  It does mean though that I can spend the next few days in the old craft room ..... whoo hoo!!

Cheerio until next time ........

Friday 20 January 2017

NBUS challenge .........

Happy Friday evening folks .......

Well .... the dreaded lergy has got me good and proper this time ...... I feel like crap!!! Excuse the language ...... I'm not very good at feeling under the weather.
I was hoping a couple of days in bed would do the trick but no ..... it's determined to spoil my weekend!  But we won't go there.

You all know the lovely Darnell ..... and if you do then you'll be familiar with her very popular NBUS Challenges (Never Before Used Schtuff!)
If you're wondering who or what I'm going on about ..... where have you been!!!  Get on over there and check out Darnell's Blog .... you'll love it.

There's a little bit of celebrating been going on over in the playhouse ...... anniversaries, Blog birthdays, a new look to the blog .... it's all going on.  And to mark the occasions Darnell is hosting not one NBUS Challenge, not two, but THREE back to back challenges.  Each challenge will run for a week and each one will have an optional theme ..... how much fun is this going to be.


This week it's NBUS Challenge #8 ........ and the theme is to use coloured pencils on Kraft card.


I do like using Kraft card ...... but I must admit I don't use pencils that often.
For this card the stamp is my NBUS item ..... a Stampendous design from way back last year I think.
Simply stamped with Versamark ink and then heat embossed in white ......


I then used Prismacolor pencils on the balloons and blended the colour with Sansodor to get a nice even finish ........


The confetti I coloured using gold and silver gel pens to add a touch of sparkle


This week's challenge is open until January 22nd so there's still time to play along ....... I'm sure you've got a mountain of NBUS stash just like the rest of us!

Thanks for popping by ..... enjoy the rest of your evening and have a great weekend.
I'm off to snuggle on the sofa with my honey and ginger and catch up on some TV.

Cheerio until next time

Thursday 19 January 2017

Time for a little reminder .......

Happy Thursday ......

It's nearly the weekend .... thank goodness.  It's been a busy old week ...... again, but we're getting there.  I just wish that Mr Mojo would play along!

I've got a little reminder for you today about this month's STAMPlorations CAS Card Challenge ...... as always the theme is Anything CAS Goes with the optional colour twist SILVER or GREY


We already had some fabulous entries, but there's still time if you'd like to play along.
Check out the STAMPlorations Blog for all the challenge guidelines and details of the prizes up for grabs

CAS design ..... and making use of the colour twist by doing my stamping in Grey


I do like stamping in grey ink ..... it gives a much softer look than the black.

I've stamped the image (from STAMPlorations  Friends and Flowers) using the Ranger Cool Graphite Dye Ink pad and then added some colour with the Zig Clean Color Brush Markers


I gave the watering can the clear Wink of Stella treatment to add a touch of shimmer .....


My sentiment was stamped in the opposite corner ...... using the grey ink again


And then the whole thing was pulled together by adding a doodled frame around the edge


Don't forget ...... if you place an order on the STAMPlorations website and use the code below, you'll receive a 20% discount on all stamps, stencils and dies

Discount code ....... STAMPGIRLLINDA

Happy stamping!

Thanks for popping by .... enjoy the rest of your day.

Cheerio until next time ......