Showing posts with label Distress Oxide inks. Show all posts

Friday, 23 October 2026

CAS Christmas Card Challenge ........

Happy Friday .........

I hope you've had a good week. 
We're back on the island, and it is nice to be home!  Even if it is blowing a hoolie and it's very wet!!

It's been a bit of a busy week here.  The van has been emptied and cleaned, the mountain of laundry has been conquered, and the kitchen cupboards have been restocked.  
I even found time to spend in my craft room.  

There's still about a week left in this month's CAS Christmas Card Challenge and, as the theme for October is Poinsettia, I didn't want to miss it ........ I do love a nice poinsettia!  


I think it's possibly on the edge of being CAS but, I didn't want to cut the pretty poinsettia down too much! 


I love how this has turned out, and it was really easy to do.  I really like the pink too, different from the tradional red.  In fact, the design is so pretty that I think you could use any colour with it.

I used the Poinsettia Embossing Folder from Lisa Horton Crafts ..... not sure if it's still available as I've had it a while now.
I swiped Worn Lipstick Distress Oxide Ink, direct from the ink pad, onto one side of the embossing folder.  I then added my piece of white cardstock and ran it through the Big Shot.


Just look at that detail ..........  love it!!
As it's a 3D folder, the ink is picked up in various places to highlight the pretty Poinsettia design.  
I simply added a touch of sparkle to the flower using a glue pen and fine crystal glitter, and a touch of gold in the centre


I wrapped some gold thread around the bottom and mat and layered before adding to to the front of my card.  A simple sentiment stamped underneath finishes it all off.  
Well, that's another Christmas card done!

Thanks for popping by ....... have a lovely weekend.
The weather forecast here is not great so I think we'll be staying put this weekend.

Cheerio until next time .......


Products used:

Embossing Folder ........  Poinsettia - Lisa Horton Crafts
Stamps ...... Sparkling Season (for the sentiment) - Gina K Designs for Simon Says Stamp
Inks .......  Distress Oxide Ink - Worn Lipstick; Delicata Metallic Ink - Golden Glitz
Other ...... Quickie Glue Pen; Fine Crystal Glitter; Distress Glitter - Garland; Gold Thread

Tuesday, 30 June 2026

What a week it's been ......

Happy Tuesday ......

Hope you're all well.

Now, where do I start? .......... let's just say,  I did a bit of a thing since my last post.
I won't go into too many details but, I will say that I am OK. 
  
A week last Friday (is it really that long since I blogged!) I had a fall.  
I fell down the stairs at home, top to bottom, and hit, full body weight onto an oak table in the hall ..... ouch!! 
Luckily hubby was there (thankfully he works from home).  I spent hours in our local A&E, and was eventually air lifted to the Trauma Unit in Aintree Hospital across in the UK with, 5 broken ribs, a fractured hip, and a damaged spleen with internal bleeding (I don't do things by half!) 

After a week of being monitored hourly, lots of medication, and plenty of TLC, I was allowed home last Thursday.  
I'm battered and I'm brusied, still in a lot of pain but, fortunately no actual surgery was needed. 
Doctors were happy that the bleeding has stopped, and that my injuries were healing nicely ...... phew! 
Now its just a case of resting, and taking things easy ...... I can do that!  
Unfortunately our next motorhome trip is going to have to wait a while ...... sigh!

So ........ before all that lot happened, I had been enjoying spending time in the craft room.  I'm loving getting back into playing with my stash.  Nothing too fancy yet, but I'll get there.  My crafty shopping list is growing daily.

Here's a quick and easy design that can be changed up to suit anyone .... young, old, male or female


As you can see, this was done with a masculine look but, just change the background, use more feminine colours and it's perfect for girls of all ages.  You could even add extra little details on there.

I simply embossed the background using a Tim Holtz Woodgrain 3D Embossing Folder with some white cardstock, and then dragged Weathered Wood Distress Oxide Ink, directly from the ink pad, over the top, to bring out the woodgrain detail


The large sentiment is simply die cut from a piece of leftover cardstock found in my bits box, which looks like it was a mop up piece from various projects.  I also cut it from black cardstock, and layered the two together, slightly off setting them to give a shadow effect


So easy, but looks great!

I think I'll be sticking to quick and easy, and Clean and Simple cards for the moment.  At least the craft room gives me something else to think about whilst I'm recovering.   
I can also catch up with all my favourite blogs, and watch all those amazing craft videos.  I'll be back to normal in no time.
And ...... I'm getting a little bit excited .......... something is happening in July!!  My lips are sealed for now, but all will be revealed very soon!

Thanks for popping by ...... enjoy the rest of your day.

Cheerio until next time .......


Products used .....

Inks ........ Distress Oxide Ink - Weathered Wood, Versafine Clair - Nocturne
Embossing Folder .......  Tim Holtz Woodgrain 3D Texture Embossing folder
Dies ....... Giant Happy Birthday Die - Lawn Fawn

Friday, 12 June 2026

Creating Balance .......

Happy Friday .........

I hope you've had a good week.  It's been a bit quiet here.  
The island is slowly getting back to normal after the TT.  It isn't quite so busy everywhere, not as many motorbikes!  Not that we've been out anywhere.  The weather's not been great (there's a shock!) ....... someone needs to remind the sun that it is June!

We have been busy making plans though.  We're off up to Scotland in just under two weeks, in the motorhome, so we've been making a start on getting things ready ....... lots of lists!
It's nearly two years since we were in the Highlands, so we're really looking forward to the trip.  It's going to be a few favourite places along with a few new ones, it should be fun!

I've also spent some time in the craft room this week which has been really nice.  There's been a bit of everything ....... planning, prepping, tidying up!  I've even made a few cards (more about those later).   I've watched a few YouTube videos, catching up with what's new.  Made a list of craft stash that I really need (haha!), and I've also found time to play in one of my journals (Large Dylusions journal)


Ever since I bought the 8x8 Pebble Stacks stencil from Funky Fossil I've been wanting to use it in a journal, and I thought this clean up page would be the perfect place.

I have quite a few of these sort of pages .... places where I clean off my brushes, or use left over paint and ink.  I also use these spaces to try out new stamps or stencils,  so there's lots of pages with just random colours here and there, and images that don't necessarily go together but, I think this kind of works.

I used Distress Oxide Inks with the stencil to create my pebbles ......  I love the coverage these inks give, and I like how the paint from underneath still shows through some of the colours giving the pebbles the look of some texture.
I also added a bit of shading using Prismacolor Pencils


The words, I came across on Pinterest ........ 


I used the same Distress Oxide Inks to colour some offcuts of white cardstock.  I then die cut the letters using Spellbinders Be Bold Upper and Lower Case Alphabet dies, layering each letter with one cut from plain white cardstock, to add a little a touch of dimension to the page.

A bit of black pen work on, and around the pebbles,  some black and white ink splatter here and there, and I finsihed it all off with a little stamped bird, perched high on the pile of pebbles ..... so cute!


The right balance is always good, sometimes hard to find though. I do think that we manage it most of the time!

Thanks for popping by ........ have a great weekend.
We're hoping for a BBQ on Sunday, so fingers crossed the weather improves.

And, if you're a football fan ......... enjoy the World Cup.  We'll be watching the games here.
C'mon on England!!

Cheerio until next time ........


Products used .......
Stamps ........ Space Reserved Clear Stamps (the bird ) - (Penny Black), 
Inks ......... Distress Oxide Inks - Pumice Stone, Weathered Wood, Speckled Egg, Tattered Rose, Old Paper, Versafine Clair - Nocturne (my go to black ink)
Dies ........  Be Bold Upper and Lower Case Alphabet Dies (Spellbinders)
Other ....... Large Dylusions Journal, White cardstock, 8x8 Pebble Stacks stencil (Funky Fossil). Black Finer Liner Pen

Thursday, 16 November 2023

Simply Less is More Challenge ........

Happy Thursday! .......

We're fast approaching the weekend again, and we've got a busy few days coming up.

I have been back in the craft room, I'm trying to get some more Christmas cards done before we go off on our adventure in the motorhome next week.  It's proving to be a rather slow process but, I think I'm getting there, with a little help from Blog Challenges  and Pnterest!

One such Blog challenge is ....... Simply Less is More. 
Their latest challenge is ........ Anything Goes (keeping it CAS of course)

Now I do love a CAS design, they're great when you're batch making for Christmas.


I used a brand new stamp set (the only Christmas one I've bought this year, so far!).  It's called Mod & Merry and it's from MFT (My Favourite Things). It's a lovely set with lots of stamps, floral designs, pine branches, stars and snowflakes but, what sold it for me were these cute little baubles.


I stamped them using Distress Oxide inks ...... Kitsch Flamingo, Tumbled Glass and Spun Sugar.  I did use my MISTI, and stamped each one a few times to make sure I got full ink coverage.

I then added a few ink splatters to the background, a touch of glitter to highlight the baubles and finished off with a few dots of white Enamel Accents and a simple sentiment.


I do have a confession to make ...... this card was actually made for the last LIM challenge (the Colour challenge .... use Blue, Pink and White) but, I was too slow and missed the deadline ..... ooops!
When I saw the new challenge theme was Anything Goes ..... I though bingo!  I hope this still fits the bill.   At least I'm in time for this one!

I've also finished decorating the first of our Christmas trees.   Well, when I say 'finished', it's done for now.  All the baubles are on but, there's definitely room for more.


Maybe a little something from the Christmas markets next week will find its way home with me.

We're off out this evening.   It's Beaujolais Nouveau Day! THE international event in the month of November .... apparently! 
 
Every year, on the 3rd Thursday in November the new Beaujolais Nouveau is released.  
I'm quite partial to a nice glass of Beaujolais, and as it doesn't stay around too long I don't want to miss out.  So, we're off to Wine Down this evening to try this years release ..... you never know, we may just bring a bottle or two home with us if it's nice ....... Cheers! or should I say Sante!


Thanks for popping by ..... enjoy the rest of your day

Cheerio until next time .......


Tuesday, 10 October 2023

Seize the Birthday Challenge .......

Happy Tuesday .......

I hope you're well.
I can't believe that we're at double figures in October already, and the scary thing is, I don't seem to have done much!
I must confess though,  I have started my Christmas shopping today, a little bit early for me but hey! the sooner I start, the sooner it'll all get done. Wait a minute, who am I kidding, I'll still be at it on Christmas Eve.  It's not much really, just a couple of baubles for the tree (the grandkids get a new one each year) and a couple of stocking fillers, it's a start though!

Speaking of making a start, I thought it was time I started playing along with a few more Blog challenges again ..... I do love a good challenge!
I thought it was a great way of getting back into the swing of things in the craft room, break things in gently.  Set themes, lots of inspiration to get my mojo going again,  plus, it's a great way to fill up my card stash boxes.

I'd better get a move on for this one though, talk about being on the last minute (some things never change!!)

Seize the Birthday is a fun bi-monthly challenge focused on ....... Birthday cards!


The usual theme is 'Anything Goes' but each challenge has a 'toppings' option.  A little extra that you can choose to add or not. 
The toppings for Challenge #270 is ....... Repetitive Die Cuts


We all like a bit of die cutting don't we, and I had a few die cut words already done so ......


I layered up the happys, coloured them using Distress Oxide inks ........ I just love the depth of colour you get from these inks 


and then attached them to the front of a piece of white card, splattered with a little bit of gold ink


A few matching gemstones here and there, and a stamped sentiment to finish


Very quick and easy to do, but a very happy and colourful birthday card.

As I said, I'm on the last minute for this challenge, the deadline is only hours away, so I'd better get going and link it up.

Thanks for popping by, enjoy the rest of your day.

We've got the family round for dinner this evening so I'd better get some tidying up done!

Cheerio until next time ........


Sunday, 14 August 2022

Fun in the sun ......

Hello there ........ 

Happy Sunday to you.  I hope you're all having a lovely weekend. 
It's another beautiful day here on the island (I could get used to this) ........ the sun is shining and it's getting hot out there!  
 
We've got a BBQ this afternoon, a nice easy one this time ....... we're having homemade pizzas!  Quick and easy to cook on the BBQ, although quite a bit of prep to do first.  Guess where I'm going next! 
    
Apparently the heatwave is about to break,  which I'm sort of glad about.  I don't mind the heat today but we're off in the van again next week so, if temperatures are about to cool off a little that's fine by me. I've been a little warm in the van this week, whilst I've been getting things ready!

Anyway, before it gets all crazy, again, I thought I'd do a little catch up.  
There's not been that much going on in the craft room, its just been too hot but, I have been in there.  Well, I had to pack a few bits to take with me in the van!

I did make this though ...... for a guys birthday


I saw something similar on Pinterest so the design isn't all mine ....... when it comes to mens cards Pinterest is always my go too!

I used a Funky Fossil stencil for the speech bubbles and Distress Oxide Inks ........ they are so easy to use with stencils 


I used a different coloured oxide for each of the bubbles, and then searched through my birthday stash for sentiments that fit inside each one.


I added a few matching coloured enamel dots here and there to finish off 


It's been a busy couple of weeks with one thing and another .... all good though.
We've had birthday celebrations, which were fun.   We finally put an end to something that's been going on for the last eight years ...... I won't go into details, I'll just say that everything went in our favour at last, so it was worth all the time and effort!
And my big brother and sister-in-law came over to visit for a couple of days which was lovely as we don't see each other very often these days.  They brought their granddaughter, Amelia with them too .... she's such a sweetheart, and growong up fast!


We caught the steam train and spent a day down in Port Erin. 


Amelia loved the train.

It was another glorious day .......


We had fun on the beach, and a bite to eat .....


We spotted one of the dolphins (couldn't really miss it!!) that are hiding all over the island this year for The Big Splash Art Trail


Then it was time to head back to the train .......


Some of us were a little sleepy on the way home ........ awwww!


And to end the day .......... a BBQ, and a rainbow.  Perfect!


It was lovely to see them, they didn't stay long enough!

I've also managed to make a start on some Christmas cards!!! A crafty day with the girls, and I was very productive for once but,  I'll save those for another post.  
Time to enjoy the sunshine I think ...... now where did I put the sun cream! 😎

Thanks for popping by ...... enjoy the rest of your weekend.  

Cheerio until next time ....


Supplies
Stamps: Various sets of birthday sentiments from my stash
Stencils: Say What stencil (Funky Fossil)
Inks: Distress Oxide Inks - Tumbled Glass, Speckled Egg, Spiced Marmalade, Scattered Straw, Abandoned Coral; Versafine Clair - Nocturne (for the sentiments)
Other: Self adhesive enamel dots

Friday, 1 July 2022

Welcome to July! ........

Happy Friday ......

I hope you've had a lovely week.  We're sadly coming to the end of our Scottish motorhome adventure.  Just one more night, then it's time to catch the ferry back to the Isle of Man, and start planning for the next trip ...... six and a bit weeks and counting!
Can you believe we're in July already ........ half way through 2022!!!!  My goodness ...... it'll be Christmas before we know it ....... just saying!

A new month means a new CAS Mix Up Challenge.  
I'm hosting this month, and it's the turn of the Watercolour Challenge, with an added little twist ......


 I would like you to use 'Things with Wings' on your cards, as well as using the watercolour element of the challenge 

Things with Wings could be anything from birds, butterflies, bees, to fairies or even aeroplanes. As long as it's got wings you'll be fine.  Keep your cards CAS (Clean and Simple) and remember to use watercolouring on there too.

Here's a couple of ideas for you, both using very easy watercolouring techniques .......


Choose your image and stamp using a water reactive coloured ink.  Distress Oxides for example, are perfect for this, they stamp beautifully and react so well with water.  
Use a wet paintbrush to gently pull some of the colour out from the outline, trying to keeping as much of the stamped detail as possible.


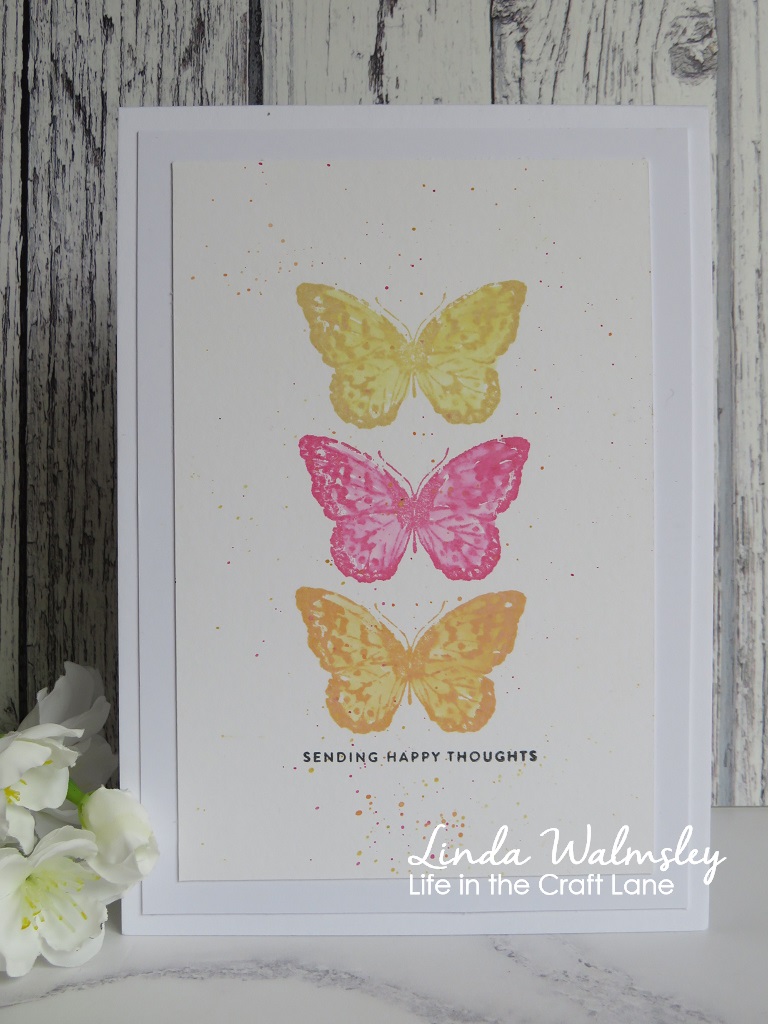
I used Distess Oxides for my card, stamped onto watercolour card ........ Scattered Straw, Picked Raspberry and Dried Marigold  

I then used a wet paintbrush to gently move the ink ...... I found the more water on your brush the more the colour seemed to move, so don't have the brush too wet.
  
If you would rather add more colour over the top of your stamped image instead of taking colour from the outline, let your stamping dry,  smoosh the inkpad onto a craft mat, spritz with water and then use a paintbrush to watercolour your stamped image ..... hope that makes sense!


Some of the original stamped detail will disappear a little, but this gives more of a watercoloured effect I think


I stamped a sentiment underneath my butterflies, and finished off with a few ink splatters from the same colours of Oxides, over the butterflies


This next technique is really quick and easy to do .......


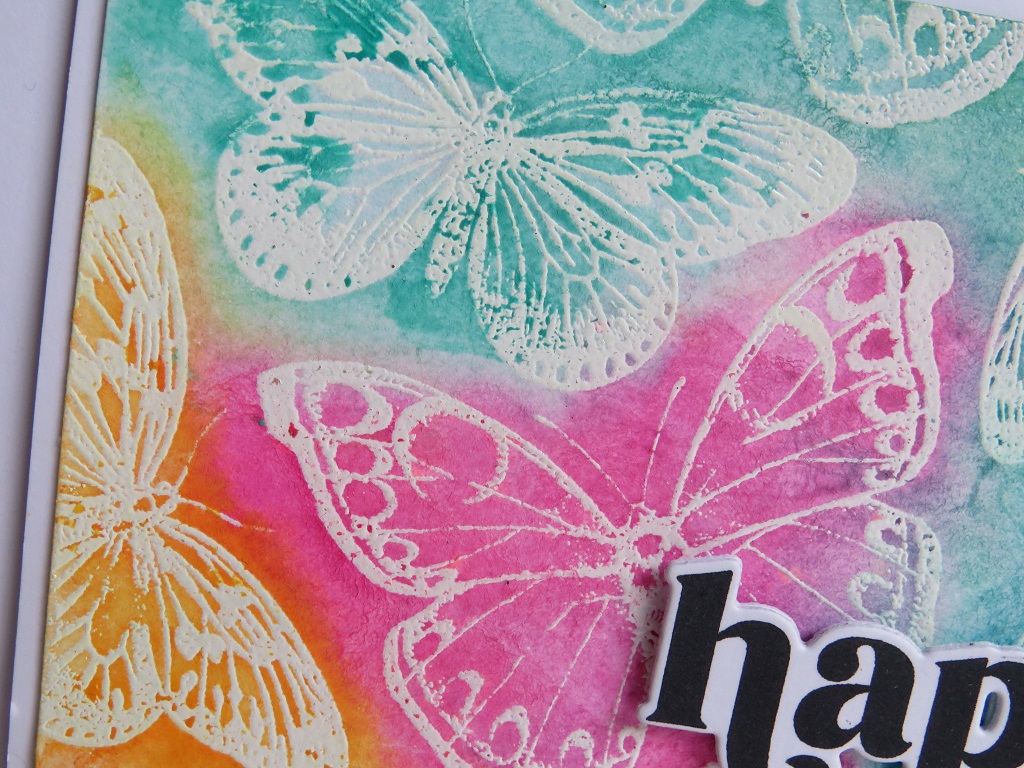
I stamped the butterflies all over a piece of white watercolour cardstock using Versamark Ink, and then sprinkled them with white embossing powder and heat set.


Once the embossing powder had cooled I then spritzed the cardstock with water and used Altenew Watercolour Paints to add the colour.
I spritzed the paints with water before I started, to get them into a liquid, and then used a paintbrush to pick up the colour and drop it onto the wet watercolour cardstock.  The water on the card helps to move the colour around but I did sprtiz again to make sure the colours blended together nicely


Repeat the process until you're happy with the depth of colour.   Use a paper towel to mop up any excess ink and water, this will also clean off your heat embossing, letting your stamped images show through.  
I prefer to leave this to air dry but you could use a heat tool, just be careful not to over heat the embossing.


The sentiment was added in two parts ...... one stamped and die cut (I do love the font on this stamp set from The Greetery!) and the second part simply stamped on a snippet of card and attached underneath


Check out the CAS Mix Up Blog for more inspiration for this months challenge from the rest of the Design Team.  There's also links to some videos using watercolour techniques.

Happy stamping!

Thanks for popping by ..... enjoy the rest of your day.

We've started our journey back to the Isle of Man today .... sigh!  
We had three lovely nights on Bunree Campsite. although the weather wasn't great.  I will share some pictures with you later.  
We really liked the site though, in fact we've already booked for next April.  I'm always ready for a trip to Scotland!

Tonight we're on a campsite called King Robert the Bruce's Cave Campsite in Kirkpatrick Flemming, not far from Lockerbie. Just the one night, then tomorrow we finish our drive to Heysham to catch the afternoon ferry back to the island.  Time to go home!

Cheerio until next time ........


Card 1
Supplies
Stamps: Watercolor stamp set CMS 217 (Tim Holtz); Tiny Words (Simon Says Stamps) for the sentiment 
Inks: Distress Oxides -  Scattered Straw, Picked Raspberry, Dried Marigold; Versafine Clair - Nocturne (for the sentiment)
Other: Watercolour cardstock

Card 2
Supplies
Stamps: Antique Engravings (Hero Arts): Opposites Attract Sentiments (The Greetery)
Inks/Paints: Versamark ink; Versafine Clair - Nocturne for the sentiment
Other: White Embossing Powder (WOW!); Opposites Atttract Matching Sentiment Dies (The Greetery)