Tuesday 30 April 2019

There's a new Uniko release on it's way ......

Happy Tuesday afternoon .......

It's going to be a busy week.
May is just around the corner, which means there's a whole new batch of Blog Challenges to look forward to.  It's workshop weekend coming up .... more calendar pages.  And ..... there's a brand new release launching from Uniko ..... new stamps, new dies, and a new stencil design. You're going to love them!
Actual release day is Sunday 5th May, and all the new products will be available on the Uniko website from 9pm (BST).
Over the next few days join Bev and the DT as we introduce you to each of the new products and give you some inspiration too ..... can't wait!

Here's a little sneaky peek of what's on the way .......

There's gorgeous new stamps ...... pretty florals you can mix and match


Great new backgrounds .....


A new cool stencil design .....


And some fabulous new dies that match two previously released stamp sets .......


I've had so much fun playing working with this new release, I can't wait to show you the results.
Join me tomorrow for the first of the introductions.

Cheerio until then .......

Monday 22 April 2019

What a lovely long weekend .........

Happy Easter Monday ......

I hope you're enjoying the Easter break ..... its been lovely here.  The sun has been shining all weekend and we've had a fabulous relaxing few days, sat in the garden most of the time.  I've even managed some time in the craft room. 
I was supposed to be tidying up in there, ready to start on new projects this week but I got a little sidetracked.  It was also a little too warm in there so I didn't stay that long ...... making the most of the sunshine has been top of the list this weekend. 

I did stay in there long enough to join in with this months Happy Little Stampers ATC challenge though


Whilst I was 'tidying' I came across some unfinished MDF Artist Trading Coins.  I haven't made any in a while so I thought it would be fun to use April's challenge theme ........ Pretty Papers (something else I haven't used in a while!) and play along


A set of three, decorated in a beautiful vintage paper, which I think was from IndigoBlu many moons ago.

I simply glued the paper onto the coins, and used an emery board to trim off the excess


I added word stickers to each one .....


And finished off with a dot of Liquid Pearl


I also painted around the edge of each one using a gold paint so they do actually look like coins


Thanks for popping by ..... enjoy the rest of your Easter break.
I think it's time for a glass of something chilled and an hour in the sunshine now ....... living the dream!

Cheerio until next time .......


Products used:
MDF AT Coins (That's Crafty); White Gesso; Glue and Seal adhesive (Ranger); Decorative paper from my stash (I think it was from IndigoBlu); Chit Chat Stickers (Tim Holtz); Rose Gold Liquid Pearls; Gold Acrylic paint

Friday 19 April 2019

It's the Easter weekend .......

Good morning ......

Happy Good Friday! The long weekend starts here!
What have you got planned for the Easter weekend? I can't believe there's nothing in our diary so we're making the most of it and having a nice relaxing few days.  You'll find me in my craft room later ...... or possibly the hot tub!

I'm starting my weekend with the lovely Lucy and Sweet Poppy Stencils this morning.  They're back on the TV today ...... 10am (I'll just about make it I think!) and then again at 3pm this afternoon, on Hochanda (Sky 673, Freeview 85 and Freesat 817).
Lots of fabulous stencils, great pastes and finishes ....... the new Ultra-fine Glasss Micro Beads are amazing! And, there's some brand new stamp sets. Along with all the fab tips, techniques and demonstrations from Lucy.

Here's just a couple of cards I made for the show using the gorgeous Perfume Bottles ........

 
Classic black and white with just a hint of colour ......  I love it!


Simply a nice black ink sponged through the stencil ........ with just a touch of silver


A cute little satin bow attached on one of the bottles and a few ink splatters onto the background


The sentiment (from one of the new stamp sets) was stamped in gold ink and I also added a little bit of gold heat embossing to finish off, using just part of one of the sentiments


I've used the same stencil here, but with a little colour this time ...... and also added those gorgeous Micro Beads over the top ......


I used Oxide Inks through the stencil first to add the colour,  then applied the Translucent Paste over the top and finally sprinkled the Clear Glass Micro Beads onto the wet paste ......


Just look at that fabulous texture the beads create ...... so pretty


I added my sentiment, and a few dots of glitter glue here and there


And finished off by stamping around the edges to add a bit more interest


OK ..... I've just got time to grab a cuppa and get comfy on the sofa ready for Lucy's first show.  I do hope you can join me.

Thanks for popping by ..... enjoy the rest of your day and have a very Happy Easter.
No chocolate for me this year, this is my Easter egg .....


Meet Esther ...... the latest addition to the Walmsley family.  I just couldn't resist!

Cheerio until next time .....


Products used:
Stamps: Life is a Journey clear stamp set (Sweet Poppy)
Inks: Versafine Clair - Nocturne; Delicata Metallic ink - Golden Glitz, Silvery Shimmer; Distress Oxides - Worn Lipstick, Picked Raspberry
Other: Perfume Bottles stencil, Translucent stencil paste, Glass Micro Beads (all Sweet Poppy)

Thursday 18 April 2019

There's still time to play along with the CAS Stencil Challenge

Happy Thursday evening .......

It's the Easter weekend.  Four days to spend with family and friends, and guess what ...... the weather is looking good!

It's also time for a quick reminder that the CAS Stencil Challenge is still open if you fancy playing along


This month the theme is Embossing Pastes/Gels ...... great products for using with your stencils, to add dimension and texture.  There's lots on the market, from clear and white pastes, to coloured and metallics, and even pretty coloured glitter gels. 
Use the clear ones on top of colour to add dimension, use the coloured pastes for quick and easy designs or, mix the white pastes with inks or paints and create your own colours.  The main thing is have fun!
Oooh ...... and don't forget to clean off your stencils once you've used the paste!

I've used a Nuvo Glimmer Paste on my card, over the top of Distress Oxide inks ...... 


I simply inked through one of Tim Holtz's pretty floral stencils directly onto a white card blank using Spun Sugar and Shabby Shutters Distress Oxide inks


I then applied the Glimmer Paste over the top ...... I used the Moonstone which is a pretty clear paste filled with a beautiful, really sparkly, crystal glitter


I added a few splatters of the pink Oxide Ink  onto the background .....


A few sparkly sequins and a simple sentiment ......


I love how the colour of the Oxides has intensified a little through the glimmer paste, giving a real pretty feminine look


Our Guest Designer this month is the lovely Bobby (bits & pieces)  Why not pop by and say Hello and also check out what the rest of the Design Team have been creating.

Thanks for popping by ..... enjoy the rest of your day and have a lovely Easter weekend.
We've nothing planned, just the family for Sunday lunch.  You never now, if this nice weather continues we might just get to BBQ!

Cheerio until next time ......


Products used:
Stamps: Extra Special (Altenew) for the sentiment
Inks: Distress Oxides - Spun Sugar, Shabby Shutters, Distress Archival - Peeled Paint (to stamp the sentiment)
Other: Floral Stencil (Tim Holtz); Glimmer Paste - Moonstone (Nuvo by Tonic); Sequins

Wednesday 17 April 2019

Calendar Girls .......

Happy Wednesday .......

And Happy World Malbec Day for all you red wine lovers!!


We're off out this evening for a special dinner to celebrate (any excuse!)  Our favourite little restaurant is hosting a five course tasting menu, all paired with the perfect Malbec wines ...... there's even a Malbec ice cream ....... we had a cheeky tasting on Monday and it's delicious!!

Enough about food and wine ........ Last Saturday was out first crafty get together of the year, it was so nice to see everyone and we had a lovely day.  We made a start on creating calendars for next year.  A little bit early but, we're planning to do about three pages each month, and then decorate the covers so it's a work in progress.

Inspired by the very talented Eileen Godwin, we'll be using different inks, different techniques with stamps and stencils and just generally having fun.

We're using the Create-a-Calendar from PaperMill Direct ...... the quality is amazing and the pages take the inks really well. 

Here's a quick look at how mine are coming along ...... I have one calendar that I use to plan the pages and then another one to re-create on the day, with the ladies.  When I say re-create I don't mean copy exactly.  Each page is slightly different, the inks don't always go on the same, and I might use different stamps etc.

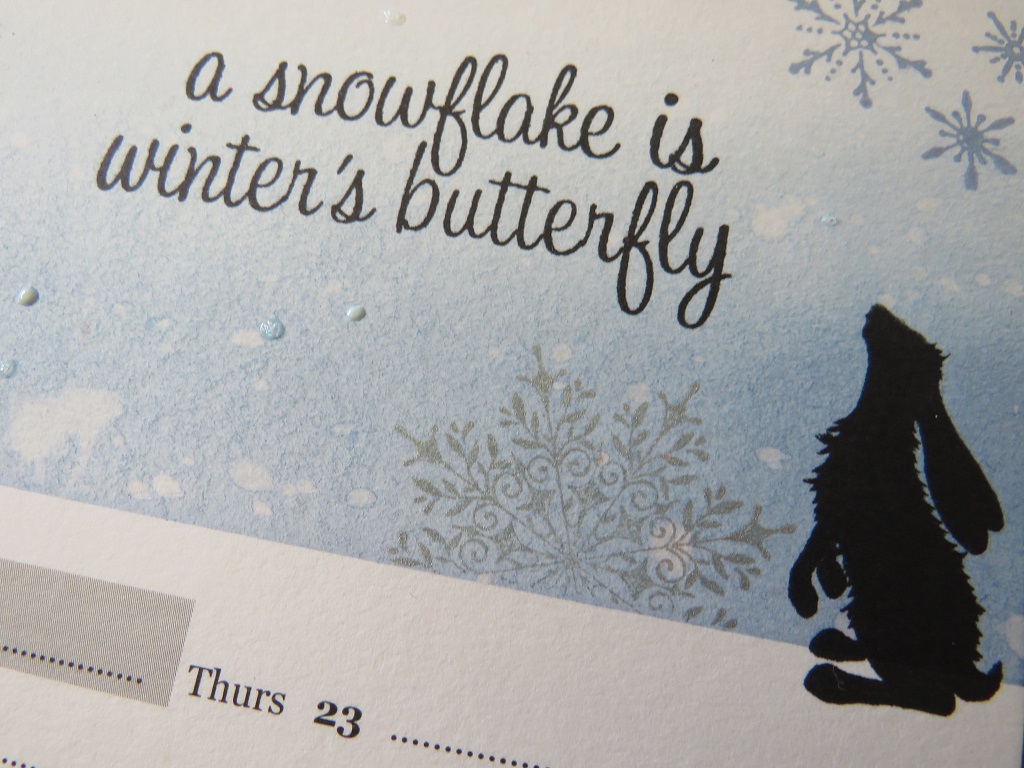
Pretty snowflakes for the start of the year .....
The one on the left was my sample .... the one on the right is the one I did on the day ..... see hwat I mean about them being different, I've used exactly the same inks but I've been more heavy handed on the second version


Simple ink blending using Distress Inks ....... three shades of blue applied with a brush, working from the top down to the centre, and the bottom up leaving some white(ish) space in the middle


A few splatters of water then some rubber stamping, finishing with some heat embossing on the large snowflake.
And I decided to add some words to this page ..... a simple sentiment stamped in black and a cute little silhouette which I'm going to continue through the calender if I can .....


More ink blending for the second page ..... Memento inks this time


This was one of Eileens designs ...... again see how the second version is so different from the first.  I've used more ink on the background and splattered it with water ......


I changed the colours of the foliage slightly too .....


Finally, inspired by Eileen again we tried the Gesso Resist technique with stencils


This was so much fun ...... and my two pages ended up completely different. Same techniques, gesso through the stencil,  ink applied over the top and then carefully wiped away from the gesso. 
I changed my ink colours slightly, and I only did a small area of stenciling on the second one .....


Love the look of these coloured inks for the foliage ...... but I also like the black


We all followed the same techniques but didn't always do the same months so each of the calendars will be completely different when they're finished ....... we are going to try and do another three pages next month!

Thanks for popping by ..... enjoy the rest of your day.
It's beautiful here, the sun is shining and it's finally warming up out there.  Let's hope it lasts for the Easter weekend.

Cheerio until next time ......


Products used:
January
Stamps: Snowflakes - Tim Holtz, Hero Arts, Stampn Up!; Sentiment - Hero Arts; Bunny - Lavinia
Inks: Distress Inks - Stormy Sky, Faded Jeans, Chipped Sapphire; Distress Oxide Ink - Stormy Sky for the small snowflakes;Silver ink (Deliata); Versafine Clair - Twilight, Nocturne
Other: A4 Create-a-Calendar(PaperMill Direct); Nuvo Drops - white; Stickles Crystal Glitter Glue; Low-tack stencil tape

February/March
Stamps: ELB30 from PaperArtsy; Cat and the mouse are both from Lavinia
Inks: Memento - Nautical Blue, Potter's Clay;  Versafine Clair - Twilight, Chianti, Nocturne; Archival - Orange Blossom, Red Geranium; Dandelion
Other: Low tack stencil tape

March/May
Stamps: Leaf Sprig - Stampendous; Wildflower, Hare - Lavinia
Inks: Memento - Pear Tart, Morocco; Versafine Clair - Nocturne; Archival Rose Madder, Leaf Green
Other: Heavy White Gesso, Stencils - JOFY; Funky Fossil, White Posca pen

Sunday 14 April 2019

It's Stencil Sunday on the Uniko Blog ......

Happy Sunday folks ........

I do hope you're enjoying your weekend.  We're having a nice lazy day today ........ nowhere to go, nothing to do, I'm not even cooking Sunday lunch! (the table is still full of stuff from our crafty get together yesterday!!)

I am on the Uniko Blog today though for Stencil Sunday.
This is a relatively new series on the Blog ....... each month a member of the Design Team will showcase one or more of the fabulous Uniko Stencil Designs.

I've chosen the beautiful Mehndi Mandala, to create some quick and easy cards, that could be suitable for any occasion.  Just change the colours ..... you change the look.


If you fancy a closer look at these designs grab a cuppa and pop over to the Uniko Blog.

As this month's theme on the CAS Stencil Challenge is all about Embossing Pastes/Gels I thought I would link up this design ......


I think I can get away with calling it CAS .... what do you think?   There's still the look of lots of white space even though I've used the glitter gel in the background


Enjoy the rest of your weekend.
Time for breakfast I think.

Cheerio until next time .....