Showing posts with label heat embossing. Show all posts

Thursday, 7 December 2023

It's that time of year again .......

Happy Thursday ........

How are you?  Full of the festive spirit yet?  
We're getting there.  This bug is still hanging on by a thread but, it will not beat me!!
Lists have been made (lots of lists!)  The shopping has started (note to self ..... I need to buy wrapping paper). 
I think I've eaten my body weight in mince pies (the diet starts in January ..... again!). I've tried the odd Christmas cocktail (or two ...... hic!) And,  I'm still making Christmas cards!


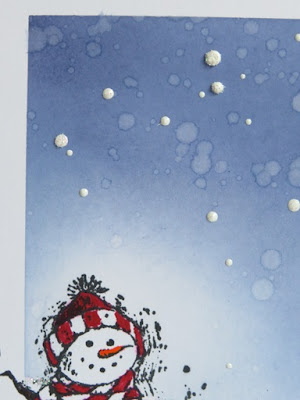
I guess he had to come out at some point now didn't he ...... my favourite little snowman.  I'm not even sure he's still available to buy.  He's an old wooden stamp from Inkadinkadoo, and every year I have to use him on at least one card ....... he always makes me smile 😊

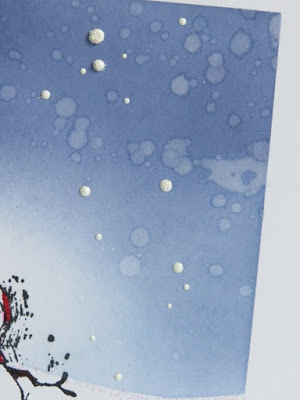
I stamped the snowman onto a piece of white cardstock.  Masked around the edges to create a frame, and then slowly blended shades of blue Distress Inks inside to create my night sky


Once I was happy with the colour, I splattered the ink with a little bit of clean water and let it sit for a few seconds.
I mopped up the excess with a paper towel and then added a few dots of white Enamel Accents here and there, sprinkled with a touch of fine crystal glitter, to give it a snowy look


The snowman was coloured using brush markers ..... he's so cute!


And I finished off with a heat embossed sentiment and a touch more 'snow'


Speaking of snow, I've loved seeing all the pictures on Facebook of the snow across in the UK at the moment.  We might have even been in some of it had we gone on our trip ........ brrrrr!
If you're snowed in at the moment, stay safe and warm.

Thanks for popping by, enjoy the rest of your day.

Cheerio until next time ........


Wednesday, 22 November 2023

Red and gold for Color Hues ......

Happy Wednesday .........

I hope you're enjoying your week.
We should have been going across to the UK today, starting our trip around some lovely Christmas Markets but, this cold I've got had other plans ........ yes, I'm still sneezing for England!  So, we've decided to cancel the trip (sigh!)

Hubby started with the same thing over the weekend and we've both been really bad ..... this thing is brutal!  I am starting to feel a little better today but hubby is about 24hours behind me so he's still quite bad.  We thought that perhaps it wasn't the best idea to set off in the van, so, we moved the ferry to early next year (we still haven't been on the new boat yet!!!) and cancelled all the campsite bookings.  We're disappointed but, it was the right decision.  There's always next year! 

So, today I'm playing along with the latest Color Hues Challenge.


Challenge #76 is all about Red and Metallic Gold ...... one of my favourite colour combinations, especially for Christmas cards (yes, I'm still making mine)


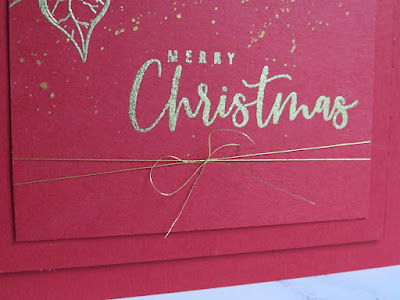
I used the pretty stamp set ....... Slimline Poinsettias from the Big & Bold range by the Colarado Craft Company.  
I stamped one of the images onto red cardstock and heat embossed with WOW's Metallic Gold Embossing Powder
  

I added a few gold ink splatters around the edges ......


and finished off with a sentiment and a little gold thread tied around the bottom ..... very festive!


Another one for the Christmas box!

Thanks for popping by ...... enjoy the rest of your day.
Lauren is currently putting up her Christmas tree so the dining room is beginning to look festive (sorry if it's still too early for some you!) 
And of course because we haven't gone away, maybe by the end of this week I'll have the tree in the lounge done.

Cheerio until next time ........


Thursday, 28 September 2023

Happy Birthday Jenny .........

Happy Thursday ......... I think!

It's been a funny old week, not sure what day it's been for most of it ...... Wednesday was Thursday, I thought today was Friday, roll on the weekend!!

I have been in my craft room though, which is a good thing.  
It took me a while to get anything done because, after the big tidy up a few weeks ago I couldn't remember where anything was!  I'll get there, eventually.  
It was also a bit weird having hubby in there too (did I mention we're now sharing an office!!)  

Anyway, I had a very special card to make (even made a box for it too!) because, one of my lovely crafty friends had a very special birthday earlier this week .......
 

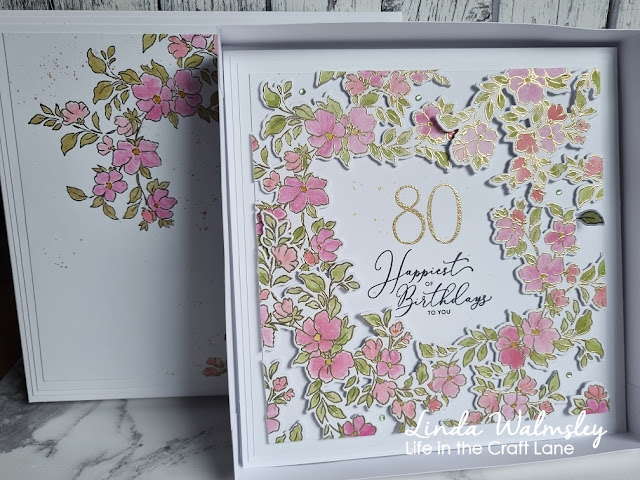
Yes, it was Jenny's 80th birthday ....... WOW!  so you can understand why it had to be a special card.

It's 8x8 inches finished size (not a size I make very often) and I couldn't find any 8x8 envelopes (goodness knows where I've put those!!!) hence the box.

I used the pretty Blooming Branch stamp set from Pink Fresh Studio.  Stamped and heat embossed in gold onto white cardstock and then coloured using Distress Inks and a water brush.


I stamped and coloured the image a few times, and then cut them out using the co-ordinating cutting die


I stamped my greeting in the centre of a piece of white cardstock


and then arranged the die cuts around the edges to form a frame, overlapping them in places to add a touch of depth and dimension


Once I was happy with the arrangement,  I attached the die cuts using foam pads and then trimmed off the excess around the edges, keeping any larger pieces that I cut off.  I did a bit of matting and layering before attaching the panel to the front of my cardblank.

A few splatters of gold ink and some pretty gemstones finished off the front nicely.


Inside the card, I stamped and coloured the pretty floral branch again and I also used one of the die cut pieces I'd trimmed from the front of the card


I was so pleased when I actually remembered how to make a box ....... first attempt too!!  


I kept things clean and simple, but matched the card perfectly!

Can I just say, I'm loving the new Polished Embossing Powders from WOW!, they are soooo shiny!  They come in Gold and Silver, Regular and Super Fine and they are gorgeous! If you love your heat embossing, you need to try them.

Well that's it for now.  
Thanks for popping by ...... enjoy the rest of your day.

Cheerio until next time .......


Saturday, 17 December 2022

Just one week to go .......

Happy weekend! ........

I hope you're all well, and that you've had a good week.  It's been a bit of a chilly one here.   
We've had freezing temperatures all week, wintry showers with snow here and there, but that's mostly been up on the mountain, and lots of ice around. Thankfully we didn't have to go too far, and hubby is still working from home so we could stay off the roads pretty much.
I wonder if we'll have a white Christmas ..... now that would be nice!

Speaking of the big day ...... this time next week it will be Christmas Eve!!!!!  Are you all ready?

The food prep has started here (yum!), and the gift wrapping has begun. (Note to self ..... next year make a list of where you've hidden everything you've bought!!!!) 
And guess what ...... the Christmas cards are all done ..... whoo hoo!!!  (I don't think I've forgotten anyone!)

I finished off with another quick and easy design, and look, I'm using up more of my coloured cardstock


Tall and slim this time, using the Gina K stamps again, from this years Simon Says Stamp STAMPtember ..... I do love a nice snowflake!

I stamped the large snowflake with Versamark ink, and then heat embossed in white ...... so pretty!


I then took an ink pad that was a similar shade to my cardstock (I think it was Peacock Feathers Distress ink) and inked top and bottom of the card to give a sort of spotlight effect around the snowflake.
I splashed a little water over the ink, let it sit for a few seconds and then mopped up the excess with a paper towel to give a touch of extra detail to the background before splattering white paint over the top to give a snowy look


To finish off, I added just a tiny touch of glitter to the snowflake and then drew a line with a Stardust Gel Pen to make it look as though the snowflake was hanging from the top of the card


Really simple to do, and perfect for slim cards.

Well that's the last of my Christmas cards for 2022 ....... made, written and posted!
I know I say this every year but, I am going to start early next year!!

Thanks for popping by ...... have a lovely weekend.  
Now, what's next on the list!

Cheerio until next time ....... 

Tuesday, 6 December 2022

More quick and easy Christmas cards .........

Happy Tuesday .........

I'm on a mission this week, to get all my Christmas cards finished, written, and posted, and then fingers crossed they get to where they're going before Christmas!  The postal strikes in the UK are not making things easy this festive season but, I suppose that is their intention!!!

Anyway ...... another quick and easy idea for you today, using a large sentiment stamp as my main focal point ....... I do love a large sentiment!


I'm also using up some of that gorgeous deep purple cardstock too!

I simply stamped my sentiment in the centre of my card and heat embossed in gold ..... this one is from the Savvy Sentiments - Merry Everything stamp set by Colorado Craft Company.  (there's four large sentiment to choose from and I love the font!)


I then had some fun splattering gold, silver and white inks around the sentiment and cvered the background ..... easy!


I added a few tiny gemstones here and there to finish off and give a little extra Christmas sparkle.
That's another batch done!

How are your festive preparations going?
It's all about the food and drink here this week.  
Shopping lists have been made, the oven is getting cleaned on Friday, and the Christmas cook book is out and ready ...... time to get the gravy started!


We've just had the Christmas wine delivered too so that's all sorted ......... cheers!  Just need to put it away somewhere then we don't drink it before the big day!!!


Hubby and I also took some time out yesterday, did a spot of Christmas shopping and went for a lovely festive lunch. Well, he's had a dentist appointment today, and I think the next few days are not going to be pleasant.  I won't go into all the gorey details ........ I'll just say rather him than me!!  

Thanks for popping by ..... enjoy the rest of your day.

Cheerio until next time .......


Friday, 2 December 2022

On the second day of December ........

Happy Friday!

I hope you've had a good week.  
What's everyone got planned for the weekend?  I think I might make a start on the Christmas gift wrapping tomorrow ..... one of my favourite festive tasks.  

I finally made time to start writing some Christmas cards today ....... yeah!!   
The posting dates may have had something to do with it, as I have a few overseas cards to send.  And, it's our crafty Christmas lunch on Sunday so I had to get those ready ....... Secret Santa gifts too  (I do love this time of year!)

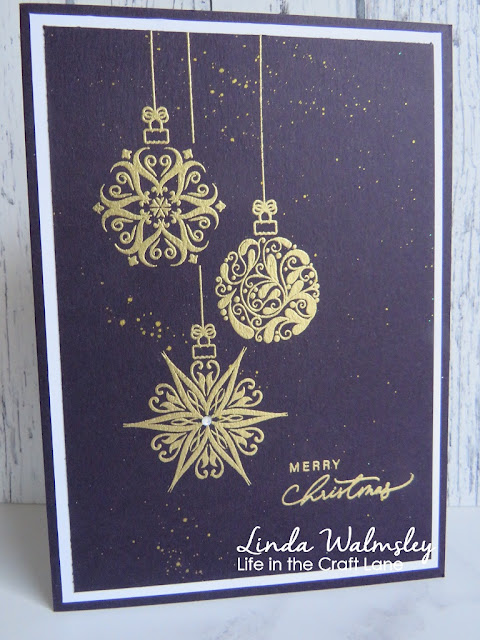
My Christmas cards this year have all been very CAS, and made in batches  


The gorgeous Sparkling Season stamp set by Gina K Designs, from this years Simon Says Stamp STAMPtember,  is perfect for creating elegant looking Christmas cards with minimum fuss.

These were done using one of the stamps from the set, along with one of the sentiments ......... couldn't be more simple.  And, if you use a stamping platform, then everything can be done at once.


I stamped in Versamark, heat embossed in gold, and then added some gold ink splatters onto the background ....... (the coloured card is actually a gorgeous deep purple which isn't really coming across in the photos.  With the gold embossing, it does look quite regal)


I added another sentiment from the same stamp set inside the card, along with the baubles again.


This time I stamped with a metallic gold ink ...... how pretty is that!


Our weekend is starting early, we're off out for dinner this evening.  We're trying out a new restaurant that opened recently ...... La Villa Perrilla.  It's a South American place, and the menu looks amazing.  The cocktail bar doesn't look too bad either 🍸
We're not eating until 8 so, we might have a pre-dinner drink before we go ..... well it would be rude not to open todays advent calendar windows now wouldn't it ......

Chris and Myra came yesterday with these ......... mine's the gin one and hubby's is the rum.  
It's years since I've had an advent calendar ......... these are so much better than the chocolate ones!!!!

Thanks for popping by ..... enjoy the rest of your day and have a lovely weekend.

Cheerio until next time ......


PS  Don't forget about the 12 Days of Christmas over on the Sweet Poppy website.  One fabulous product, available for 24 hours, at an amazing price.
Todays offer is .......... the gorgeous Floral Dahlia stencil 


Tuesday, 1 November 2022

Time to make a start on the Christmas cards .........

Happy Monday ........

Welcome to November ....... and dare I say it ......... the run up to Christmas!!

I hope you're all well.  Did you have a lovely Halloween?  It was very quiet here, we didn't even bother with Trick or Treat!!
 
It's still a little quiet on here too .... sorry!  I'm not quite sure what I'm doing with my time but, I don't seem to have had much spare recently.  And, with not having to do the Blog Challenges each month my cardmaking has taken a back seat for now.

I have made a start on some Christmas cards though, which is not bad going for me.   As you all know I'm usually on the last minute, still making them in December!!    This year though,  I thought I'd try and get them out of the way early so,  I've spent the last two crafty get togethers with the girls in a festive mood.  I prepped everything during the week and then on the day all I had to do was put everything together ...... easy!  And look, a whole batch done .........


Nothing too fancy ..... festive red and gold, and very CAS.

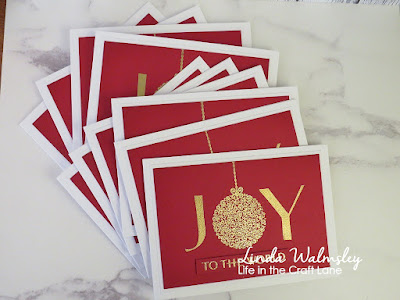
I used the beautiful new Big & Bold Joy Ornaments from the Colorado Craft Company.  A gorgeous stamp set with pretty detailed baubles, two sentiments, and the letters to create the word JOY

I simply stamped onto red cardstock, and then heat embossed in gold ......


I did the letters with plain gold embossing powder and the bauble in the centre using a sparkly gold


I stamped and embossed the rest of my sentiment onto a seperate strip of red card, and attached this underneath with foam pads ..... simple to do, but a very classic look I think.


I also had a play with my version of a technique I saw on Katrina Werner's blog a while ago ..... using Distress Re-Inkers to create a sort of ombre effect background ...... what do you think?


I really like the effect, and again it's another great way to create a whole batch of fabulous Christmas cards in no time at all.  Just paint your background cards, leave overnight to dry (that's what I did anyway) and then use large Christmas sentiments to add your greetings.

I used Festive Berries Distress Re-inker and Hot Pressed Watercolour cardstock (the smooth stuff!) 
I mixed the re-inker with some water, and used a paintbrush to add the colour across the card, starting at the top working my way down the card adding more water as I went along to get the ombre effect.  I repeated the process a few times until I got the colour, and the blend, that I was happy with and then left the card to air dry.


Once it was completely dry, I used an anti-static bag over the whole piece and then stamped and heat embossed my sentiment in gold


Another stamp set from the Colorado Craft Company ....... Quick Holiday Cards Savvy Sentiments .... I do like a large sentiment stamp!

To finish off I sprinkled on a little Chunky White Embossing Enamel and heat set this from underneath


Well, that's another one for the festive box!

This technique was so much fun to do, I might just give it a try using some different colours!  Gets me using those Distress Re-inkers too!

Thanks for popping by ..... enjoy the rest of your day.

We're off out for tea this evening, first time in a while.  No special occasion, I just didn't feel like cooking!

Cheerio until next time .......