Happy Monday folks ........
Welcome to the beginning of a new week.
We had a lovely weekend ...... a great barbeque yesterday, the first one at the new house so it was kind of a house warming I suppose. Good food, great wine in the company of family and friends .... the perfect way to spend a Sunday afternoon. Even better when it's the other half that was doing the cooking!
And we rounded off the day with a friendly poker game .... always fun but it didn't end well for me this time .... enough said!
Saturday was workshop day ...... another fun session with my lovely crafty buddies.
This week we played around with
Spotlight Stamping and a little bit of
Split Colouring ..... another clever technique I came across on
Jennifer McGuire's Blog.
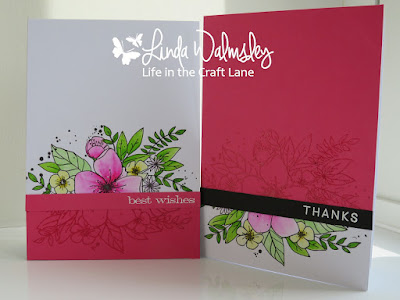
This is a great way to get 2 for 1 cards, and I think works so well with pretty floral designs.
See what I mean ..... 2 for 1!
Simply stamp the image onto white card and colour it in completely. Stamp the same image again onto a piece of coloured cardstock and emboss with clear powder.
The MISTI is fab for doing this as your image needs to be in the same place on both pieces of card.
I used my current favourite stamp ....... again! .....
Hello Lovely from Concord and 9th, and coloured it with ZIG Clean Colour Brush Markers.
You then cut both pieces, in the same place and then mix and match the two halves to create 2 lovely cards .... both the same, but different
Add a simple message strip using some of the coloured card, or go bold and use black
If you don't like using coloured card then how about keeping things just on the white ....
Really simple ... just stamp with black ink, colour half the image or thereabouts, then split into two with a sentiment strip.
I do think this would also work with background stamps, stamped onto white and coloured card and then pieced together as above ..... think I'll give that a try!
And of course this would work with almost any stamped image that needs colouring in. Check through your stash and see which ones you could use.
Onto the
Spotlighting ..... love doing this technique. Some of the ladies had already tried this out but it was new to some.
Sorry .... same stamp again. You'll be thinking I haven't got any more stamps soon. Don't worry I'm sure another
favourite will be along shortly!
This time we stamped the image twice onto white card ..... then cut out sections from one of them that we wanted to highlight, added some colour and then attached over the top of the other one.
I used dies to cut circles but punches work just as well and it doesn't have to be circles .... try cutting squares, or ovals
A simple sentiment .....
and a few sparkly sequins finish off the front of the card, and part of the image stamped off the edge gives the finishing touch to the inside
We stamped the images twice but a quicker way of doing this technique is to stamp the image onto your piece of card, die cut
(or punch) the bit you want in the spotlight, colour it in and then put the piece back in place ....... or use foam pads if you want to give it a bit of dimension.
Why not give it go!
I've got a busy week coming up .... lots still to do in the old craft room, and coffee and cake out with the ladies one day .... yum!
The countdown is on too ..... only 5 days to go before this year's TT gets underway. It also means that our holiday isn't that far away ....... Ahoy there matey! Once the TT's over we're off on our annual family getaway ....... not Bourton this year ..... the Norfolk Broads here we come
Can't wait!
Thanks for popping by ...... enjoy the est of your day.
Cheerio until next time


