Tuesday, 8 September 2015

Inspired by the retreat ......

Happy Tuesday folks,

I've got a bit of a busy week this week ..... I'm off on one of my trips to the UK again on Friday (whoo hoo!) so lots to do before I leave.  
I need to get my head in gear and get the old craft room sorted, as well as getting everything else organised, and seeing the little man off tomorrow on his first day at school (oh .... bless him!) His uniform is all ready ..... Alex is definitely ready (a bit nervous, but very excited!) not sure that his mummy is though ...... better get the tissues ready too!
By the look of things I'll be burning the midnight oil a little, to get everything done in time ..... the list is rather a long one this week!

It's going to be a fun weekend though ... I'm not travelling alone this time either ...... two of my crafty pals are going across with me.  It's going to be a craft filled few days ..... a bit of retail therapy perhaps, a nice meal out here and there and then we're all off to the Clarity Open Days ......


I went along last year with my buddy Susan, and we had a ball!

Speaking of Clarity, do you remember back in July (oooh .... was it that long ago!) ....... I was lucky to go to the two day Clarity Craft Retreat down in Crowborough.  What a fab time we had ...... if you ever get chance to go on one of these .... DO IT!!!  It's two days crammed with learning techniques and picking up tips on how to create fabulous pieces of artwork .... all taught by Barbara Gray herself with a little help from the fabulous Paul Church from the DT.  You don't actually come away with finished projects as such, but you do have a mind full of ideas and a folder full of details and instructions that you can refer back to over and over again and ...... pieces of art that you can then re-create or complete and transform into something fabulous at a later date.

Here's one of mine that I didn't actually finish on the day but, taking a leaf out of Maria Simm's book (another member of the Clarity DT) I'm going to make an effort to get around to finishing off all those half done projects ...... we've all got boxes of them ...... well, I have anyway!!
Maria's called them Finish It Friday projects ....... this wasn't done on Friday by the way but it is finished now .....


So simple to do, but very effective.  I love the vintage, distressed look with that splash of colour.


I've simply stamped the columbine flower (I think I've got the right one! ....... from the Gentian & Columbine set) onto an old book page and then added colour using Spectrum Noir pencils ..... so pretty!

A little bit of tearing and distressing around the edges and some words added from the Million Thank Yous set  .......

And I finished off by adding some natural twine and a pretty painted wooden heart button


Well that's one finished ....... it's a start!

OK ..... I'd better go and check on the old suitcase situation. I have started packing but I'm trying to keep things to a minimum ...... well I need to save plenty of room for all that new craft stash that is no doubt going to find it's way into my bag .... ooops!  I've only booked hand luggage too ...... so ..... it's only 3 pairs of shoes this time!!!!

Thanks for popping by ..... enjoy the rest of your day.
And, if you're in the area at the weekend why not pop along to the Clarity Open Days ..... I believe there's still some tickets available .... it would be lovely to see you!


Cheerio until next time

Linda
xx

Saturday, 5 September 2015

A quick birthday card ......

Happy weekend folks!

Just a quick post today .... we've got to be out of the house soon, the little man has a birthday bash to get to and I'm off to have fun on a craft workshop .... whoo hoo!
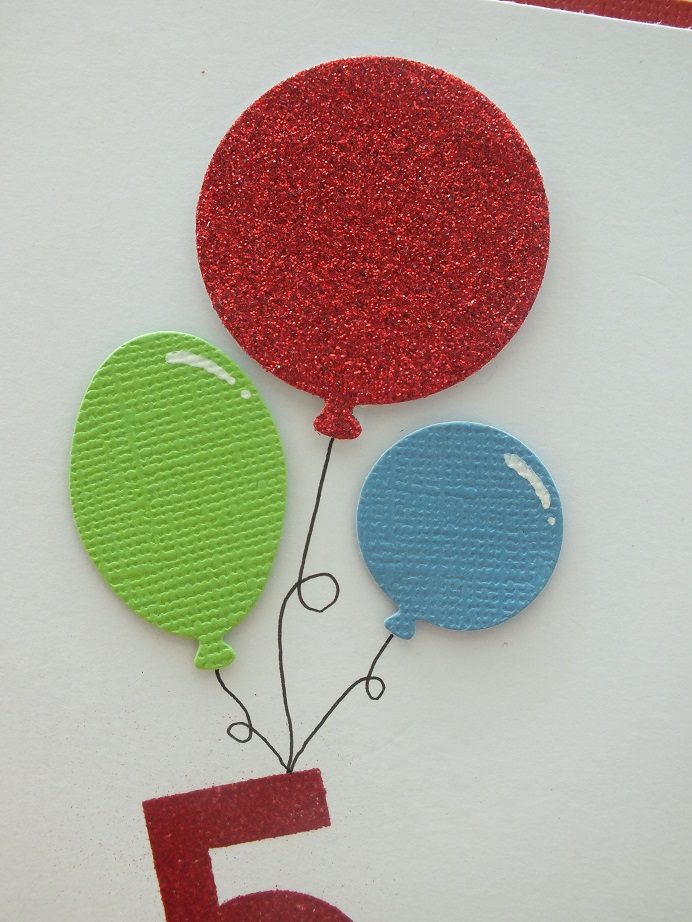
Before we dash off though, Alex thought it might be a nice idea to share the CAS, very quick and easy, birthday card that we came up with for today's birthday boy ........


How useful is this set of stamps going to be ...... it's one of the brand new designs from Happy Little Stampers ....... called Big Bold Numbers (it's exactly what it says on the tin!)

All I've done is stamp the number using Versamark ink and then heat embossed with a red powder


Added a few colourful die cut balloons ...... cut from left over scraps of card


And added a fun sentiment to the bottom ....... using another of the fabulous new HLS stamp sets .....
Bold Birthday Sentiments ..... don't they go well together!!


There's a little something on the inside too .....


The bright bold colours are great for those little guys ....... but, change the colours to nice pastel shades and its just right for the girls too.  And just think ..... it could be for any age!

It's not only a great set for birthdays ..... how about anniversaries, or even Christmas cards ........


Heat emboss the numbers in gold ..... I've cut around mine and used foam pads to attach them onto my card to add a bit of dimension


You can see I've also splattered a little bit of ink in the background, and added just a touch of Fran-tage Shabby White Embossing Powder ........


A nice festive greeting (from the  HLS Mixed Christmas Sentiments) finishes off another CAS design ..... great for doing batch cards.


Oh well ...... better be off .... don't want to be late for the party now do we!


Thanks for popping by ..... have a great weekend.

Cheerio until next time

Linda
xx

Friday, 4 September 2015

Take a stamp .... any stamp ..... it's challenge time again!

Happy Friday folks!

It's the first Friday of the month again ..... I can't believe we're in September already! ..... only 16 weeks until Christmas (yikes!!!)
It's also time for a brand new challenge over on the Craft Stamper Blog.

Speaking of Craft Stamper ..... have you seen the new look to the magazine?


How fabulous does that look!!! And not only have we got a new look on the outside ..... there's a few new faces on the inside too!  Grab yourselves a copy of the brand new issue .... you're in for a treat!

This month on the challenge, it's the turn of Take a Stamp ......... you can create whatever takes your fancy, all we ask is that there's some rubber stamping on there somewhere (no digi images .... sorry!)
Remember ...... link your entry post back to the Craft Stamper blog, only ONE project per post please and, you can enter up to 3 times.  Fancy giving it a go ..... you could win one of the two great prizes up for grabs .....

First up .....  our sponsors prize ..... randomly chosen.  This month the challenge is sponsored by the fabulous


and the prize is .....
Boxed Blooms and Bold Sentiments stamps sets and .......


Leaf Print and Bold Florals stencils too!

Not only that ..... STAMPlorations have been very generous and have supplied us with a Coupon Code for Craft Stamper Challenge players to take advantage of  a FREE SHIPPING offer from the store.  All you have to do, is use the code CSTAKEITMAKEIT on all orders over $20 (approx. £12.90) to get the free shipping (even to the UK!!)  The code is good for the whole of September and can be combined with any other STAMPlorations coupon.

Next ....... the Design Winner prize ....... chosen by the DT.  They will get their winning project published in the Craft Stamper magazine, be invited to be a Guest Designer on a future Craft Stamper Blog Challenge, AND .... get their own Winners Profile published on the Craft Stamper Blog ..... WOW!!
For more details and full challenge rules, check out the Craft Stamper Blog.

Right .... now that's out of the way, time for some inspiration I think.


I love my rubber stamps! and at the moment I'm loving making pieces of home decor.  This started out as as small 6x6 canvas board but as you can see ...... in true Barbara Gray style ...... it's ended up as a 12x12!!!

Sorry about the picture quality ........ bad light!!  The colours look very pastel but actually they're a lot more vibrant in real life.

Anyway ..... I started out by playing around with the 'bleeding art tissue' technique on a blank white canvas board.  I first saw this on the the very talented Eileen Godwin's blog some time ago .....  she's also done a video on YouTube too .... check it out here

It's so easy to do and it's one of those techniques where you'll never get two results exactly the same.
All I did was cut out some shapes from the coloured tissue paper ..... which by the way you can buy from Amazon and ebay etc., and it's not expensive.  I used dies and punches but you can just as easily tear it.
I then placed the tissue shapes onto my canvas and brushed over the top of each one with some clean water..As the water soaks through the tissue you can see the colours transferring to the canvas and they also mix with each other where the tissue overlaps, which is quite cool!


Once all the pieces of tissue were in place and I was happy with the design, I put the canvas to one side and let it dry naturally.

In the meantime,  using a Black Archival ink, I stamped one of my current favourite stamps onto a piece of regular white tissue paper ...... (I say 'current favourite' as this does change quite regularly!!) I do love this butterfly from Tim H's Perspective stamp set .......


I added some colour to the image using Spectrum Noir pencils ..... colouring on the back.

Once the canvas was dry, I carefully removed the tissue shapes and voila!! ...... the background was taking shape!
Using a paint brush, I splattered a little ink over the top to add a bit more interest, using colours to match the butterfly.
When this was dry I pasted the stamped butterfly over the top using a thin coat of Glue and Seal.  I love the translucent effect you get when stamping onto tissue paper, and once it's all dry you can hardly see the edges.  I also added a sentiment to the canvas in the same way


To finish it all off I took some white acrylic paint along with some black gesso, and used an old gift card to add the painted lines around the edges


I decided to hang this on the old craft room wall but, I felt it wasn't big enough .....


So ..... I took a 12x12 canvas, and gave it a coat of black gesso.  Still wasn't 100% happy with it, so ....... out came the brick wall stencil, a little bit of texture paste here and there and another coat of black gesso.  Now I'm happy!

Right ..... it's over to you.  What will you create ..... I can't wait to see!
If you still need inspiration though pop over to the Craft Stamper Blog the rest of the Design Team have created a stunning collection of pieces for you this month!

It's been a busy old week here .... hubby's had the week off work and we've got quite a bit of stuff done.  Had the odd day out here and there, a couple of nice meals, coffee with friends you know what sort of thing I mean.  We're off out again tonight ... nothing fancy just a few drinks with his work buddies to round off the week nicely.  Then next week's going to be a big one .... the little man has got his first day at school (noooooo!!)  Both me and his mum will need the tissues that morning I'll bet!

Thanks for popping by ..... enjoy the rest of your day and have a fabulous weekend!

Cheerio until next time

Linda
xx

Thursday, 3 September 2015

Sprays and mists ......

Happy Thursday evening to you,

How is everyone? I hope you're having a good week.
We've had the Manx Grand Prix going on this week ...... it's been race week.  There's been a few disruptions to the race schedule but at least they weren't all because of the weather!!  It has been pretty good on the whole ..... the Bank Holiday was glorious and the only rain we've had has been during the night.
We haven't actually seen any of the races though, heard the bikes ..... and have been caught up in the road closures .... always fun!!  It's been a good week though ....... and you never know, we may just catch one of the races tomorrow as it all comes to a close for another year.

I have managed to spend some time in the old craft room though ....... hubby has taken advantage of being off work and has spent some of the time in front of his computer, which has meant that I didn't feel too guilty locking myself away to play with my craft stash!  To be fair .... I have had DT stuff to do so it hasn't all been play time!

One thing I did manage to do was play along with this week's Less is More challenge.
Last weekend we were still in August, and because it was the 5th Saturday of the month we have a Lucky Dip week this week. The challenge is .......

 to use Sprays/Mists

You know me ..... I love spritzing and spraying.  Splattering ink here and there is one of my favourite techniques.


We still have to keep things CAS though ..... lots of white space.  Not always easy when usng a spray bottle .... anything can happen!

Using a Black Archival ink, I stamped the beautiful butterfly (from Tim Holtz) slightly off the edge of a piece of white cardstock.
I then made myself a mask and covered up the image, before spritzing, just the once, with Abandoned Coral Distress Spray Stain


I let this dry for a couple of minutes then spritzed again over the top, with the mask still in place, only this time I used the Perfect Pearls spray mist.


I also mixed some of the Perfect Pearls with some Distress inks to colour in the butterfly ..... spritzed the PP directly onto my craft sheet, swiped my Distress ink pads on there too, then mixed the two together with a clean paintbrush ....... shimmery Distress .... how pretty is that!!


I added a touch of Glossy Accents to the body and finished off with a sentiment ......


Well that's it from me today.  I'll be back in the morning with the launch of this month's Craft Stamper Blog Challenge ........ have you got your copy of the magazine yet?

Thanks for popping by .... enjoy the rest of your day.

Cheerio until next time

Linda
xx

Wednesday, 2 September 2015

Challenge time at Happy Little Stampers!

Hi there

It's time to launch September's CAS challenge over at Happy Little Stampers, and this month it's all about ...... Colouring


We have a new challenge sponsor too.  From this month, until the end of the year the CAS challenge will be sponsored by our very own Happy Little Stampers Shop


The challenge winner will receive one of the fabulous stamp sets from HLS
So ...... what are you waiting for .... get those entries in!

Here's a little inspiration for you to get you started .....
There's lots of ways to colour in your stamped images ...... use inks, paints, pens or markers, pencils .... the choice is up to you.
I've gone for pencils .... you know I love my Spectrum Noirs!


And I've used one of the gorgeous new stamps from the HLS Butterfly Birthday stamp set ...... these stamps are fabulous ..... I love them! (can you tell!) They're great designs and so easy to use.

I've kept things very CAS, masking off the butterflies as I stamped, to create the continuous line across my card.
I actually started off by stamping my first butterfly across the fold of the card ........ and carried the design onto the back.  I've seen this a few times recently, on Pinterest, and thought what a fab idea ..... looks so cool!


I then coloured in each butterfly using the pencils ..... nothing fancy, kept each one a different colour and added a touch of shading to the wings


I added a sentiment to the bottom (comes in the same stamp set)


and gave the bodies the Wink of Stella treatment. Sorry, this doesn't come across well in the picture, trust me it's very sparkly in real life! 
You can also see I've added a few dots of white Enamel Accents here and there.


OK! OK! ...... I confess ...... these were a bit of a last minute thing.  
The card was more or less finished when disaster struck!!!!  The dreaded tiny spot of black ink suddenly appeared ..... where from ..... who knows, but ..... I wasn't colouring in all that lot again!!!
Not a bad rescue job .... can you see the black spot?

Anyway ...... to finish off, as always, I had to put a pretty butterfly on the inside ......


Need a little bit more inspiration ..... then pop over to the HLS Blog.  You'll find lots more gorgeous ideas from the rest of the DT and, we have a Guest Designer with us this month ....... the very talented Riti (A Lil Piece of Heaven) is joining us for September ..... why not pop over and say Hi! you won't be disappointed! 

Thanks for popping by ..... enjoy the rest of your day, and good luck with the challenge.

Cheerio until next time