Tuesday, 11 July 2017

Weekend's workshop ......

Happy Tuesday ........

We've got a bit of a grey, start this morning.  I was supposed to be meeting a friend for coffee later but we've decided to give it a miss ...... not much fun in the rain!
It means I can spend some time in the old craft room, playing ... ooops! I mean working with, some new designs from Sweet Poppy Stencils.
Watch this space because our Lucy is back on the TV soon with some gorgeous new stencils, maybe a few festive designs in there too.  Great if you want to make a start on all those Christmas cards ..... did I say the 'C' word out loud ..... sorry!!

It also means I have time to share last weekend's workshop with you too.  We had a fab day playing with patterned papers ..... I believe they all went home inspired, grabbed their mountains of papers and made even more cards ...... I love it!!

Once upon a time I always used patterned papers, for backgrounds, matting and layering, fancy folds etc., etc. ..... how times change.  I still buy them occasionally, but they very rarely see the light of day!  Shame really because there's some gorgeous designs.

Anyway, we had fun paper piecing .......


CAS designs using up those scraps of paper that we just can't throw away because we might need them!


It's also a great technique for adding colour to your stamped images .....


EDITED ......
After a little nudge from the lovely Di .... from Pixie's Crafty Workshop (thanks hun), I'm linking this little guy up to the latest Snippets Challenge.  Well it is only snippets of paper used to paper piece him and the balloon.


Back to the cards ......You don't need to paper piece the whole thing ..... just focus on one section of the image


Use the same paper to add a little more detail to your designs .....


A simple strip across the bottom, highlighted with a little gilding flakes makes all the difference.

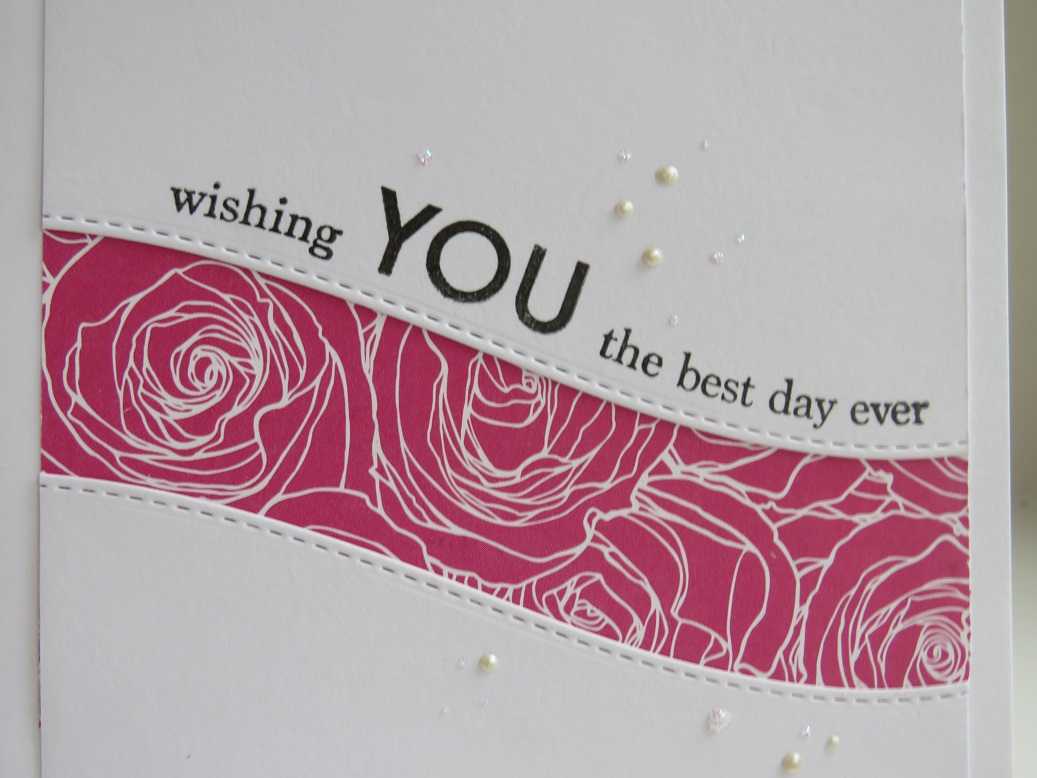
We used pretty papers to make really simple, yet stunning cards.  Here's the same design using the same paper in two different ways ..... love how these turned out.  The paper is from a 6x6 pad called Roses All Over from My Favourite Things ...... it's gorgeous, some of the ladies loved it too.


I used one of the CUTplorations Stitched Snow Hills dies to cut the curved edge, but it could quite easily be done free hand with scissors


A simple stamped greeting along the edge and you're done.  And if you use clear stamps you can even shape them to follow the curve .......

We used punches with patterned papers to create this pretty floral design ......


I came across this idea on Pinterest a while ago but unfortunately I can't seem to find the blog that it was on originally.  I think it's been closed for a few years ..... Two Peas in a Bucket or something like that I think it was. Anyway, this is my version ......

I used a large circle punch and cut seven circles from various pieces of patterned paper.  Then using the same punch I cut two petals from each circle .......


Simply turn the punch upside down and insert the edge of a paper circle until you see a petal shape. Make two marks where the edge of the paper is and then cut


Turn the paper circle around and cut the same shape again. The two marks will show where the edge of your paper needs to be for all your petals to be the same size .... roughly.  Use different sizes of circle punches to make different sized petals.

Arrange the petals into a flower and add another circle to the centre .....


You can see I finished off with a bit of faux stitching around the edges .....


Last but not least ..... it was a busy workshop ..... we did a little bit of alteration.  Changing the look of some of those less favourite of our papers.


We don't always fall in love with all the papers from a particular collection or paper pad.  There's the odd one that's too dark, or we don't like the colour or the design ..... well, don't throw it away, change it.  Stamp onto it ......


A bit of white embossing with a pretty lacy design works wonders ...... or try a bit of rubber stamping with a dark ink .....


Add a few more elements like a bit of twine, a few drops of liquid pearls here and there


or even a bit more stamping ..... I've added a butterfly that's been stamped on patterned paper and fussy cut and then stamped my greeting on a separate piece of card and attached with foam pads.

Phew! what a lot of pictures.  Well done if you're still with me ...... I think I need a coffee now!

I hope I've given you some ideas on what to do with those gorgeous patterned papers that I know you have in your craft stash..... even the little pieces.  Have fun!

Thanks for popping by .... I hope the weather's a little nicer where you are.  Enjoy the rest of your day.

Cheerio until next time .......

Monday, 10 July 2017

Happy Little Stampers ATC challenge .....

Happy Monday evening to you ......

And what a great start to the week.  We're celebrating hubby's birthday today .... well actually we've been celebrating all weekend but we won't go there!!!

Happy Birthday hun .........


It's also time to get this month's Happy Little Stampers ATC Challenge underway.

I'm pleased to say we had such a good response to the launch of this challenge last month.  I'm glad you all love creating these miniature works of art.
ATC's, or Artist Trading Cards, are so much fun to make, whether it be a one off ...... a whole collection or a simple set of 2 or three.  Why not join in the fun this month.

July's theme is ....... ANIMALS


Here's this month's set of three .......


All three of them have Distress Oxide ink backgrounds. I simply smooshed the inks directly onto the card and then spritzed with water to blend the colours together

Worn Lipstick and Fossilized Amber on the first one ......


I stamped the zebras first on this one, before any smooshing, and painted over them with masking fluid. Once it was dry, then I smooshed the colour on ......


The masking fluid simply rubs aways leaving what's underneath free from colour ......


I used more Distress Oxides to add a touch of colour to just one of the zebras.

How cute is this little guy on my second one .....


Background done in the same way ...... Peeled Paint and Cracked Pistachio this time and then I stamped my little frog


Added a bit of foliage around him and used one of the Prima Art Alchemy paints - Fairy Wings from the Sparks range, to colour him in


The words were stamped and clear embossed to finish off.  I don't know about you but I've kissed a few frogs in my time before I finally found my prince!

Last but not least ..... a grey hare (I've got a few of those too!!)


In fact they're all over the house. Here's the two most recent additions to the family .....


So what are your favourite animals?  Can't wait to see what shows up in the gallery this month.

Thanks for popping by..... enjoy the rest of your day.

Cheerio until next time .......

Friday, 7 July 2017

Where did that week go .........!

Happy Friday folks .....

Boy am I ready for the weekend!  How's your week been?

It's the first Friday of the month so it's time to get the Craft Stamper Challenge underway.


As always the theme is Anything Goes ..... as long as there's actual rubber stamping on your project somewhere.
And please make sure to follow the challenge rules to be in with a chance of winning .... you can find full details on the Craft Stamper Blog.

Our sponsor this month is the fabulous STAMPlorations .....


And the prize for the challenge winner is ....... three (3) sets of fantastic stamps

That's not all ........ for the whole of July when Craft Stamper readers/followers place and order for $15 or more from the STAMPlorations store they can get 20% off all stamps, stencils and dies by using the code CRAFTSTAMPER at the checkout ........ not bad eh!  And, with the recent brand new release there's lots of fabulous goodies to add to your craft stash.

Onto the challenge ...... here's one of those new release stamps .....


Design #1 from the gorgeous new Blossom Spray range ....... how pretty is that!  And I've teamed it with Be You from the Say It Big series.

The new Blossom Sprays are so pretty and can look so different depending on the colours you use.
I've kept my design quite pastel ..... using ZIG Markers with a water brush to colour the flowers


The words, simply stamped in black alongside the spray make quite the statement I think.


I then used one of the CUTplorations Stitched Snow Hills dies to cut across the bottom of my card and then separated the two pieces by adding in a strip of co-ordinating patterned paper to make the whole thing fit on a 7x5 card blank (the gap is about an inch wide, maybe a little more)


To finish off I dotted a few liquid pearls here and there ....


And stamped the blossom spray on the inside ......


Using patterned papers on my cards is something I haven't done for such a long time.
I have loads of them (although not as many as I used to have) ........ gorgeous 12x12 papers, that just sit in boxes.  You know the ones I mean ...... we all have to have them.  We get them out occasionally, look at them, even stroke them now and again, but we just can't bring ourselves to cut into them.  And when we do, we have to hang on to every last little piece just in case we NEED it! Go on ..... admit it, you've got boxes full too!

Well this weekend I'm going to be using some of those papers .... even the small bits! My little crafty group are going to be using patterned papers on their cards.  Paper piecing .... always fun and a great way to add colour ........


Stamping onto the papers to create a pretty collage effect .......


And using them to create beautiful quick and easy cards .... can't wait!


Thanks for popping by .... enjoy the rest of your day and have a great weekend.

It looks like it's going to be a nice day here, the sun is shining.  I've been up since 5 ..... hubby was on an early flight to London this morning.  I made good use of my early start though ..... all the housework is done, even the old craft room is tidy!  I'm off out for coffee later with a friend and no need to rush back now ...... it's going to be a nice day.

Cheerio until next time ......

Thursday, 6 July 2017

Happy Little Stampers Mixed Media Challenge ......

Happy Thursday ......

What a busy week it's been ..... and it's not over yet!
I've got another Blog Challenge for you this evening.  Fancy a little bit of Mixed Media .... well you're in luck because it's time for the July Happy Little Stampers Mixed Media Challenge


This month it's all about Texture.
I love adding texture to my projects ..... using pastes and gels through stencils or by adding metal embellishments or chipboard, even beads and painting over them.
But it doesn't always have to be so touchy feely ..... you can create the look of texture simply by using your inks and different methods of applying them, or by building up layers using stencils or stamps


For my inspiration piece I started out by adding some simple die cut flowers onto a piece of cardstock ..... this is one of my all time favourite dies from Penny Black, I love it and it's an easy way of adding texture to your cards.

I then used a piece of acetate to apply Distress Oxide inks onto the background ..... I swiped the ink onto a craft mat, spritzed with a little water and then picked up the ink using the acetate.  I then pounced the acetate over the cardstock to give this mottled effect to the background.


I repeated this for each of the different colours, drying with a heat tool in between so as not to mix the colours together


I used the same technique to colour the die cuts ..... I love how it's left a sort of halo around the flowers,  I think it really makes them pop!

Once this was all dry, I took the same colours of Distress Oxides and used the Tim Holtz Mosaic stencil to add another layer to the card and give the look of more texture
I think this is going to become a new favourite stencil of mine .... what a fab design!


I added in a sentiment ..... from the HLS Doodled Flowers and finished off with a few dots of glitter glue .... more texture


Hope you like it.

As with all the HLS challenges there's a $20 Gift Certificate for the winner, to spend in the store  so get creating and I'll see you in the gallery.

Thanks for popping by .... enjoy the rest of your day.

Guess what! ..... the BBQ is up and running .... whoo hoo!!
It took us most of yesterday afternoon to get it sorted, but it looks .... and cooks fab!!  Even the weather was good.
Hubby's pleased with his new toy ........ and so he should be!


It's a little on the large side but .... what cooks a lot will cook a little!
As you can see it all lights up ..... once it's on all the control knobs turn red so you know which burners are on ...... ooooh!!  It's got a back burner for a rotisserie ...... ..yum!   and enough grill space to feed a small army  ...... (it all cleans really easily too!)


There's an ice bucket built in on one side to keep your beers chilled, and on the other there's this super hot grill plate which you can use to sear steaks in seconds or you can change the height of the grill and use it with a wok or grill pan to cook vegetables, or stir fry prawns etc  .... whatever you like really.


I promise I won't go on about the BBQ anymore ...... all I will say is, it was a bit of an impulse buy but it was worth every penny ..... bring on the summer!


Cheerio until next time .....