I hope you're all safe and warm and have escaped the storms that have been battering the UK. We've had some of the heavy rain and wind over here, but nothing like across there. Let's hope the worst is over.
I'd like to say Hello and welcome my latest follower Rita. It's nice to have you along on my creative journey. I hope you enjoy reading as much as I enjoy blogging it all.
On Friday, my DT post over at Creative Studios was a cute little Christmas Gift Bag.
For those of you who don't already know how to make it, I did say that I would blog some instructions on how to put it together. So here goes .....
My gift bag was made from a piece of A4 cardstock.
Take your cardstock and score, along the short edge, at 4.5cm and 16.5 cm
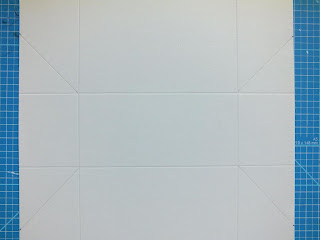
Turn the card and score along the long edge at 12cm and 17.5cm, so you end up with this ......
you can just about see the score lines (I hope)
With your cardstock in landscape position, measure 7.5cm from each of the 4 corners and make a small pencil mark on the edge of the card
Score a line from your pencil mark diagonally into the corner where your scorelines meet. (once you've done this you can rub out the pencil marks)
Fold and crease all your scored lines. Use a bone folder to get nice crisp edges.
With your cardstock in portrait postion, lift up the bottom edge about half way, fold up the side of your card and the diagonal score line should naturally want fold into place, giving you this sort of shape .......
Gently open out your folds and apply adhesive as shown below.....
Stick all four sides, then apply more adhesive to these bits ....
Fold up the sides to complete your gift bag.
Holding the top edges together, punch two holes about 4cm apart, so that you can thread your ribbon through to tie the gift bag.
You can now decorate it, with scrapbooking papers, rubber stamping, use your embossing folders, whatever takes your fancy. And there you have it, a nice little bag that's quick and easy to make, for all those special little gifts.
Hope these instructions were easy enough to follow. Happy wrapping!
Thanks for looking today. Enjoy the rest of your Sunday.
Bye for now
Linda
x


4 comments:
Hi Linda, thanks for doing the template, it looks straightforward enough for even me to follow! Hugs, Anne x
Hi Linda, great bag and brilliant instructions...enjoy your Sunday evening. X
Hi Linda, great gift bag and a very clear tutorial.
Just been catching up, hope Mr Mojo has returned, and if mine's with him, send him back!
Avril x
Stunning, stunning bag Linda... I love it!!! Really want to have a go at this one. Your tutorial is great.
Hugs
Sandra x
Post a Comment