
The weekend starts here ..... whoo hoo!! And it's Halloween tomorrow ...... mwahhahaha!!
We're still in the festive mood though today ......... with the last of my Clarity samples.
More Christmas designs using the brand new Festive Stencils, plus a couple of ideas that could be used all year round ...... for any one of those other special occasions that crop up during the year.
Lets start with a bit of Holly shall we ......

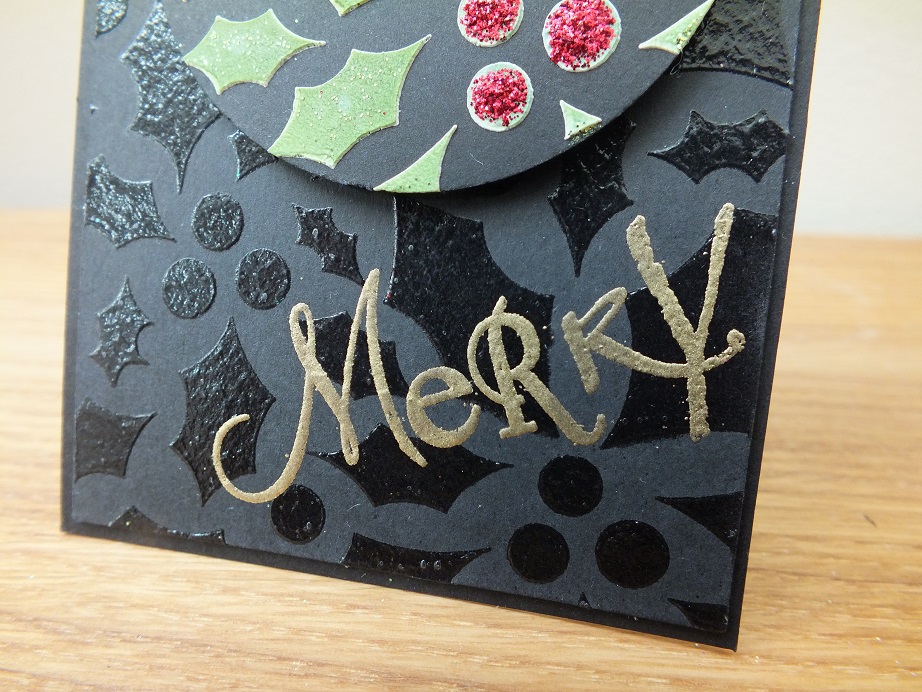
A gorgeous background stencil full of holly leaves and berries. Don't just use it for backgrounds though ..... make it the focal point!
I've used it here with Grunge Paste ...... let it dry then replaced the stencil back over the top and added colour using Distress Inks ..... Grunge Paste takes colour so well so this is a really easy, but effective way to create your Christmas cards.

I also added glue to the holly berries and sprinkled them with festive red glitter to add a touch of sparkle.

A pretty red ribbon and a cute little tag give the finishing touches.
I've used the stencil on the tag, this time just with ink directly onto a piece of Kraft card, and then embossed my greeting over the top .... from one of the Word Chains ...... with gold embossing powder.
Why not make nice tags to go on all those wonderful festive gifts ..... here's a really quick and easy idea

Stenciled background using clear texture paste .....

Holly stencil as before, with the Grunge Paste and then coloured. Cut out a panel to go onto the front of your tag .... I used a circle punch but it could be any shaped punch or die.

A touch of festive glitter onto the leaves and berries, and a nice embossed greeting to finish off
Next up is the Christmas Tree stencil .... love this!

I've simply inked through the stencil using Distress Inks, to create my Christmas tree. Then, I used the inside piece to cover up the tree whilst I did the winter scene in the background ......

I then covered the outside again, so that I could decorate the tree, using the other background stencil that you get in the set ..... the stars. Grunge paste and glitter did the job nicely .....

I added a cute little tag to the bottom, with a sprinkling of Chunky white embossing powder here and there.

Finally, that fab Stars stencil is great ...... and not just for Christmas either. How about some quick and easy birthday cards ......

Done in whatever colours you choose. I've simply masked off the bottom of my card .... used the stencil with various colours of ink .......

Added a touch of glitter ..... why not!

And finished with one of the Word Chains .....

You don't like multi-coloured .... then just keep it simple ......

All one colour with just the one gold (or silver if you like) star. I've used Grunge Paste again and coloured with acrylic paint this time


Just perfect for all your little stars!
Well that's it from me today .... I've got some pumpkins to carve then I'm off out for lunch. We're checking out a possible venue for our crafty groups's Christmas do!!
Thanks for popping by .... enjoy the rest of your day and have a lovely weekend.
Cheerio until next time
Linda
xx
3 comments:
What a beautiful array of colour, I love each and every one of these beauties especially the starry one, it is fabulous! Hope you have a lovely spooky weekend. Hugs, Anne xx
Great samples using the stencils, love the Christmas scene with the tree, very festive, and the stars, as you say would be so useful.
Have a great weekend.
Avril xx
Wow Linda, you came up with such a wonderful collection of cards and tags! I'd not heard of grunge paste before but you make it look fabulous.
Hugs
Carol x
Post a Comment