
It is Friday isn't it ....... this week seems to have gone by so quickly, I'm not quite sure what day of the week it is! I'm looking forward to the weekend ....... let's hope it's a quiet one (as if that's going to happen!)
Let's turn the clock back a little shall we ...... to last weekend, when it was my November workshop. I've just realised I haven't shared the projects with you.
We were playing with Distress Inks, and the fab new Distress Oxides, creating Galaxy Backgrounds and winter skies. Surprisingly, we didn't get as messy as I thought ..... aprons and the odd pair of gloves were worn by some.
Jennifer McGuire was the inspiration again ....... check out her blog/video for this technique and you'll be hooked too!
Distress Oxides applied with a brush onto watercolour cardstock ........ spritzed with water and dried (left hand piece below)

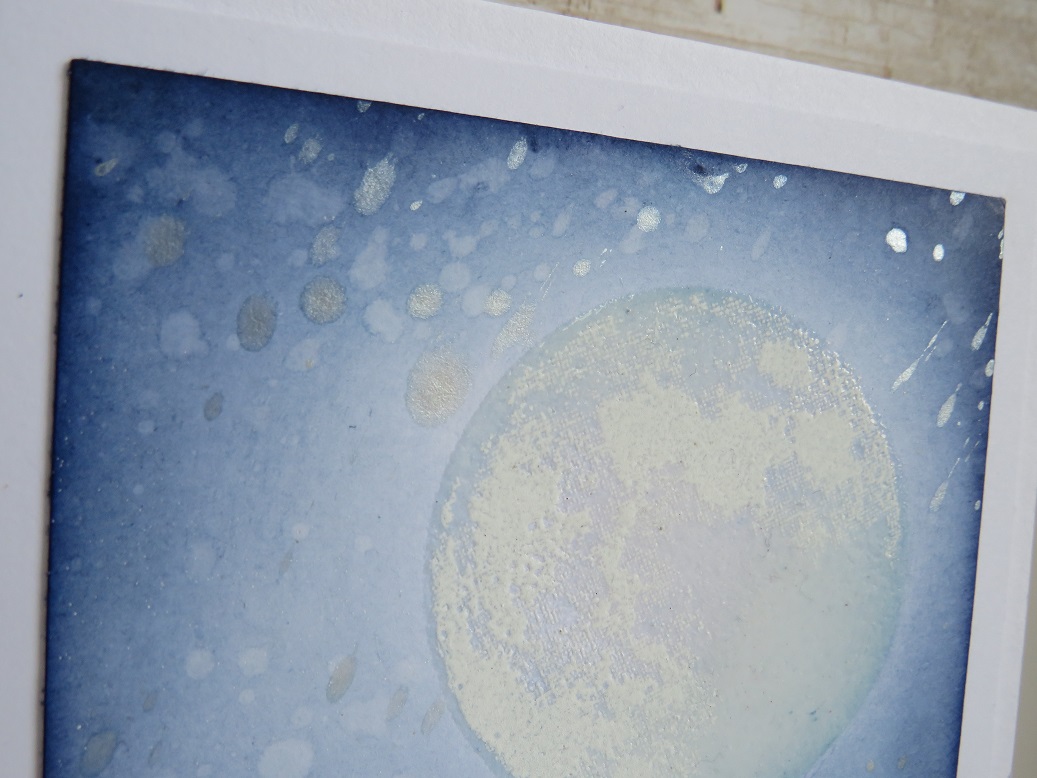
Black Soot DOX onto a craft sheet and spritzed with pearl mica powder then applied over the top of the colour using the acetate smoosh technique (right hand piece)
Same colours of Distress Inks applied directly from the ink pad on to watercolour card, spritzed and dried as before (left hand piece)

Then black soot spritzed with mica added over the top (right hand piece)
By applying the ink directly from the ink pad you get a much more intense colour .....

And the Black Soot Distress is more black than the Oxide version ...... love it!

Here's some of the inspiration pieces ......
Simple white embossing looks great ......

How about a cute design ...... stamps are by Clearly Besotted.

Love these little aliens .....

Here's one you've seen before ...... using the inlaid die cutting technique ......

We also created the good old simple night sky using just blue shades of Distress Ink ........

and then flicking water over the top to remove some of the colour. I also added a few drips of pearl mica to give that starry look
And we had to finish with a Christmas card ....... still love this little guy!

A few stamped and embossed snowflakes gives a real festive look

There's one more workshop to look forward to this year ..... the preps been done, everythings ready

Looking forward to this at the beginning of December ......

Speaking of December ..... not long to go now. I'd better make a start on those Christmas cards!
We've almost finished the Christmas shopping though .... well the big stuff anyway. What did we do without the internet!?
I've made a start on the festive food list too ..... don't worry it's all hidden so we won't be tempted to eat it. I just have to remember where I've put it!
And town is beginning to look a lot like Christmas. The festive lights in Douglas switched on last night.

We took the little man down there to see it and he loved it. Especially when it started snowing!

Although he was quick to tell me that it wasn't REAL snow ..... it was just bubbles!!

Thanks for popping by ..... enjoy the rest of your day and have a lovely weekend.
I'm hoping for a quieter week in the craft room next week ..... I've a bit of catching up to do.
I've been Santa's Little Helper this week, creating this little lot ......

A ticket system for Santa's grotto at the Poker Stars kid's party

All hand painted and decorated tags ......... fronts and backs

I hope this gets me on the Nice List!!!
Cheerio until next time .....

4 comments:
Goodness, you have been busy Linda, all of your cards are beautiful!! You did a brilliant job with Jennifer's technique, the dark skies look fantastic!! You have reminded me that I need to start making some Christmas cards too -yikes, not long now! Have a lovely weekend! Anne xx
I'm sure Santa will definitely put you on the 'nice' list when he sees what you've been up to making the Grotto Tickets, such a great idea.
Love the Galaxy backgrounds really must try that - your cards look fabulous, thanks for the link.
Have a great weekend.
Avril xx
Hi. I don't comment on many cards (I do blog hops lol) but I just had to Thankyou for sharing how this was done. Brilliant card. I really like the blue background too. Hopefully I will be able to do one similar (I don't suppose you have a little tutorial to do the background and moon? Please). Xx
Thank you for your lovely comments Andrea. I'm so glad you liked the cards and that you're going to give the backgrounds a go. If I get chance I will try and put a step by step here on the blog for the card with the moon. Watch this space! x
Post a Comment