This week is flying by ....... I've been busy in the craft room though. It's almost time for our annual family holiday so I'm trying to get organised!!
Two weeks on Friday you'll find me on a boat on the Norfolk Broads. Well actually two weeks on Saturday ..... two weeks on Friday we'll be on a slightly bigger boat, sailing across to the UK, but more about all that some other time.
Last week was workshop weekend. We took a break from the calendars and had a great time creating cards with Jennifer McQuire's Floating Die Cut Frames technique.
I must say I am hooked on this at the moment, and I think a few more ladies are after last Saturday.
It was a busy day, with lots of stamping, a whole load of colouring and plenty die cutting of course.
We did find time for cake though .....
I used Altenew stamp sets that had matching dies, and ZIG markers for my all of my colouring
I even did a little bit of heat embossing
Stamped sentiments to finish off ......
And a few little gold ink splatters here and there.
I love how you get a twofer everytime .......
Change things up and use different shapes to create the apertures ...... this was my favourite pair from the day
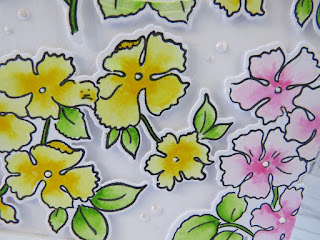
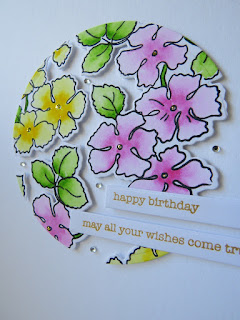
I love this stamp set ...... it's Ruffled Flowers from Altenew, and of course the matching dies make it so easy to cut them all out
I added a die cut sentiment on this one ......
And of course, another pretty little twofer
In fact ....... from this set of die cuts I actually made FOUR cards, that's 2 sets of twofers!!
These were made from all the cut off pieces from around the edge of the original panel ...... they just too pretty to throw away
I added the little bees so that I can link these two cards up to this month's Twofer Card Challenge ......
First up ..... a little Thank You card
Smaller than I usually make ..... this is 6x4 inches, but I was using up leftovers.
I arranged the left over die cuts over a panel of white card cut to the size of my card front. I then covered them with some Glad Press & Seal ...... if you're not familiar with this it's a bit like cling film, but sticky. and then
I ran this through my Big Shot to die cut the centre panel. The Press & Seal holds everything in place ....... it's fab! Check out Jennifer McGuire's video it explains everything.
Once you've die cut the centre out, remove the white card from the back, turn over the remaining piece of Press & Seal and put foam pads on the back of all the die cut pieces making up the frame. This then goes onto the front of your card ..... the Press & Seal holds everything in the right place .... clever eh!
Once the die cuts are stuck down, carefully peel off the Press & Seal, and your die cuts will look as if they are floating ...... I love it!!!
The little bees are from a Stampin Up! set called Dragonfly Dreams ..... I'm not sure if it's still a current set.
And here's the twofer ...... a Birthday card made using that die cut centre panel
A simple frame around the edge, and a sentiment banner to finish off
You have to give this technique a go ..... it's so much fun!
Thanks for popping by ..... enjoy the rest of your day.
It's lovely here today, the sun is shining and it's warming up nicely. It's about time though, it is June afterall!
No sitting in the sun just yet though, it's back to the craft room for me and I'm about to go all festive!
Don't worry, its for a magazine later in the year so I'm not going all Ho! Ho! Ho! just yet!!!
Cheerio until next time .......
Products used:
Stamps: Ruffled Flowers, Leaf Canopy (both with matching dies ) Altenew; Dragonfly Dreams (SU) Penny Black sentiment stamps; Birthday Messages (Mama Elephant)
Inks: Versafine Clair - Nocture; Versamark; Delicata Golden Glitz;
Others: Hello Die (Altenew); Nestabilities die - circles, rectangles, ovals: Gold Embossing Powder (WOW!); ZIG Clean Color Brush Markers; Pearl Drops (Nuvo); Small crystal gemstones


7 comments:
Fabulous cards - you've been very busy!
Kath x
I hadn't seen this technique before, Linda, and gave myself a good smack in the forehead for not thinking of doing something like this myself, lol! All of your cards are gorgeous. Those leaves look incredible with the gold embossing and your watercoloring is spot on! The flowery cards are stunning as well, and done in perfect colors. But it's those bee cards that have me smiling the most. They are really lovely, and so full of interest. That chubby little bee looks like he could flit right off the card front! Beautiful cards. Thank you so much for joining us at the Twofer Challenge! Bev
Love these bright and beautiful cards! xxx
I am literally blown away by all the gorgeousness you presented for us with this beautiful floral Fourfer, Linda! How fun you all must have had playing with this technique! You really make everyone want to try it now!! I love that you could easily add your big fat bee to two of them and have them work perfectly for our challenge! Thank you so much for the inspiration and for playing in Twofer Card Challenge #17! I plan to be back before you leave, but if I'm not, have a magnificent hols!! Hugs, Darnell
amazing array of cards! I love 💕 how you mixed and matched your images:)
WOW! Your cards are AMAZING, Linda! What a fantastic technique and I really need to give this a try. First, love that you get two cards from one panel ... AWESOME! Your leaves are gorgeous and I love them paired with the gold embossing and the oval aperture. So pretty and elegant. Your second set is gorgeous with those sweet ruffled flowers. Love the different colours --- such happy cards. And your final set with leftovers (you have the BEST leftovers) and adding those bees ... Sweet!! Thanks for sharing wtih us at Twofer Card Challenge. And thank you for the inspiration!! xx
Beautiful cards - sounds like a fun day!! Enjoy your upcoming holiday xx
Post a Comment