
I hope you're enjoying the weekend.
Dare I say it ......... are you getting that festive feeling yet? Thinking about making a start on all those Christmas cards! Well, there is only 146 days to go ..... just saying!
For all you Sweet Poppy Stencils fans, I've got a little heads up ...... Lucy is back on our TV screens tomorrow with more gorgeous, new, Sweet Poppy goodies ..... yeah!
There's brand new Sweet Poppy festive stamps and stencils, along with some back in stocks, and a few old favourites, so if you are thinking about Christmas you wont want to miss the show (details and times are at the bottom of this post)
As always Lucy will be working her magic showing us how to get the best from our Sweet Poppy stash, and there'll be lots of gorgeous inspiration from the rest of the Design Team.
I haven't had much time to play with the new Christmas release ....... holidays and family stuff getting in the way, you know how it is. And it was a bit weird making Christmas cards when the temperatures were soaring outside, and even more so in my craftroom! But, I did manage to get a few done .....

I love this new Victorian Bauble stamp set! ........ you know me and my tree decorations. You can never have too many pretty baubles!
Using a black ink, I stamped the baubles (you get two different sizes in the set), two of them directly onto a piece of white card cut to fit my card base, and then a third one onto a seperate piece, which I added a touch of gold and silver paint to, and fussy cut.


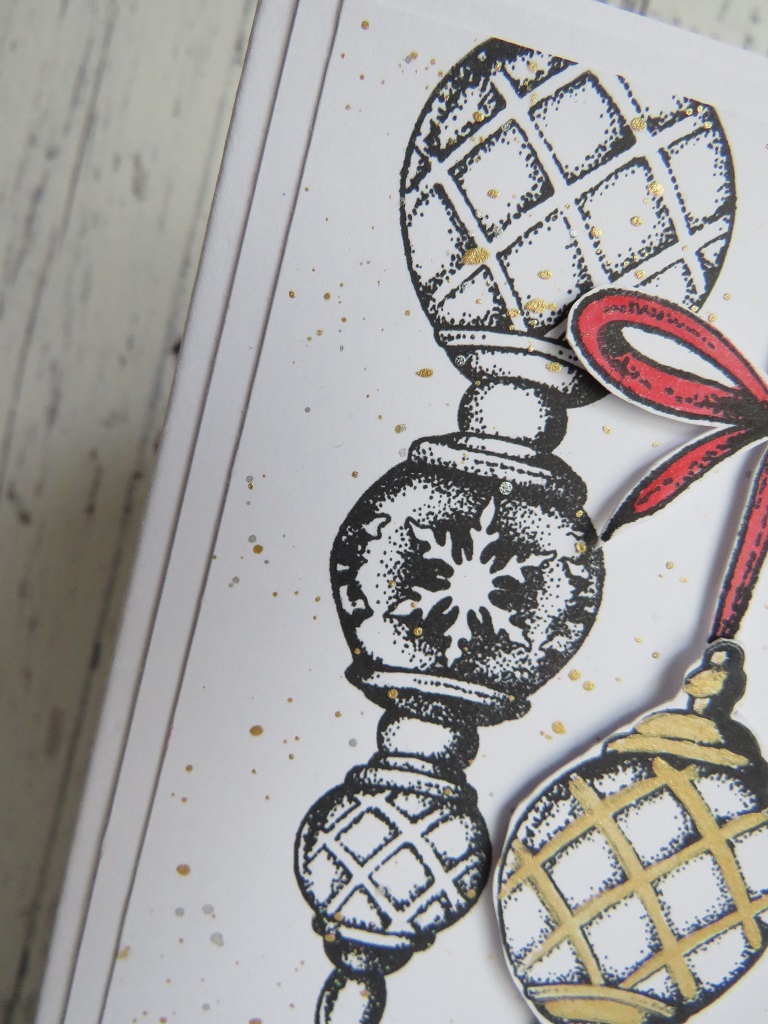

Really quick and easy to do, great for batch making, which we all do with Christmas cards.
And, if you're worried about postage, instead of fussy cutting and using foam pads, you could stamp the centre bauble first, create a mask and simply stamp the two in the background over the top to create the same look.
Keep things even more simple by just using one of the stamps ........ classic gold and silver on black cardstock ...... always a winner!

Stamped and heat embossed in gold and then coloured using pearlescent paints ...... I kept it to just silver but, think of all the colours you could use ..... so stylish!


I stamped and heat embossed the baubles in gold, and then used Distress Inks over the top to add the colour ...... Evergreen Bough and Festive Berries (love this combination)

I started blending the colours from the top of the card, and worked down the baubles fading out the colour gradually, as I got closer to the bottom.
I also used a wet paintbrush to 'bleach' out the colour a little, from inside the baubles and the ribbons, before using a Distress Reinker (Festive Berries) to paint the ribbon .......


I simply sprinkle a little where I want the snowy effect, no embossing ink required, then I gently heat from underneath until the embossing powder begins to melt ...... so effective.


This is just one of the stamp sets that Lucy will be showcasing tomorrow. So don't worry, if you're really not in the festive mood just yet, it won't all be about Christmas.
Check out the show times below and tune in.

Thanks for popping by ..... enjoy the rest of your day.
We're taking advantage of the nice weather and having a BBQ later. Nothing fancy, just getting the family together.
It was our wedding anniversary yesterday, 34 years since hubby and I tied the knot ...... time flies when you're having fun!
We celebrated with a lovely lunch out yesterday, so it'll be nice having everyone together later. And, I won't have to do the cooking, which is even better!
Cheerio until next time ........

Supplies
Supplies
Stamps: Victorian Bauble stamp set (Sweet Poppy Stencils)
Inks: Versamark ink; Versafine Clair - Nocturne; Delicata - Golden Glitz & Slivery Shimmer inks; Distress Inks - Evergreen Bough, Festive Berries
Other: Gold and Silver Embossing Powders (WOW!); Gold paint (PaperArtsy); Quickie Glue Pen; Fine Crystal Glitter; Pearlescent Paints: Chunky White Embossing Enamel (Stampendous)
2 comments:
Three wonderful ways to use this stamp set, Linda! I love all the gold and silver and sparkle!
Three beautiful cards showcasing that gorgeous Victorian bauble, Linda. I could see these hanging on your trees!! Great work. Happy belated anniversary, my friend! xx
Post a Comment