Showing posts with label Alterations Dies. Show all posts

Friday, 18 January 2013

Doesn't Time fly ........

Happy Friday everyone,

Welcome to my new followers this week.  Thank you for taking the time to share in my crafty journey,  it's nice to have you along.

It's a little bit chilly on the Isle of Man today, and it's SNOWING!!!  Nothing like what parts of the UK are getting but the white stuff is definitely falling.  I don't think we're getting enough here in Douglas to cause any major problems (famous last words!) but, up on the mountain road is a different story .........
These are pictures taken this morning from the IOM Webcams up there ...........Brrrrrr!!!
We're off across to the UK tomorrow morning (hopefully!) I'd better wrap up warm I think.

The reason for our little trip across is Lauren's birthday.  She was 21 yesterday, and we're having a little family get together on Saturday.
Where has that time gone, I ask myself.  My baby's all grown up ......... and she now has a baby of her own. How old does that make me feel ........!!?!!

As it's a special birthday I had to make a special card ......
....... it's even got a box!  Here's what's inside ......
I hope she likes it ........ it's a 'more is more' sort of card.  I got a bit carried away I think.  There's a lot of my favourite products on there, Fran-tage, Mega Flakes, the Indigo Blu Vintage Flourish stamp  ......
I've used my Cricut machine for the numbers (Storybook cartridge), and a Tim Holtz Alterations die for the clock ....
..... which has been painted and crackled to give an aged look. 
Of course there had to be a key on there somewhere too, and I had to put lots of flowers, a handmade paper rose, ribbon, lace, beads, glitter for a bit of sparkle, you name it, it's on there ........

The inside has been decorated too, just to finish it all off ....

As I've said, I hope she likes it. 

Well, that's another busy week nearly over.  I've just to do my weekly post over on the Creative Studios DT Blog then I can close the old Craft Room until Sunday. 
Here's a sneaky peek of this weeks project ........

a little something for the guys again .... maybe.


Have a lovely weekend.  Stay cosy and warm.

Cheerio for now

Linda
x

Friday, 28 December 2012

Only a few days left

Morning all,

Not long to go now before the start of a new year.  What's 2013 got in store I wonder.

I hope you've all had a good Christmas, not too much of the old festive spirits.  It's been a pretty quiet one over here, nice and relaxing.  Christmas dinner out is something I can definitely get used to.  I did miss having the whole family around but, we had a fabulous meal, ate far too much though - 10 courses!!!  And the best bit was, no washing up - or loading the dishwasher I should say.
When we got back home we spent the rest of the day on the sofa and watched the whole first series of something called 'Falling Skies' - all 10 episodes!!  Neither of us could face anything else to eat, not even a "little mint wafer"!  In fact we didn't eat until well into the afternoon on Boxing Day.  The fridge is still bulging with all that 'just in case' festive food, and the Christmas pudding still hasn't been touched.  Oh well, the diet doesn't start until January.

The old craft room door finally closed on Christmas Eve (and hasn't been opened since!)  The last task on my 'To Do' list was my Timmie Tags.

Drumroll please ............ my December tags are done - whoo hoo!!  My set of 12 Tags of 2012 is now complete.

Here are Tim's December tags ......
He's made them into cards this time.

And here's my versions .......
I've kept pretty much to the original design, just added my own little bits here and there.
I loved doing the backgrounds using the metallic Distress Stains. You can't really see the shine from the metallic stains in the photograph but it is there, trust me.
   
On the snowman one I decided to add some snowflakes in the background and embossed them with a sparkly white powder.  I added an extra layer to his hat and also his scarf.   The word 'snowman' was stamped again and layered to cover up a bit of bad rubber stamping on my part, but I do quite like how it stands out.  My sentiment is a rubber stamp I've had forever, and I chose to finish off with the blue tinsel instead of the silver - very frosty looking.
The final tag was so quick and easy to do, it's all die cuts.  The tattered poinsettia is done in the same way as Tim's, grunge paper covered with tissue wrap then coloured using Distress Inks.  I did an extra layer in green Kraft-core cardstock for the leaves. Each layer of the flower has been given a coat of frosting using the Distress Stickles Dry Glitter in the Clear Rock Candy.  It's more sparkly when the light hits it in real life, on the picture it does actually look like frost.    My flourish is a Memory Box die - would you believe I don't have the Alterations one (must sort that out in the new year!) and I've added a couple of metal charms from my stash.


There you have it, all 12 Tags done!

I've really enjoyed doing these, and to have actually been amongst the winners one month too was just amazing!  I hope we can do it all again next year.

In case I don't get chance to blog again this year, I'd like to wish each and every one of you a very Happy New Year.
Thank you for all your comments and support over the last 12 months, it's been fun!!

All the best
Crafty hugs
Linda
x 

Friday, 19 October 2012

What a busy week I've had

Hi everyone,
Happy Friday!  This week has flown by, but it's been fun.
I'm still busy in the old craft room, at least the 'To Do' list is going down (sort of) - yeah!
There's a project on there that's been on for weeks, I just haven't had the time to do anything about it.  It's a Memory Box for my Grandson Alex. 
My father-in-law made the box last time we were across in the UK and up until yesterday I'd only had time to put a layer of primer on there.  Now it's had a coat of colour - whoo hoo!  I'm trying to get it finished before we go across again - November 7th.  I'll keep you posted!

In the meantime, here's something I did a couple of weeks ago.  I think I'm safe posting it today - the lady who it was for should have seen it by now.

It's an anniversary card for the wife of someone who hubby works with.  It was their 1st Wedding Anniversary on the 14th (I think) and Baard asked me to make a special card for him to give to his wife. I even made a matching box with Gift Tag for it to go in.
When I started out I was going to keep it quite simple, but I think I got a little carried away. There's a bit of everything on here .....
As you can see, my 'Fran-tage' phase is still in full swing.  I used the Shabby Blue on the corners of the background paper and the black card.  Everything was distressed around the edges using the Tim Holtz Distressing Tool, and then inked with Victorian Velvet Distress Ink to soften it and give an aged look.

There's some embossing on there (Birds and Swirls embossing folder).  There's some die-cutting (Weathered Clock, and the Tree Branch).  Rubber Stamping - the hearts were done with a Stampendous stamp and heat embossed in white, the sentiment is from Penny Black.
I used punches for the birds and the blossoms on the branch, and I added ribbon and gems to finish it all off.  It was pretty when I'd done - I was pleased with it anyway.
It's always a bit of a worry when I'm making something for someone else, especially when I don't know them that well.  But, I know that Baard likes it, I just hope Alena, his wife, thinks the same.

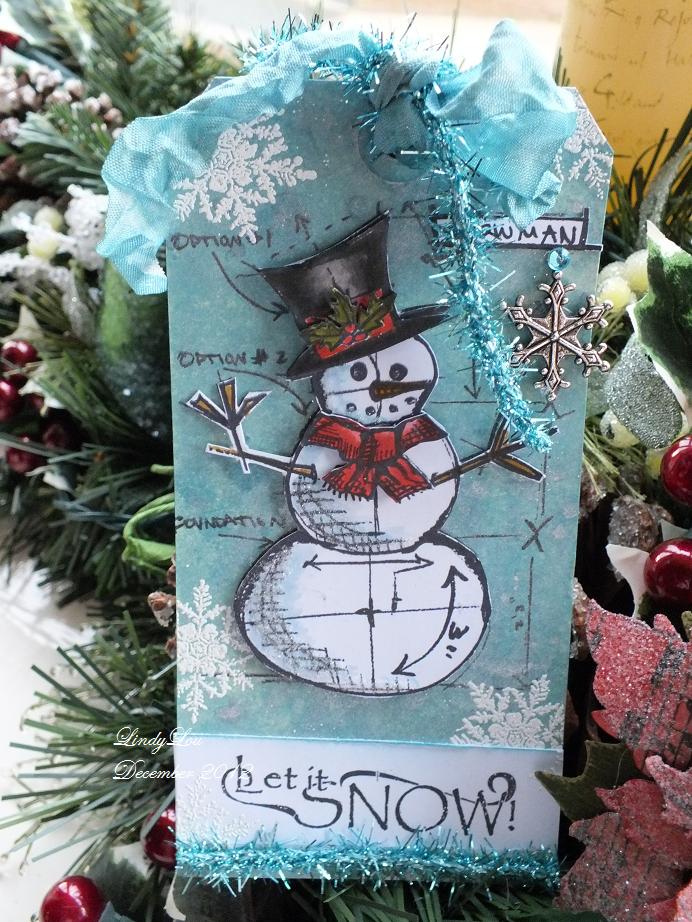
As it's Friday, it's my day for posting on the Creative Studios Blog.  I had fun yesterday finishing off this week's project.  I've gone all frosty looking this time, same stamp sets as last week but a competely different look.  I can let you have a sneaky peek, but if you want to see it in full, and read how it was done you'll have to pop over to the Design Team Blog later and have a look.

Phew! I think that's me done for this week.  Not sure what we have planned for the weekend.  Stephen's back from his London trip this evening, so no doubt the washing machine will be going on a some point - I get all the good jobs!
If I do get time over the weekend  I'm hoping to do my Timmie Tag.  I've made a start.  I've coloured my glitter .......
....... it was white when I started!
I had a bit of an 'OMG! I've done it wrong' moment when it all started to clog, but it all came good in the end - Tim said it would!
Full instructions are on Tim's Blog post for this month's tag.  What a fabulous technique, I'm now looking at all my alcohol inks and thinking what fab colours of glitter I can make.  I'll be using this one again!

I hope you all have a lovely weekend.  Thank you so much for sticking with me this week, all your fab comments really do mean a lot.  I always look forward to hearing from you.
I'm off to do my DT post, then it's back to the old craft room.  It's a hard life! 

Bye for now

Linda
x

Wednesday, 20 June 2012

Back again! 1st Challenge of the week

Hello again,
Lunch time over, back to 'work'.
It's Less is More time again. (LIM)  I love taking part in this little Blog Challenge.  I say 'little' but last week there were over 170 entries.  It's always nice to see so many different ideas and designs each week.  I must apologise though for not stopping by more blogs and commenting on the cards last week, but time just ran away with me.  I will do better this week, I promise.
It's Theme week this week and the challenge is 
                Something Shiny
                                 
Hmm ........ something shiny?? This could be any number of things -  gems or glitter, shiny silk ribbon maybe.  Metal trinkets or glossy cardstock?  Shiny could be a nice new car, shiny new bike, diamond ring. It could even be a Christmas bauble.  The list could go on.  In the end I went with mirri card and made a bunch of shiny keys for a lovely new home.
I don't use much mirri card these days, but the different coloured pieces I found in my bit box were perfect for the job.  I used the TH Alterations die - Hardware Findings, to cut the keys and the keyhole.  I sanded the edges of the keyhole a little, to remove the shiny layer then coloured over with DI to give a bit of a worn look. I attached it to the front of my card then cut out the middle - you can just pick this up in the photo.
As you can see I've used the spritz technique again.  I wanted to add a little colour so I used a circle template as a stencil, positioned off the edge of the card, then doodled around the outside.   


I'm loving this look at the moment (can you tell).  While there's ink in those little spray bottles, beware!  
It's funny how you forget techniques then suddenly everything you make includes one particular thing - well this is mine.  It won't be for much longer though the bottles are nearly empty. 
 
It's not a brilliant picture, sorry.  I'd left it until late in the afternoon to phoptgraph it and I struggled to get a decent shot. (I said we'd had a nice week so far)  What with the sunshine streaming through the window and the mirri card reflecting on my camera it wasn't easy.  It looks shiny to me, what do you think? 

Hopefully I'll be back later on.  What's this, nothing for days, then 3 at once!  Just trying to catch up a little.


Bye for now, enjoy the rest of your afternoon.


Linda