Showing posts with label Clearly for Art. Show all posts

Saturday, 8 November 2014

Tag #3 ....... for Loll's 12 Tags of Christmas

Hello again,

Hope you're having a good weekend.  We decided to have a lazy day today .... well the weather wasn't good, not the sort of day for being outside!  Instead we had a nice family day at home, watching the football ..... my Chelsea boys won again today ..... whooo hoo!! (sorry if you're a Liverpool fan!).  Playing computer games (hubby and the kids .... not me!)  And there's now a rather large Lego train going around the lounge ..... again nothing to do with me, that's all down to the little man and his mum!

So what have I been up to ...... well let's see.  We had a new addition to the family this morning ....... meet Holly Berry ........ a little on the green side, but sooo cute!  She's settling in nicely.


It's Day 6 of Loll's 12 Tags of Christmas event ..... and seeing as I'm only on Day 3, I took the opportunity to spend some time in the old craft room and catch up a little.  Here's the result .....

Tag #3
I took my inspiration for this one from Loll's Tag on Day 3.

I started by colouring my background card using the Faux Mother of Pearl Technique (details of which can be found here on Loll's blog), along with Distress inks.


I stamped my festive greeting on the bottom using IndigoBlu FlitterGlu and Chariot of Fire (gold) Mega Flakes.  I then overstamped, this time using Black Archival ink, and I moved the stamp slightly over to one side to give a sort of shadow effect.


The poinsettia has been die cut using the Spellbinders Layered Poinsettia die, cut from a piece of Studio 490's Clearly for Art modelling film, that's had a layer of Tim Holtz Frosted Film attached to it.
If you've never used Clearly for Art, it's a bit like a cross between thick acetate and shrink plastic ..... except it doesn't shrink!  When you heat it gently with a heat gun you can mould it into shape while it's still warm.  The great thing is, if you don't like the shape you end up with, just heat it up again and give it another go ...... it's fab stuff!

(I must say though, the actual die didn't cut right through the modelling film, and I did put it through  my machine 3 or 4 times.  I had to finish cutting it out with scissors and a craft knife, but the lines were deep enough to follow so it wasn't hard to do).


I added some colour to the bloom using Festive Berries Distress ink, and then spritzed the layers with the Picket Fence Distress Stain Spray.  I love these sprays, and guess what ......... the remaining 24 colours have just been released .... whoo hoo!!  (Don't tell anyone ...... but I may just have placed my order for those this afternoon ..... ooops!)

Anyway, I digress ........  I added a sprinkling of Chunky White Embossing Powder to the background and layered up some festive foliage across the middle of my tag, before adding the poinsettia.


A few sparkly gemstones and a pretty organza bow add the final touches.

Well that's tag number 3 done ...... just need to start thinking about gifts that they can go on now.
That could be a job for tomorrow.

Thanks for popping by ......

Cheerio until next time

Linda
xx  

Monday, 30 December 2013

The last tag of the year ....... sigh!

Happy Monday!

It's been another fun year following Tim's 12 Tags.  Each month we've been treated to inspiration from the master himself, with step by step instructions to help us to create our own versions. 

When I saw December's tag I couldn't wait to give it a go ....... the Tattered Poinsettia is one of my favourite dies and I loved the idea of using the Frosted Film with the Clearly for Art - what a combination!!

This is Tim's tag ....... how gorgeous is this ...... 
 

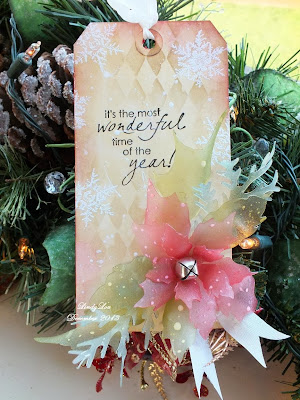
and here's mine ...... my favourite one of the year ......


The colours are a lot more intense in the flesh ....... I just couldn't capture them properly on camera.

Using the Frosted Film with the Clearly for Art gives a fabulous finish to the poinsettia and it's so much fun when you heat it up...... a bit like shrink plastic except it doesn't shrink, but you can mould it into any shape you like.  And the beauty of it is if you don't like it once it's cooled, just heat it up again.


I added a couple of holly leaves in there and some ribbon, and finished off the centre with a festive bell.

I must admit my splattering technique needs a bit of work, and I didn't have Tim's sentiment stamp (another one to add to the shopping list) but I think the one I've used says it all .......


Well that's it ....... the 12th Tag of 2013.  I do hope we can do it all again next year ....... and who knows I may just get some of them done with a bit more time to spare.

Thanks for popping by ........ I'll be back tomorrow with the final part of My Favourite Makes of 2013.  Enjoy your day.

Cheerio for now

Linda
xx

Tuesday, 30 April 2013

Cutting it fine ..... again!

Happy Tuesday everyone,

Well, it's the last day of the month again, so that means it must be time for my Timmie Tag.  Talk about cutting it fine ...... I'm getting later and later with this each month.
12 Tags of 2013
As usual, I didn't have everything on the supplies list but, I got there in the end.
I don't think I've mastered Tim's technique for this month that well.  Could be something to do with me not having the right paints - that's my excuse anyway.  This month the master has been showing us how to create the look of patina on different surfaces.  Check out all the details here 

This is how mine turned out .......
Similar I suppose.  I didn't have a lot of time to mess about with it really.   Are you ready for this ...... I didn't have ANY of the colours of Distress Paints - shock! horror!  I had the metallics, no problem there but, I had to find some similar colours in my box of acrylic paints.  In the end I went for Paperartsy's Fresco Finish in shades of Blues and Greens.  Not sure that they work in the same way as Distress though but I quite like the result.  And using the distress inks over the top is so clever, I love the mottled effect.

I pretty much kept to Tim's design (again, not a lot of time to play around), but I decided to add a bit of fantasy film into the mix.
I stamped the dragonfly onto the Clearly for Art - if you've not used this before try it. It's so cool! The clear version feels like thick acetate but when you heat it, it goes all soft and pliable so you can shape it before it cools.  Once it cools down, it holds it's shape.  Perfect for adding a bit of dimension to you projects. And, if you're not happy with the shape first time, just heat it up again, it all goes flat. and you can shape it again.
Once I'd stamped the image, I used some Glossy Accents, and stuck the fantasy film onto the back.  Once this was dry, I cut out the wings and the body of the dragon fly and attached them to the tag.
I wasn't sure if the film would stick once I heated the wings again but, it worked ........
You can just see a hint of colour as the light hits, they look quite delicate.

The rest of the embellies I've used are more or less the same as on Tim's tag, but with a little LindyLou touch.
I decided to make my tag a little more feminine, I inked and stamped a paper flower and added it to one of the mini gears.  We should be seeing a few more flowers bloom now, it is supposed to be spring after all!

Well that's April done and dusted.  I've already made my 'To Do' list for May.  It looks like I'll be spending quite a bit of time in the old craft room in the next couple of weeks.  I've loads of stuff to do before we go away.  New stash to play with too.  Look what my lovely postie brought me yesterday ......
It's all out of the packaging and sat waiting to be used.  Hopefully, before the end of the week, I can get melting. Watch this space.

Thanks for popping by today.  Sorry I haven't been visiting everyone recently, I don't know where the days are going.  I will try and catch up with you all this week.  Enjoy the rest of your day.

Cheerio for now

Linda
xx