Showing posts with label White Embossing. Show all posts

Friday, 4 October 2019

It's the first Friday of the month .........

Happy Friday .......

It's almost the weekend ..... whoo hoo!!  I hope you've had a good week.
It's been a bit crazy around here but, only one more sleep then it's time for some R&R!  That's if I ever get the suitcases packed!  At the moment I've got my pj's, toiletries and a swimming costume in there, oh and my flip flops .... I suppose I could manage with those at a pinch!
We don't actually fly to Santorini until Sunday morning, but we're flying over and staying at Gatwick tomorrow night .......... I've still loads of time to pack!

Before all that though, it is the first Friday of the month so, that means it's time to launch October's Craft Stamper Take It Make It Challenge


As always there's no particular theme to follow ....... it's Anything Goes.  Anything that has actual rubber stamping on there that is .... so NO DIGIs please!
You can find all the guidelines for the challenge over on the Craft Stamper Blog, along with the details of this months prizes.  There's also some amazing projects on there from the Design Team
if you need a little inspiration to get you started.

Before I get full of the Christmas spirit and go all festive, which will no doubt happen once I get back from holiday (I hope anyway ...... I've still got all my Christmas cards to make!  I've got a pretty floral design using one of my favourite stamps at the moment from Altenew .....


I masked off around the edges of a piece of white card using low tack tape.  I stamped the pretty floral image onto two opposite corners (I do like working on the diagonal), and heat embossed in white.


I used my ZIG Markers to add colour to the flowers and quite a bit of water.  I like to paint the petals with water first, then add a touch of colour using the pens and then, add a little more water to my paintbrush to move the colour around giving a nice watercolour effect ..... great for adding shading too!


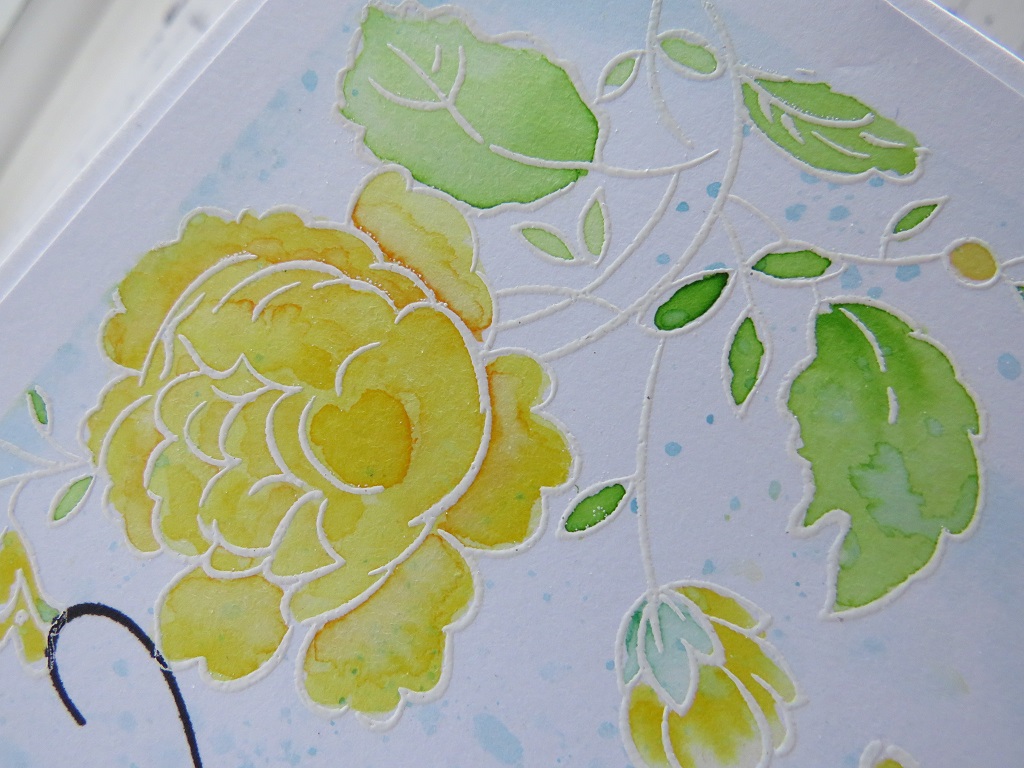
I used the acetate smooshing technique to add the background colour ....... smooshed Distress Ink onto a craft mat, spritzed with water and then used a piece of acetate to pick up the colour and then 'smoosh' it on to the background .....


All this, by the way, was done with the masking tape still in place around the edges.
Once everything was dry then the tape was removed, and I was left with this lovely framed look, without having to add another layer of card.

A simple stamped sentiment in the centre, and a few sparkly sequins finish it all off.


The challenge is open until Oct 23rd so there's plenty of time to get your entries in.
As always we have two fab prizes on offer ......
1.  The Design Winner ..... chosen by the DT.  Their winning project will be featured in the Craft Stamper magazine along with a Winner's Profile, and they will also be invited to be a Guest Designer on a future challenge.
2.   The Challenge Winner ..... randomly chosen, will receive this month's fabulous challenge prize
Two x Prima Redesign Moulds ...... In the Garden and Leafy Blossoms.  How pretty are those!


Happy stamping!

Thanks for popping by ...... have a lovely day and enjoy your weekend.
I'm off to finish up in the craft room and then try and get it tidy ..... if that fails I can always close the door and no-one will be any wiser!!
I'll also be back again later with one more blog challenge for you, then it's sun, sea and greek salads for me!!

Cheerio until then .......


Products Used:
Stamps: Handpicked Bouquet (Altenew); Special Sentiments (Penny Black)
Inks: Versamark ink; Versafine Clair - Nocturne; Distress Ink - Tumbled Glass
Others:White Detail Embossing Powder (WOW!); ZIG Clean Color Brush Markers; Low Tack Masking Tape; Sequins

Thursday, 16 November 2017

Welcome to 12 Tags of Christmas with Loll and Friends ..... Day 11

Whoo hoo! .... hello again

Welcome to Day 11 of one of my favourite Blog events of the year.  Yes ......Twelve Tags of Christmas with Loll & Friends is currently underway .......


When Loll invited me to be one of her Guest Designers again this year I immediately said Yes!
It's always a pleasure to be part of this fun event ....... and you all know how much I love making tags!


I'm loving Kraft card at the moment and I think it goes so well with white to give a real snowy look.


I cut my tag and heat embossed in white, some pretty snowflakes onto the background .....


and then added some texture paste through the Tim Holtz Speckles stencil .... I love using this to create the look of falling snow.  I sprinkled the texture paste with fine crystal glitter while the paste was still wet to add a touch of sparkle

White ink around the edges, applied with a stencil brush, finishes off the snowy sky.

I die cut some white card stock with the CUTplorations Stitched Snow Hills dies and layered the pieces onto the bottom of the tag, stamping and heat embossing the sentiment in gold


I finished off the tag by adding a beautiful die cut snowflake .... cut from white card and glitter card, layering them together to add dimension ...... isn't it pretty!  I think it's a Memory Box snowflake but I'm not sure ..... I haven't got the packaging!!


A simple white pearl in the middle adds the final touch.

I hope you're enjoying the Tag event as much as I am.  There's been some amazing tags created by Loll and her Guests over the last 10 days and it's not over yet.
There's still time to play along ....... just create a mixed media Christmas tag, any size, any style, which includes rubber stamping, plus two mixed media elements ..... that can be mixed media products or techniques.  Go on ...... join in the fun!

Thanks for popping by ..... enjoy the rest of your day.
I've been busy prepping a workshop today for the weekend ..... we're going to be playing around with Galaxy Backgrounds ....... it could be a messy one!

Cheerio until next time ........

Thursday, 6 April 2017

Happy Little Stampers Mixed Media Challenge

Hi there ..... me again!

After an afternoon of trying beer and ales I'm now (hopefully!) sat with friends, in my favourite restaurant, eating my way through what will no doubt be an incredibly delicious meal, drinking very nice wine, and celebrating the birthday of one of hubby's work pals (I think there may be the chance of a little headache in the morning ..... ooops!)

But .......... it's the start of April's Happy Little Stampers Mixed Media Challenge and I couldn't miss that now could I


As you can see, this month it's all about SPRAYS
This could be mica sprays, ink sprays, paint sprays even, or ......... just plain water.
Which one did I go for ....... water, along with some Brusho Pigment powders.  I never get tired of using these little pots of magic ..... the results you get are different every time.


I started by stamping the large daisy, from the HLS Especially For You set, onto a piece of smooth watercolour card, and heat embossing the images with white detail embossing powder


Next I sprinkled on the Brusho pigment powders ...... Rose Red (my favourite), Gamboge ith a touch of Lemon, and just a tiny sprinkling of  Lime Green onto the stems.
I tried to keep the powders just over the flowers, as this is where I wanted the most colour.  Then came the water spray.  I spritzed quite heavily over the pigments, spraying outwards from the flowers, so that the colours spread across the card.
I mopped up any excess water and repeated the process again until I was happy with the colour


You can see how the colour fades as it goes up the card ....... perfectly blended and so easy to do.

To make the daisies stand out more, I used the same Brusho colours, mixed with a little water, to paint over the petals.  You can see how the embossing acts as a resist to the Brusho and the lines stay beautifully clean and sharp


I die cut an aperture in the card, added a sentiment and a few dots of glitter glue here and there for added sparkle


I used exactly the same techniques, and the same colours on the inside of the card too .....


see how it turned out completely different ..... love it!!


As with all Happy Little Stampers challenges the Mixed Media challenge is sponsored by the HLS Store


and the winner will receive a discount voucher to spend in the shop.

Full challenge details can be found on the HLS Blog along with more mixed media inspiration from the rest of the Design Team.
We've got a fabulous Guest Designer this month too ..... the lovely Autumn from SewPaperPaint is joining us.  Hop on over and say Hello.

Thanks for popping by ..... enjoy the rest of your day.
Hopefully I'm still enjoying mine!

Cheerio until next time .......

Thursday, 2 February 2017

Happy Little Stampers ..... CAS Challenge

Hello again .........

The start of a new month is always fun ......... lots of new challenge themes.  I've got another CAS one for you this evening and there's colour involved again.

It's time to launch this month's HLS CAS Challenge, and the theme for February is .......

BLUE


As with all Happy Little Stampers Challenges ...... it's sponsored by the HLS Store .....


and the winner will receive a $15 discount voucher to spend on HLS goodies.
What are you waiting for ... get stamping!

I've been playing with my Brushos and a little bit of white embossing ..... I love this look.


I stamped the flowers (from the HLS Doodled Flowers) using Versamark ink and then heat embossed with Fine Detail White Embossing Powder. I did a little bit of masking along the way to build up the design

I then sprinkled over the top with a blue Brusho pigment powder .... sorry I didn't check which shade it was but I think it might have been Ultra Marine Blue, because of the purple shades in there.  Yes it was just the one pot of Brusho that I used ..... I love how there's different shades in each colour and depending on how much water you spritz depends on how the colours mix ...... gorgeous!


I used the same Brusho ..... this time I actually mixed the pigment with water, and applied it with a paint brush to add more colour to the centre flower.
A few sequins added to the centres of the flowers give the design a touch of sparkle and a simple embossed greeting finishes off the card nicely.


Now it's your turn ..... can't wait to see what you all come up with.

Thanks for popping by ..... enjoy the rest of your day.

Cheerio until next time .....

Monday, 17 October 2016

What a fabulous weekend ..... we should do it more often!

Happy Monday ......

What a great weekend we've just had .... hope yours was a good one too!

After a lovely crafty day last Friday, I was told that hubby and I HAD to be in The Saddle (Chris's place) that evening .... no matter what!
Hmmm ....... now I don't usually like surprises but ..... this one was a good one!
My brother and his wife had come across for the weekend ..... it was so nice to see them.  Chris was the only one that knew anything about it (and Sam his girlfriend), apparently they'd been organised it for weeks!!  Thanks love ....... what a fabulous surprise for your old mum!!

We all had a lovely night out ...... called in to Artisan see Lauren as she was working, she was as surprised as I was .... lots of squealing and hugging going on!!  It was also Chris's one year anniversary of having his name above the door at The Saddle ..... hasn't that 12 months gone quickly!!! ........ so as you can imagine, there might just have been a little bit of celebrating going on!!
We did it all again on Saturday too!! Oh yes .... you've guessed it ..... Sunday was a bit of a lazy day!

Not only was I out partying all weekend ....... it was workshop weekend too!!  There wasn't too much of a headache on Saturday morning ..... just as well really as we had the usual crew around the table, plus a few extras for this one.  The place was full .... and we had a great day.

Four cards, with matching tags, all done using Kraft Card.  
It's one of those things I think, you either love it (which I do)  or .... you're never quite sure what to do with it!  Well I gave them all a few ideas ...... starting with simply stamping onto it using a black ink and adding a some black and white cardstock ...... very elegant.


I gave them a choice too .... either everyday using the gorgeous Penny Black Poppies ......


or a Christmas version with the jolly Inkadinkadoo Snowman ......


Next we did some white embossing ..... which always looks stunning on Kraft card .....


I love my large Clarity Christmas Tree, especially with a touch of sparkle and some added falling snow .....


And why not add a bit of festive red into the mix ......


 Snowflakes white embossed again, but also stamped in Crimson Red Versafine .....


But, it doesn't have to be just Christmas cards ...... this colour combo works just as well for everyday designs


Tags to match too .....


Then it was on to some simple colouring on Kraft card ....... stamping with a brown ink and using water colour pencils ......


How cute is this little guy .....


Add some Picket Fence Distress ink around the image and a little falling snow and you're done.  A nice quick and easy, one layer card with matching tag ..... great for posting!


And of course .... there was an everyday option .....


This time stamped in Black and coloured using Prismacolor pencils ..... with a tag to match


And finally ...... we finished the afternoon with what was my favourite, and everyone else's I think ..... white ink on Kraft card.


Inspired by the ladies from Inkylicious ..... and using their beautiful stamps, two wintry snow scenes.

First option ...... using a stencil and white ColorBox ink to create the circle, then stamping the Inkylicious Winter Lodge over the top ......


This is where the MISTI is such a useful tool.  To get all the detail of the stamp clear, over the white ink I stamped the image about 3 or 4 times using a brown ink pad.  Then I added in some extra white detail, the snow on the roof and the trees, and around the bottom of the lodge, and then ..... I stamped the lodge again over the top.  Because I used the MISTI each stamping was perfect!


The other option was made using the same white ColorBox ink and a piece of copier paper to create the snowy hills ......


I used stamps from the new IndigoBlu Winterland Wood and the Inkylicious small Winter Cabin

With my copier paper masks in place I stamped the images first, using the brown ink again (Ranger's Java Bean Dye Ink)


Then I added in the snow ......


The ColorBox white ink works really well on Kraft Card .... I will say though they are quite a wet ink pad so less is definitely more.  I always like to use a brush to apply my inks and I start with very little on the brush and gradually build up the depth of colour.

Love how these two designs turned out.


I said it was a busy workshop ..... I think everyone enjoyed it though.  They've booked on the next one anyway!

Well .... that's Monday nearly over with.  It's going to be a bit of a whirlwind week I think ..... I've only 4 days .... 3 now ..... to get everything done, then I'm off on a little trip across to the UK next weekend ...... I'm so excited!!!!  More about that later.

Right now it's time I got on with the dinner .... tummy's rumbling!!

Thanks for popping by .... enjoy the rest of your day.

Cheerio until next time .....