
It's time to launch another challenge for the month of March ...... and this time it's a Christmas one. Time to get all festive for the Happy Little Stampers Christmas challenge ..... Ho! Ho! Ho!
This month we'd like to see .......
SHAPED CARDS


Hmmm ..... I don't really do shaped cards, I'm much more of a traditional straight edge sort of gal!!! But hey ..... I'm always up for a challenge!
When I say I don't do 'shaped cards' I don't like anything too fancy. In the past I've made easel cards, I suppose they could be classed as shaped. I do like to make tag shaped cards and another of my favourites is this cute little circle card, made using the Spellbinders Nestabilities Circle dies and the matching Scalloped Circles ....... what do you think ..... cute or what?

It's fairly simple to create .... just a bit of matting and layering and can be used for any occasion depending on how you decorate it. For this one I simply inked the centre circle using Distress Inks, spritzed with a little water and then stamped some pretty snowflakes over the top and embossed them with a white detail powder

A few dots of glitter here and there add a little extra sparkle.
Now for the card ....... fold a piece of white cardstock (not too thick a card, remember the die has to cut through two layers) Take the largest die from the Large Circles Nestabilities and place it over your folded card making sure that one part of the circle is actually OVER the fold ....... so that it doesn't cut

Run it through your die-cutting machine and you'll end up with this ......

Next cut the layers for the outside ....... another large circle (to ink and stamp your design on) and a matching scalloped circle. Layer these up and attach to the front of the card.
Cut two slightly smaller circles to layer and fit on the inside of your card

Because my actual card blank was cut from thinner cardstock than I usually use, these extra layers give the finished card more stability.
For a little more embellishment I added some sparkly snowflakes, punched from glitter card
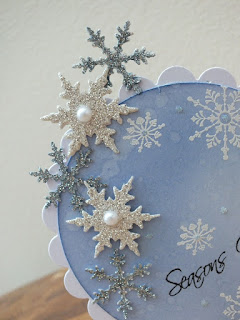
And finished off with a festive greeting and a couple of pearls in the centre of some of the snowflakes

As I said, this design can be used for any occasion .... here's a blast from the past, a pretty floral design .....

Not exactly festive ..... but it could be. Use poinsettias or holly maybe ..... just a thought!
What shape will you create? I'm looking forward to seeing this months entries.
It's Friday evening ..... and my birthday celebrations are about to start. I know it's not until tomorrow (Saturday) but, we've been invited out for a few drinks so it's a good excuse. We're off out for cocktails down at the Bath & Bottle. Should I stick with my usual Bellini (so nice) or try something new seeing as it's my birthday ...... hmmm ..... a Hemingway Daiquiri maybe (sounds nice) or a Dark and Stormy ..... bit like the weather here!!!
Thanks for popping by ..... enjoy the rest of your day and have a great weekend ..... looks like I'm going to ..... Cheers!
Till next time ......


A few dots of glitter here and there add a little extra sparkle.
Now for the card ....... fold a piece of white cardstock (not too thick a card, remember the die has to cut through two layers) Take the largest die from the Large Circles Nestabilities and place it over your folded card making sure that one part of the circle is actually OVER the fold ....... so that it doesn't cut

Run it through your die-cutting machine and you'll end up with this ......

Next cut the layers for the outside ....... another large circle (to ink and stamp your design on) and a matching scalloped circle. Layer these up and attach to the front of the card.
Cut two slightly smaller circles to layer and fit on the inside of your card

Because my actual card blank was cut from thinner cardstock than I usually use, these extra layers give the finished card more stability.
For a little more embellishment I added some sparkly snowflakes, punched from glitter card

And finished off with a festive greeting and a couple of pearls in the centre of some of the snowflakes

As I said, this design can be used for any occasion .... here's a blast from the past, a pretty floral design .....

Not exactly festive ..... but it could be. Use poinsettias or holly maybe ..... just a thought!
What shape will you create? I'm looking forward to seeing this months entries.
It's Friday evening ..... and my birthday celebrations are about to start. I know it's not until tomorrow (Saturday) but, we've been invited out for a few drinks so it's a good excuse. We're off out for cocktails down at the Bath & Bottle. Should I stick with my usual Bellini (so nice) or try something new seeing as it's my birthday ...... hmmm ..... a Hemingway Daiquiri maybe (sounds nice) or a Dark and Stormy ..... bit like the weather here!!!
Thanks for popping by ..... enjoy the rest of your day and have a great weekend ..... looks like I'm going to ..... Cheers!
 |
| (picture from the B&B) |

xx


