Showing posts with label Distress Stains. Show all posts

Friday, 15 January 2021

More splatters for the CAS Mix Up Challenge ........

Happy Friday ........

I hope you're week's been a good one.  

We've reached the half way mark on the CAS Mix Up Challenge so here's a little reminder of this month's theme.
It's a Mixed Media challenge for January.  Hilary is our host and the theme is ...... Splatters
Remember to include some rubber stamping on your project, and at least one other Mixed Media element (you'll find a helpful list on the challenge blog) and of course follow the theme.


I do love to splatter on my projects, using inks, or paints, and I usually use an old paint brush. But, not everyone is comfortable splattering ink all over their beautiful finished cards ..... it can be a bit hit and miss as to where the splatters end up!  My advice is just go for it ....... the more you do it the more confident you get.  It's also a great way to cover up mistakes!!!

Something else I like to do is use Distress Stains to create my splatters ....... you know the ones, the little bottles with the foam tops.  
I simply turn the bottle upside down and 'splat' (technical term there) the ink down onto my card.  


I stamped the flowers using a black ink, across the bottom of a piece of card, and then used the stains over the top for a really quick and easy way to add the colour to the flower heads ......


Depending on how hard you splat the foam down onto the card will determine the size of the ink splatter ...... the harder you splat the larger the spread.

I watercoloured the stems and leaves using a little of the Distress Stain with a waterbrush to control where the colour went this time


I added a few co-ordinating gemstones for a little sparkle, and finished with a sentiment strip across the bottom


The challenge is open until January 24th so there's still plenty of time to get splattering and play along.

Thanks for popping by ..... enjoy the rest of your day and have a lovely weekend.
We've got lockdown birthday celebrations this weekend.  
It's Lauren's birthday on Sunday, so we've ordered a special take away from our favourite restaurant for tomorrow night (they don't deliver on Sundays), and we're having a family and friends video call ...... a socially distanced, lockdown birthday party ..... should be fun! 

Cheerio until next time ....... stay safe!


Products used:
Stamps: Ranunculus Field (Stampendous); Happy Birthday sentiment from my stash
Inks: Versafine Clair - Nocturne; Delicata - Golden Glitz; Distress Stains - Picked Rapsberry, Squeezed Lemondade, Dusty Concord, Mowed Lawn
Others: Small coloured gemstones

Saturday, 6 May 2017

HLS Mixed Media challenge ......

Happy Saturday folks ......

I hope you're enjoying the weekend.
I'm currently on the boat travelling home from a fabulous day at the Happy Stampers show in Port Sunlight on the Wirral.


I've no doubt had a brilliant day .... we always do, it's a great little show.  And I've probably spent far too much on lots of new craft goodies. Don't worry I'll show you my new stash when I get home. Hopefully the weather has been kind and the trip home isn't proving to be a bad one!

But, just because I'm off enjoying myself, doesn't mean I have to miss out on this month's Mixed Media Challenge over on the Happy Little Stampers Blog ...... I've been looking forward to this one!


As you can see the theme for this month is SPLATS!!


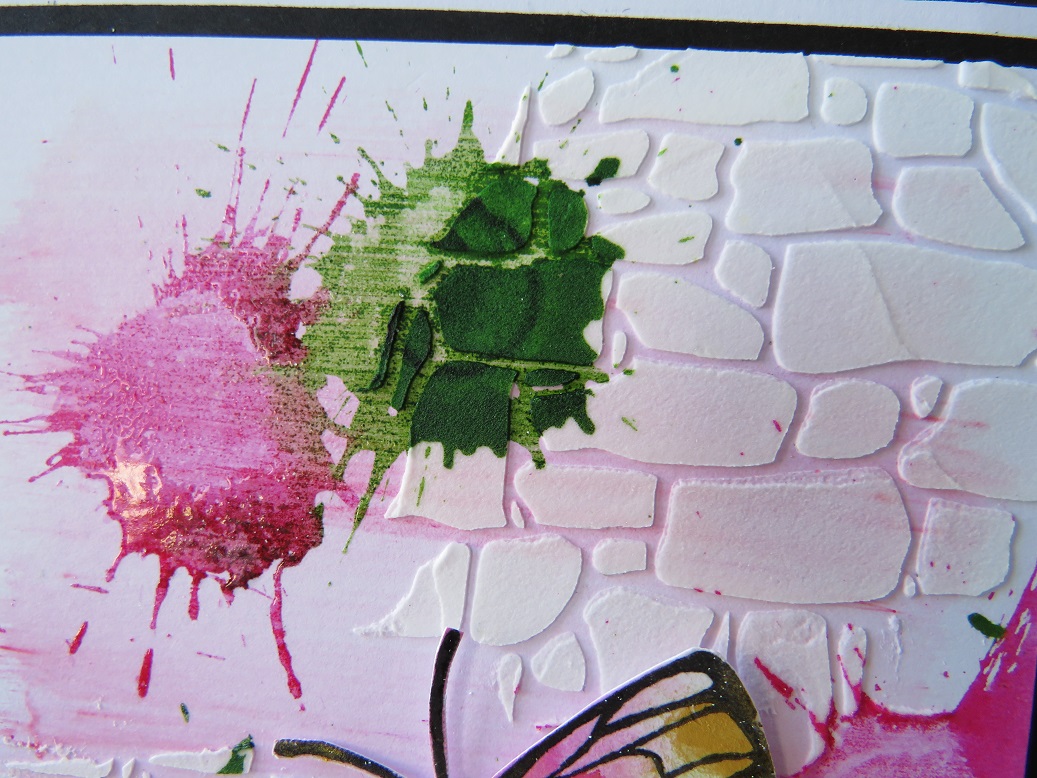
My splats were added using Distress Stains ..... simply splat the bottle directly onto your card.  I love doing this .... the results are always different, depending on how hard you splat.  The harder you do it the more the stain will spread.

I started by adding a wash of colour to the card using Rose Red Brusho spread over the card with a brush and a little bit of Glazing Medium


Next I added some texture using the new Stone effect stencil from Tim Holtz and some white texture paste


Once this was dry it was time to splat!!  Mowed Lawn and Picked Raspberry where the colours .... love it!


I left this to dry again ..... where the stain had pooled it was taking longer to dry so instead of going straight for the heat tool, I added a touch of clear embossing powder to the wet stain and then heated it.


I added my sentiment and finished off by adding one of the butterflies from the HLS Butterfly Birthday stamp set ..... stamped and embossed onto a piece of card which I found in my stash, previously coloured with Brusho I think and a touch of Inka Gold smooshed in there


I couldn't resist adding some splats on the inside too .....


See what I mean about each time you do this you get a different result.  I splat these two quite hard onto the white card and I love the effect I got ..... I really like the print from the sponge in the centres, the shading looks fab and all I did was splat the bottle onto the card .... simple!


Now it's your turn ........ happy splatting!

Thanks for popping by .... enjoy the rest of your weekend.
I'll be having a lazy start tomorrow (Sunday) ...... it's been a long day today!

Cheerio until next time .......

Thursday, 21 July 2016

There's still time to enter this month's STAMPlorations CAS challenge ......

Happy Thursday .......

It's time for a little reminder about July's CAS Challenge over at STAMPlorations.  As always the theme is Anything Goes ..... clean and simple that is .... with the optional colour twist.  July's colour is nice and summery for you ..... ORANGE.  
Not a colour I use a lot but ..... it's good to try something different.


Clean(ish!) and simple and so quick and easy.  Fun too ...... and you can use any colour you like it doesn't have to be orange.  I went with it and used Ripe Persimmon Distress Stain ..... straight from the bottle .... splat the dabber top directly onto my piece of card.  the harder you do this, the more of a spat you'll get.


Love how the ink splatters ...... so much fun


A nice bold sentiment in the middle ..... from the STAMPlorations Noteworthy set ..... and job's done.


And I couldn't resist splatting the inside too ..... easy!


You can find full details of the challenge over on the STAMPlorations blog along with more inspiration and great ideas from the rest of the design team.

Happy stamping!

Thanks for popping by .... enjoy the rest of your day.
I'm up in Ballaugh today, for the monthly craft workshop.  I believe it's going to be a messy one .... so aprons at the ready.

Cheerio until next time .......

Friday, 17 June 2016

A fabulous work of art ........ then it's back to Bourton we go

Happy Friday ......

Just a quick post this morning to say .... Cheerio!
I'm off to the UK later to spend a nice relaxing week (as if that's going to happen ...... when do the Walmsley's ever do relaxing!) in the lovely Cotswold village of Bourton-on-the-Water.  This will be our home again for the next 7 days ......


 ...... the picturesque Fairlie Cottage on the banks of the River Windrush ........ apparently, they say that this is the most photographed cottage in Bourton ..... the last time we were there, every morning when you opened the curtains there was always someone taking a picture so they could just be right!! It is a pretty cottage though .,.... especially when the roses are in full bloom.

Anyway ... I have a plane to catch so must get on.

I'm playing along with this week's Less is More Challenge .... well, it is One Layer Week after all!
The theme this week is ......
SPLATTERS

You all know how I like to splatter ink here and there ...... so I just couldn't resist this one.


Distress Stain splatters ..... straight from the bottle .... love doing this and the results are always great.

I cut a mask the size of my sentiment (Stampin Up! Work of Art stamp set) and placed it onto my card.  I then took the bottles of Distress Stain .... Picked Raspberry, Twisted Citron and Squeezed Lemonade..... and literally splat them straight down onto the card, over the edges of the mask


This is so much fun to do .... no two splats are ever going to be the same, and, depending on how hard you hit the bottle onto the card, it will vary the size of the splatters.  The harder you hit the card with the bottle, the bigger the 'splat'


Once the mask was removed I stamped my sentiment in the middle, and then using a fine liner I drew around where the mask had been


And I had to splatter the inside too ......


Well that's it from me this week ...... I'm off to throw the last few bits into the suitcase and then we're on our way!
I'm not taking any craft stash with me either ..... so it really is a break.  I am taking my laptop though so I'll be able to keep an eye on things.  And my note book is coming with me too, so I can jot down ideas and plan stuff.  I'm looking forward to a really lazy week.

Thanks for popping by ..... enjoy the rest of your day and have a lovely weekend.

Cheerio until next time ......

Tuesday, 30 July 2013

25 years ...... and still going strong!

Morning everyone,

It's a bit of a landmark day today - I've done my Tim Tag with over 2 days to spare!!! ....... No,  that's not the reason ......... it's actually our Silver Wedding Anniversary.  I can't believe it's 25 years since we said 'I Do' 
After seeing each other for only 10 days, Stephen whisked me away to Scotland for the weekend and proposed.  I said Yes, (obviously) and the rest is history.

July 30th 1988 (he looks so young!)
It's been a fabulous 25 years of fun and laughter, always an adventure, there's been a few tears along the way too.  But, I wouldn't change a thing.  He's my best friend, he can always make me smile (well, nearly always), and I love him to bits!
We're certainly eeking out the celebrations - the holiday in Italy, weekend away in the Cotswolds, we're off out for a meal tonight (just the two of us) and we were going to spend the night in a hotel but, unfortunately Stephen is off on a business trip early tomorrow so we thought we'd save that for another time.

I must confess, I haven't made him an anniversary card - how bad am I?!  I am going to dedicate my July Tim Tag to the best husband ever though .........
Here's Tim's inspiration for this month


and this is my take on it ....... specially for hubby.


All the details on the techniques and products used can be found over on the Tim Holtz blog.  As usual, not all mine are the same. 
I kept to the colours (more or less), and did Tim's brayering technique to colour the tag.  Then I used stamps from Urban Chic (CMS086) and Shabby French (CMS087) to create the background.  I also added a few words from a sheet of the 'Words'  Remnant Rubs.

I went for the Heart Wings alterations die to create the focal point, cut from Grunge Board.  I think it's time I had a new pot of the Rock Candy Crackle paint though - mine was very thick when I applied it, you can see all the brush strokes.  I quite like the effect it's made though, it's still crackled ok and I love how it takes the colour  from the stains ......

I used Festive Berries Distress Stain on the heart, and Brushed Pewter on the wings.

The 25 was cut using the Wordplay die then coloured with Distress Paint


The words are from Tim's 'Simple Sayings' stamp set .......


and I finished it all off with some seam binding, coloured to match, and some metal embellies


There's even a tiny heart on there, encased in Glossy Accents, along with a lock and key.  Well hubby does have the key to my heart - aawwwww!


Thanks for popping by today.  Enjoy the rest of your Tuesday. 

Cheerio for now

Linda
xx

Thursday, 23 May 2013

One more day to go .........

Morning everyone,

It's nearly time to close the old craft room door. A tidy up and a quick skoosh with the vaccum cleaner is all that's left to do in there.   I'm going to miss the place while I'm away.  I have stashed the new Stampin Up This and That journal, new rotary stamp, and a couple of small inkpads in my suitcase though, just in case! There's not much in the way of clothes in there yet though,  that's this afternoon's job.


One of the important things on the 'To Do' list was my May tag ....... for 12 Tags of 2013. I wasn't going to miss one now was I!
It was the same rush as ever to get this finished, only this time it's a week early.

I wasn't too sure when I first saw this, but I soon decided which stamp I wanted to use.  I did pretty well actually this month, with the supplies list.  The only thing I didn't have was the colour of alcohol ink Tim had used, and I realised I hadn't replenished my crinkle ribbon. So not too bad there.

Here's my finished tag .......


I love this stamp!!!  She's been in my stash since March, waiting to be used, and I thought she'd be perfect for this project.

I followed Tim's step by step using his new Remnant Rubs and inking with the Distress Stains.  These rub ons are sooo cool and I love how they resist the stains.


I went for a pale blue alcohol ink to use on the enamelled tag before adding more rub ons - love the mottled look .......

And I decided to attach my word band using some of the stained ribbon that I'd made for the tag, it gave it a softer look I think.

I'm really pleased how she's turned out.  I wasn't to keen when I started, but now it's finished I think she's one of my favourites.

Well that's it for today.  I've got one more crafty post for you tomorrow, then it's arrivederci!  from me.

Thanks for popping by.  Have a lovely Thursday.

Cheerio for now


Linda
xx

Tuesday, 30 April 2013

Back again! This is really last minute .......

Hello again,

I'm certainly seeing April out with a bang.  I've been busy in the old craft room this afternoon, supposedly tidying the place, but I got a little bit distracted shall we say.

All month I've been meaning to do a little something to enter into the Country View Crafts Blog Challenge, and somehow I've never got around to it.
Since moving to the Isle of Man, Country View Crafts has become my favourite online place to shop for all my craft supplies. 

It's a fabulous online store.  Great products.  Best prices.  Really quick delivery, even across to the island, and it's free p&p too!
It's only their second challenge this month, (I was so disappointed not to enter the first one) and the theme is ..........
BUTTERFLIES

There's some stunning inspiration pieces from the Design Team on the blog, and loads of fab entries too.  The challenge closes tonight - in less than 5 hours actually.  So I'd better get a move on.  See, I said it was last minute.

Here's my entry .........
It's a hinged tag, made using the Indigo Blu Wild Meadow stamp set.

I cut my tag from a piece of white cardstock - approx. 3 1/2 inches by 7, and used Distress Stains - Broken China, Salty Ocean and Picket Fence to colour it.  I put the stains directly onto my craft sheet, spritzed with a little water and then dragged my tag through the stains.  I repeated this a couple of times to make sure the whole of the tag was covered, then dried it off with a heat tool.
Next, I used the stains to make 'splats' to add a bit more interest to the background .......

This is great fun but the ink can go everywhere, so make sure your craft desk is protected - no part-finished pieces of work lying around, or nice new paper pads (why am I telling you this? .......... been there, done that, wearing the splattered t-shirt!).

I stamped the grass silhouette across the bottom of the tag using Onyx Black Versafine, and the dandelion off the edge slightly.  
To make the hinged part I cut off the bottom 1 3/4 inches and made 3 small holes across both edges where I made the cut
The butterflies were stamped onto some cardstock  from my bit box, which had been coloured using blue shades of Distress, spritzed with Perfect Pearls, and then cling film put over the top and left to dry (one of my favourite techniques, I do use it quite a bit, so I've always got scraps of card left over).
The large butterfly is from Wild Meadow, the medium one came free with an issue of Craft Stamper, and the tiny one is a Hero Arts stamp.
The sentiment is from a Dylusions stamp set, stamped onto cardstock and then cut into sections.

I mat the two tag pieces onto some black cardstock, used a fancy border punch for the bottom edge, then joined the two pieces together with some large jump-rings.   I added the sentiment, and butterflies, just attaching the butterflies by the bodies so that the wings could be raised and add a bit of dimension.  I also stamped the large butterfly again onto acetate, and layered it over the top of the cardstock just to make him flutter that bit more.
I added a fancy metal corner and some co-ordinating seam-binding to finish off.  Challenge entry done - yeah!!

I'm also entering this into Hels Sheridan's Sunday Stampers - get me!!  2 challenges from 1 make.  Anyone would think I'd thought about this one (ha ha!)  This week's theme is  ............BLUE  I think it qualifies don't you.

Well, that's it for me today.  Hubby's just got in from work and he's brought me a little treat ........

Fish supper from the best fish and chip shop ever!  It's been a while so I'm going to enjoy these Nom! Nom!

Thanks for popping by (again).

See you all soon

Linda
xx

Thursday, 21 March 2013

It's only words ........

Happy Thursday everyone!

Yes, I'm back from my latest crafty adventure ........ more about all that later.

Wow!  What a fabulous response we had to the first Indigo Blu Forever 21 Blog Challenge.  Thank you so much to everyone that took part, we had some stunning entries.  Well done to all of you, but as you know there can only be one winner.   Mr random.org did his magic stuff last night, and the number he came up with was ..... number 7

Congratulations! to Minxy ....... our first winner.  You're going to be getting your hands on that mahoosive prize.  Enjoy all your goodies.

Now on to this months challenge.  The theme for the Forever 21 Challenge #2 is .......

Same rules as last time .....

Entry must feature Indigo Blu stamps only
Only one entry per person
Enter the challenge via Mr Linky at the bottom of the blog post - challenge closes at 8.00pm on the 20th April
Winner will be chosen at random by random.org
Simples!

Here's what I came up with, hopefully to give you a little inspiration .......

For those of you that follow my blog, you'll already know I love my tags.  And, a current favourite thing I like to do, is to add the hinged bit at the bottom. 
My inspiration for this project came from an article by the lovely Hels Sheridan, in the March edition of Craft Stamper Magazine.
I loved the bright colours that she used - not what I would usually put together so I thought I'd give it a go.

I cut my tag shape from a piece of manilla cardstock (approx. 3.5inches by 7inches).  It's then been coloured using Picked Raspberry, Ripe Persimmon and Picket Fence Distress Stains.  The colours have been put onto a craft sheet then the tag has been swiped through the inks to create a marbled effect.

Once this was dry I stamped the background, using the script from Sarah's Choice in Picked Raspberry Distress ink, and the Itsy Bitsy Backgrounds stamped in Black Archival.
I stamped the bottom of the tag with the gorgeous lace stamp from the Mr Darcy set, again in black.

I then cut the bottom 2 inches off the tag and punched three holes, for the jump rings.

From the main part of the tag I cut out a heart using one of the Tim Holtz Alterations Movers and Shapers dies.  I covered a piece of white card with some of the Washi tape and placed it behind the cut out, to add a bit more interest.

My words came from the new 'B.F.F.' stamp set.  I've taken the 'friendship' sentiment and stamped it, using the Flitter Glu and Flakes, onto black card.  I've then cut out the two large words.  The stamping onto the white card was a little more tricky because there's no room to cut around the words.  You need to stamp this a couple of times, and the easiest way is to ink your stamp using markers.  That way you only ink the words you need, leaving lots of space to cut them out.

I stamped my favourite image from the Mr Darcy set, and added a touch of colour to her using the same Distress colours from earlier ............ isn't she pretty!
A paper flower in her hair, a bit of matting and layering, and the odd spot of doodling with a white gel pen finishes off the tag. 
Ialso coloured some vintage seam binding with the Distress Stains so that my ribbon would match the tag perfectly.

Why not pop over to the DT Blog for more fabulous inspiration from the rest of the Indigo Blu Belles.

Feeling inspired?  You have until 8.00pm on 20th April to get your entries in. Good luck!

There's another fabulous prize up for grabs.  This time it's your choice of Indigo Blu stamps - wow!
You can choose one of the following options .....
1.   2 large stamp plates (A5 size)
2.   4 small stamp plates (A6 size)  or
3.   1 large and 2 small stamp plates

How good is that!   Happy crafting!

Linda
x