Showing posts with label WOW! Embossing Powders. Show all posts

Saturday, 9 October 2021

What a busy World Cardmaking Day ........

Happy Saturday ........

Welcome to the weekend.  This time last week I was getting ready to spend the day in my craft room celebrating World Cardmaking Day, did you join in with any of the celebrations?

I spent the day with Facebook .......... yes I know, some of you may think a whole day on Facebook, what a waste! ....... not this one!  I had so much fun, it was the longest I'd spent in the craft room actually making something, for a long time!  And the good thing is, I have a whole pile of cards and lots of ideas, again something that's been missing for a while.  

It was a fabulous day, organised and put together by Sharon Everett from The Forget Me Not Kraft Kabin.  
The whole day was full of demonstrations and inspiration from lots of familiar names and faces in the craft world.  There were FB Lives which you could craft along with, recorded sessions again which you could follow along with.  All the supplies used had been listed during the week leading up to it so I was all ready to go.  
The FB group is still there, with all the videos available to watch, however it's now been made a Private Group so I think you have to ask to join or be invitied ...... check it out if you haven't already, here's the link ......... World Cardmaking Day
  
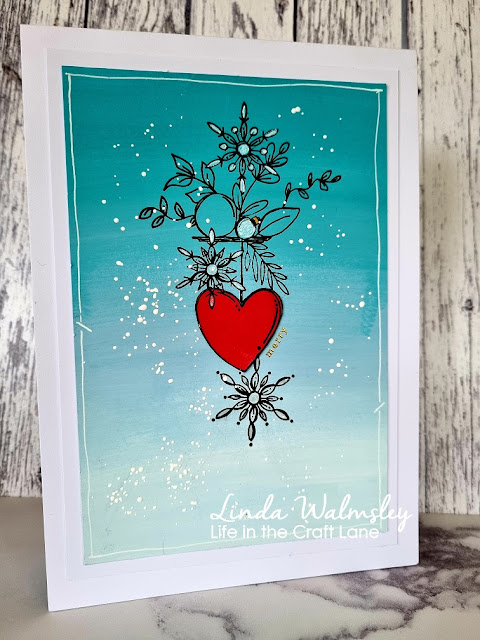
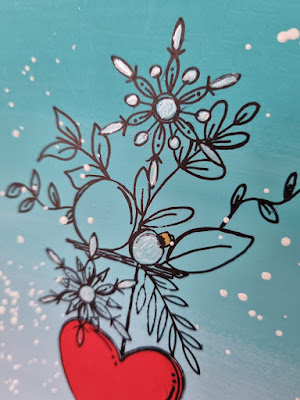
The lovely Jo Firth-Young got things underway.  I followed the techniques, I didn't have the stamp she used so I improvised .......


I also used something that's been in my stash for a while, hardly ever used but, I love the effect from PaperArtsy's Pearl Glaze ....... will definitely be using that again! 


Just a touch here and there, but how pretty does it look when the light catches it!   And get this ..... I even did the inside of the card.  Not a bad start to the day.

 
Next up was Martine Smith doing amazing things with flower dies and embossing folders.   
Making flowers is not really my thing, I don't have the patience but, I did have the embossing folder so I went with that


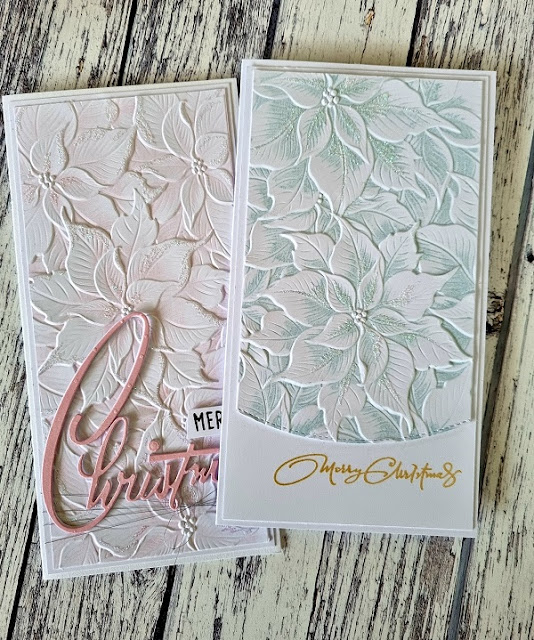
One of Martine's tips was to ink your embossing folders before putting them through your machine.
How pretty does this look with just a hint of colour .......


along with some added sparkle of course 


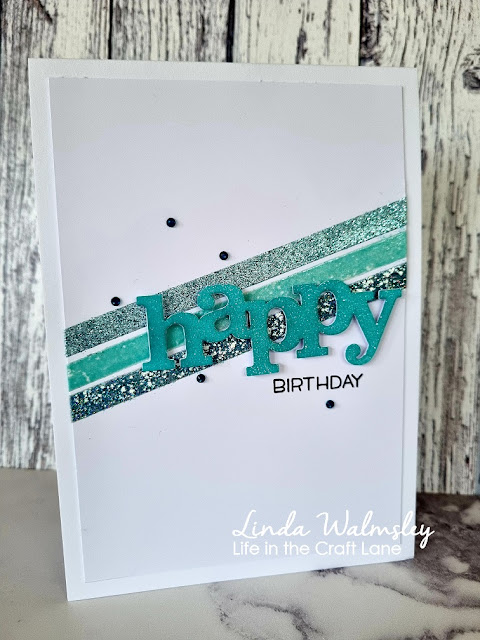
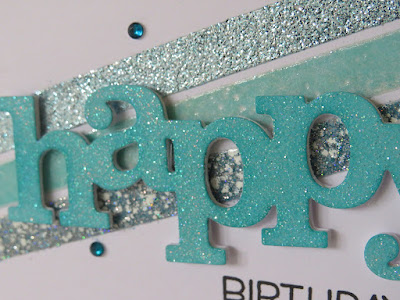
One of the pre-recorded videos was from Marion Emberson using WOW! Embossing Powders


I love this simple design, and it was so easy to do using double-sided tape with the embossing powders. and a die cut sentiment.


There's so many fabulous WOW! Embossing Powders to choose from with so many different looks.  Just remember if you're using double-sided tape under your powders, make sure it can stand the heat!

That's just some of my cards from last weekend ....... as you can see it was a busy, but fun day.
I'll share the rest with you some other time.

I've got another crafty day today. I'm off up to the North to meet up with the girls ...... it's been a while! 
Not sure I'll be as productive as last weekend but, you never know.

Thanks for popping by, have a lovely weekend.

Cheerio until next time ......
 

Products used:

Card #1  inspired by JOFY 
Stamps: JOFY 106 (PaperArtsy); the small sentiments are from my stash
Inks: Jet Black Archival ink; Versamark
Paints: Cerulean, Ice Blue, Snowflake (PaperArtsy Fresco Finish Paint)
Other: White Gel Pen, Gold Embossing Powder (WOW!); Pearl Glaze (PaperArtsy); Chunky Whit Embossing Powder (Stampendous)

Card #2  inspired by Martine
Stamps: Chritmas sentiments from my stash
Inks: Distress Inks - Spun Sugar, Speckled Egg; Delicata - Golden Glitz; Versafine Clair - Nocturne
Embossing Folder: 3D Poinsettia embossing folder (Lisa Horton Crafts)
Other: Silver thread; Tim Holtz Merry Christmas dies; Fine crystal glitter

Card #3  inspired by Marion 
Stamps: Birthday Sentiments (Happy Little Stampers - no longer available)
Inks: Distress Ink - Salvaged Patina; Versamark (used on the die cut word)
Embossing Powders: WOW! Embossing Powder - Glacier, Bluetiful; Bahama, Halo on the
Others: Double-sided tape; self-adhesive gems 

Sunday, 14 June 2020

Leave a little sparkle .........

Happy Sunday evening .......

I hope you've had a nice weekend.

It's time to launch the latest Perfectly CAS Challenge.  You know the one ...... CAS designs using just one third (or less) of the space on your card ..... easy!
Or maybe not.  Perhaps you struggle with Clean and Simple (CAS) designs ....... can't quite keep to the 'less is more' or, maybe all that white space is just a little too scary! Well, if you keep to the one third rule you really can't go wrong.  Check out the Perfectly CAS blog for lots of inspiration and fabulous CAS designs.

The theme for this challenge is ...... Sparkle


I do like a touch of sparkle ........whether it's from glitters or pretty gemstones, sparkly inks or even embossing powders.

I also have a thing for large sentiment stamps ..... perfect for creating CAS designs.


I simply stamped the words directly onto the front of my card using a gold metallic ink and keeping to that centre third of the card


I then sprinkled a sparkly gold embossing powder over the top and heat set ...... so pretty!


A few tiny gemstones and a splattering of gold and silver ink onto the background and I'm done ..... simple!


How will you add your sparkle?


A NOTE FOR ALL YOU PERFECTLY CAS FANS ......

Perfectly CAS will be taking a break after this challenge, but don't worry we'll be back again in the New Year.
Here's a little note from the lady that does all the hard work ........

A QUICK NOTE TO OUR REGULARS

We are going on hiatus after our June Challenges. After 8 years of running challenge blogs, I need a break :) So, all my challenge blogs will be having a 6 month holiday at the close of the June challenges. Thank you for your understanding!

Kylie


We've been out in the motorhome again this weekend ..... down in the south of the island this time.  We've had a lovely, quiet weekend ....... well, apart from when the family came to visit on Saturday!! We've been at a place called Glendown Farm Campsite, inbetween Port St. Mary and Port Erin.


We arrived on Thursday afternoon so we've had three nights there. The weather wasn't great but it didn't spoil our fun.  It rained Thursday evening and some of Friday ....... but we did manage a walk into Port Erin once the rain stopped (I needed some new jigsaws!)
Saturday was completely different though ..... it was glorious! 
As I said, the family came to visit us .... to eat mainly!  And I actually did an online journaling workshop with Tracy Scott in the morning, in the van!!


I didn't make any mess either, which was a bonus!

Last week wasn't great so it was nice to get away for a while and just chill for a few days.
I won't go into too much detail but ...... my father-in-law passed away on Wednesday.  We knew it was going to happen at some point but, that doesn't prepare you for when the call actually comes. And because of all the travel restrictions etc., at the moment we haven't been able to get across to the UK yet.  Hopefully we can sort everything next week and be there for the funeral.

Thanks for popping by ..... enjoy the rest of your day.

Cheerio until next time ......


Products used:
Stamps: Leave a Little Sparkle (STAMPlorations)
Inks: Golden Glitz, Silvery Shimmer Metallic Inks (Delicata)
Others: Unicorn Magic Embossing Powder (WOW!) 

Sunday, 15 March 2020

A quick reminder for this month's CAS Challenges ........

Happy Sunday .......

It's been a busy weekend for blog posts.

Time to remind you about this month's CAS Challenges ...... first up CAS Mix Up .
March is a special month for us ..... we're celebrating our 4th Birthday ..... whoo hoo!


To mark the occasion there's prizes to give away ........

a $25 Simon Says Stamp Gift Certifiate for the Challenge Winner
and ....  a $25 Simon Says Stamp Gift Certificate for one random draw from all the entries
(you must follow the challenge rules to be eligible for the prizes)

Our host this month is the lovely Jenny and the theme she's chosen is ........ Acrylic Paint


We all have them ..... we don't always use them though, especially for card making.  But, all those bottles and tubes or tubs of pretty coloured paints can give amazing results and effects.
Still not convinced ...... then check out the CAS Mix Up Blog for links to some really useful videos full of tips and techniques.

I've used my acrylic paints to add colour to the flowers on this design .......


The piece was originally done for one of my workshops where we were using a faux bleaching effect.

The background was coloured using Distress Ink applied directly from the ink pad onto the card and then swiped across using a wet wipe


Once the ink was dry, I stamped and heart embossed the flower bouquet using a white embossing powder.  Then with a water brush and a paper towel I 'bleached' out the colour from the stamped image.  Simply paint with water over the flowers and leaves and then dab away the colour with a paper towel.  This removes the colour from the image allowing you to paint over the top with pencils, or markers, or in this case acrylic paints


I used opaque Fresco Finish Chalk Acrylics from PaperArtsy and mixed them with a little water to make them easier to paint with.


I added a simple stamped sentiment to finish.


Are stencils your thing?  Then how about playing along with the CAS Stencil Challenge .....


This month's theme is all about using your stencils with Heat Embossing


I've simply used Versamark ink through my stencil design ....... applied using a sponge ....... and then sprinkled gold and silver embossing powders over the top and heated in the usual way.


If you wanted a little more dimension to your stencil design, use stencil paste instead of the Versamark, sprinkle with embossing powder whilst the paste is wet, and leave to dry.  Heat the embossing powder once the paste is dry.  This also creates a little more texture too.

I die cut the word star from three snippets of card, layered two of them together and covered the third with Versamark ink and used the embossing powders again.  I did this a couple of times, to create a thicker embossed layer


I attached the embossed word on top of the others and then inlaid it into the stenciled panel.
Finished of the sentiment with a little stamping.


Another fun way of using your stencils.

See you in the gallery!

Thanks for popping by ........ enjoy the rest of your weekend.
We've got the family coming round later ..... don't think they're here to see us, they want to check out the new motorhome I think!

Cheerio until next time .......


Products used:

CAS Mix Up
Stamps: Hello Lovely (Concord & 9th); Simply Said Blocks (Uniko); Tiny Words (Simon Says Stamp)
Inks: Distress Ink - Picked Raspberry (background colour); Versamark;
Acrylic Paint: Fresco Finish Chalk Acrylic - Wisteria, Lavender, Magic Moss, Granny Smith, Lemon Meringue (PaperArtsy)
Other: White Embossing Powder (WOW!);

CAS Stencil
Stamps: Written in the Stars (MFT)
Stencils: Shooting Stars - Funky Fossil
Inks: Versamark, 
Other: Gold & Silver Embossing Powders (WOW!); Shining Stars Die (MFT)

Wednesday, 4 March 2020

Birthday Fishes for the CAS Stencil Challenge .......

Happy Wednesday .....

Guess what ..... have I mentioned it's my birthday tomorrow!!!
I'm 29 ..... again, and again, and again. In fact I'm 29 again for the 29th time (hubby worked that one out!!)

Anyway, enough about my birthday ...... it's time to get this month's CAS Stencil challenge underway.
Viv is our host for March, and the theme is ..... Heat Embossing


This is another fun way of using your stencils.
We've all sponged inks and paints through our stencils,  applied some texture paste perhaps. Well, how about trying some heat embossing.  Use your stencils instead of stamps ........ apply Versamark or an embossing ink through the design, sprinkle on some embossing powder and heat in the normal way ..... easy!


Use your coloured inks too, all you need is your ink to stay wet long enough for you to get the embossing powder on the top.
I've used Distress Oxide inks on the above design.  These inks do tend to stay wet for a little while so if you're quick enough you can sprinkle your embossing powder over the top and then heat in the usual way.
Regular Distress Inks also work, Versafine and Versafine Clairs work well too, and I'm sure there's lots more brands that you could use,  just play around with the inks you have.

My background is a mop up piece from my stash ....... I think its just Distress Ink on plain white cardstock, nothing fancy.
I then used a Funky Fossil stencil and applied Distress Oxide Inks through the design


I quickly sprinkled sparkly embossing powders over the top and heat embossed .....


It looks so pretty when the light catches the fish .....


I added a sentiment, and finished off with a few dots of Nuvo Drops to look like bubbles


Need more inspiration?  Then pop over to the CAS Stencil Blog for more fun ideas from the rest of the Design Team and, our lovely Guest Designer ..... Cat (Cat Luvs Paper) who's joining in the fun this month.   You'll also find some useful video links on there too.

Thanks for popping by ..... enjoy the rest of your day.

Not sure if I'm looking forward to tomorrow or not ....... we're out in the evening which will be nice but, I have an appointment at the hospital in the morning.  A simple routine check for a woman of a certain age ....... yes it's time for a mammogram ..... Happy Birthday Me!!

Cheerio until next time ......


Products used:
Stencils: Shoal of Fish (Funky Fossil)
Stamps: Gill Friends (MFT) - for the sentiment
Inks: Distress Oxide Inks - Tumbled Glass, Salty Ocean, Twisted Citron; Distress Ink - Tumbled Glass (background); Versafine Clair - Warm Breeze (sentiment)
Other: WOW! Embossing Powers - Under the Sea, Glacier, Golden Pine; Nuvo Drops - Sea Breeze