Tuesday, 22 December 2020

Wishing you a very Merry Christmas .......

Happy Tuesday .......

Not long now until the big day.

Before this week gets even more crazy, I just want to say a big Thank You to all who have visited my blog over the last year.  I really do appreciate the support from each and every one of you, especially this year!

The craft room door is now closed for the rest of 2020,  I've decided to take a much needed break and hopefully recharge my mojo!
Don't worry, I'll be back, raring to go, on January 1st for the start of 2021's Blog challenges ...... see you then.

All that's left for me to do now is wish you all a Merry Christmas and a Very Happy and Health New Year.  


Make it a good one!

Thanks for popping by ....... see you on the other side!


xxx

Tuesday, 15 December 2020

It's beginning to look a lot like Christmas ..........

Good morning ...... Happy Tuesday!

Ten days to go until the big day ...... are you ready?
I'm getting there ..... all the decorations are up now, presents are bought.  I've made a start on the gravy for Christmas dinner with the help of Jamie Oliver.  The cranberry sauce will be made later this week, and guess what ...... the Christmas cards are finally finished ... yeah!   
There's just a few more to write then I'm off to get them in the post, and hopefully they'll be delivered in time.

(Note to self ..... don't leave things so late next year!!!!)

For the last few cards I decided on pretty poinsettias ......... Christmas wouldn't be the same without those glorious blooms

  
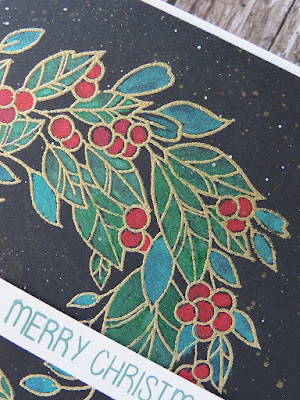
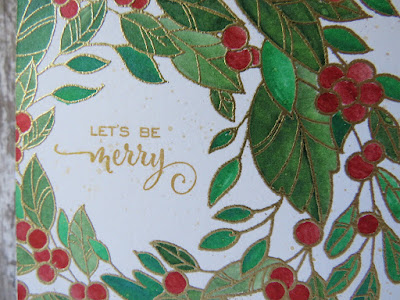
and some festive foliage ........ not exactly a Christmas stamp set this one but, I think it works in the festive shades


The poinsettias are from the Colorado Craft Company ...... and are perfect for slimline cards.


I stamped and heat embossed in gold, and then used Twinkling H2Os to colour the blooms ......


A simple sentiment in the centre and a few splatters of gold onto the background ...... very festive!
But, how elegant do those poinsettias look left without colour and just a touch of sparkly glitter ..... gorgeous!


On these ones, I stamped the sentiment in red and added a few dots of white enamel accents onto the background


For the foliage cards I used a Stampin Up! set which I've had for a while (one of those MUST HAVE stamps, then when it arrives it doesn't get used ...... you know the ones) 

I used Distress Inks to stamp the pretty foliage around the edge of a square piece of card


Added my sentiment across the centre, and added some gold splatters ...... easy!


To finish, just a few touches of glitter here and there to add a little Christmas sparkle


And that's it ..... this years Christmas cards all done!   
Next job, post office.  Coffee is needed first though.

Thanks for popping by ..... enjoy the rest of your day.

Cheerio until next time .......


Products used .......
Poinsettia cards 
Stamps: Big & Bold - Slimline Poinsettias (The Colorado Craft Company)
Inks: Versamark ink; Versafine - Crimson Red (sentiments); Delicata - Golden Glitz (splatters)
Other: Gold Embossing Powder (WOW!); Quickie Glue Pen, Fine Crystal Glitter

Foliage cards
Stamps: Forever Fern (Stampin Up!); Season's Wishes (Mama Elephant)
Inks: Distress Inks - Evergreen Bough, Pine Needles, Festive Berries; Delicata - Golden Glitz (sentiment & splatters)
Other: Quickie Glue Pen; Fine crystal glitter

Friday, 11 December 2020

A flurry of snowflakes ......... on my Christmas cards that is

Happy Friday ........

The end of another week ...... I hope you've had a good one.  
Can you believe that two weeks today it'll be Christmas Day ..... two weeks!!!  I need to get a move on and find the festive spirit.

My cards are nearly all done, thank goodness.  Just a few more designs to share with you.
It's snowflakes today ...... always have to include some in my Christmas cards


These might not look CAS but, they were really easy to do.  I used my MISTI for most of the stamping and heat embossed with white, a sparkly gold, and silver embossing powders.

I love how different they look on the coloured cardstock ....... I had to include a festive red


A classic navy for a real stylish look ......


And a frosty turquoise blue, which I think is actually my favourite .....


I did the stamping and heat embossing first, then filled in any spaces with smaller snowflakes, stamping these in inks the same colour as the card.
I then sponged some of the ink around the edges of the card to add some depth, stamped my sentiments in gold ink, and finished with a few dots of glitter here and there, and a splattering of white paint over the top.

If you're not keen on all that stamping and heat embossing, how about these one layer designs, using the gorgeous Blizzard Hugs stamp set from The Ton


I stamped using gold and silver metallic inks


And then added a touch of sparkle with a Quickie Glue Pen and some fine crystal glitter .....


The large snowflake looks fabulous heat embossed .......


And then lots of sparkly glitter added ......


I also stamped it using a coloured ink ......... so pretty.


There's a whole blizzard of snowflakes there ...... thankfully it's only on the cards.

Thanks for popping by ..... enjoy the rest of your day and have a lovely weekend.

Cheerio until next time ......


Cards on coloured cardstock
Products used:
Stamps: Swirly Snowflakes, Mini Swirly Snowflakes (Tim Holtz); Small snowflakes are an old Stampin Up! stamp;  Slimline Poinsettias (Colorado Craft Company) for the sentiment
Inks: Distress Inks - Aged Mahogany, Chipped Sapphire, Speckled Egg; Delicata - Golden Glitz, Versamark
Other: Embossing Powders - Metallic Silver, Bright White, Metallic Gold Sparkle (WOW!); Fine Crystal Glitter, White Acrylic paint

One Layer cards
Products used:
Stamps: Blizzard Hugs (The Ton)
Inks: Delicata Metallic inks - Golden Glitz, Silvery Shimmer, Versafine Clair - Nocturne; Harmony by Spectrum Noir Opaque Pigment ink - Oasis
Other: Quickie Glue Pen, Fine Crystal glitter

Tuesday, 8 December 2020

A CAS Snowy Lodge ...........

Happy Tuesday evening ........

I hope you're having a nice week.  
Mine's got off to a bit of a slow start after the weekend of Christmas parties.  

We had a great night on Saturday although we did leave early.  It was really nice to catch up with everyone, it was the first big social gathering from hubby's work since the beginning of the year so everyone was there.
Then on Sunday it was Christmas lunch with my crafty ladies ...... always fun when we all get together.

It's been blowing a right old hoolie here all day.  The good news is I didn't have to go out in it and ...... I'm almost finished with the Christmas cards ..... whoo hoo!!

Keeping things clean and simple seems to be my theme this year ......... 


I do like a bit of Kraft card for the festive season, and I love the contrast from the black stamping.

I used my MISTI to stamp the snowy lodge, then with the card still in the stamping platform, I coloured the snow using a white gel pen.


Once this was dry I re-stamped the image again over the top of the white gel pen, to put back any of the detail that I might have been covered up.

I stamped and heat embossed the sentiment using a fine detail gold embossing powder ......


added a touch of sparkle here and there with some fine crystal glitter ......


and finished with few splatters of white paint onto the background, and a little bit of white ink brushed around the edges, to give a real snowy look ...... brrrrr!


That's a few more done, just need to get them in the post now!

Thanks for popping by ..... enjoy the rest of your day.
I'm off to tidy up this mess just a little bit ...... it's been a snowflake kind of day today, I'll share the results later in the week


Cheerio until next time .......


Products used:
Stamps: Winter Lodge (Inkylicious); Big&Bold Slimline Poinsettias (Colorado Craft Company) - sentiment
Inks: Versafine Clair - Nocturne; Versamark; Distress Ink - Picket Fence
Other: Gold Embossing Powder (WOW!); White Gel Pen; Fine Crystal Glitter, White Acrylic Paint (PaperArtsy); 

Friday, 4 December 2020

Festive wreaths ....... and we've had our first snow!

Happy Friday .........

The weekend starts now!
I'm still busy with Christmas cards, but we're getting there ...... slowly.    
The craft room is a total mess, I think I've had nearly every Christmas rubber stamp that I own out this week, and hardly used any of them!!   And there's soooo much glitter everywhere, the whole house is sparkling! 

Remember the card I made for the last CAS Mix Up challenge ......


Well I decided to make a few more ........ with a few changes


I kept the wreaths off the edge, heat embossed in gold and painted them using pearlescent paints


This time I added ink splatters onto the background, cut the black panel down slightly to give a white border and added my sentiment on a banner. 


I also tried the same design on white cardstock ........ which I think is actually my favourite


I used the same colours of paints for both cards, I love how different they look on the white .......


I went for a small sentiment so that it would fit in the centre of the wreath .......


And I added a few sequins to finish off .......


Note to self ....... next year start your Christmas cards EARLY!!!!!!

We've got a busy weekend coming up ..... the Christmas parties are starting.  
We've got hubby's work Christmas party on Saturday night ......... always a good night.  And then on Sunday I'm off out with the crafty girls for our Christmas lunch, which reminds me I need to wrap my Secret Santa gift! 
I also need to dig out the winter coat I think, our weather has turned a little chilly.
We had our first snow yesterday ..... not where we are but up on the high ground.  Lauren drove over the mountain in it and then I spotted this beautiful photograph on Facebook which someone took .....

photo taken by Isle of Man by Drone

Brrrrr ........ it looks cold up there!

Thanks for popping by ..... enjoy the rest of your day and have a lovely weekend.
I'm off to write my first Christmas cards now and hopefully get them in the post later!

Cheerio until next time ......


Tuesday, 1 December 2020

Welcome to December ...........

Happy Tuesday ........

And a Happy 1st of December ....... the countdown is on!

I hope your week has got off to a good start.  We had a bit of a busy weekend so yesterday was a quiet one here.
  
I've no blog challenges for you this month, CAS Mix Up and Simply Sweet Poppy are having a very well deserved Christmas break.  Don't worry though we will be back again, raring to go, with a whole load of new fun challenges for you in January.

It does mean that I can concentrate on getting my Christmas cards finished ...... yes I'm still making them (I'll apologise now if any are late arriving!) 

If you're like me, and still looking for festive inspiration, then how about these for quick and easy, fun Christmas cards ......


I'm loving the new Aperture Stencils from Sweet Poppy, I used the tall triangle on a couple of my show samples recently and I loved the finished look so, I decided to create a few more quick and easy, contemporary designs.

Looks great in festive reds and greens ..........


I simply masked across the bottom of my card using low tack stencil tape and then used the tall triangle stencil to create my little forest of trees

I started in the centre and inked through the aperture with Distress Ink, building up the colour gradually.
I then masked off the inked edges of the triangle shape, moved the stencil over a little, varying the height and size of the triangle, and applied a different colour of Distress Ink through the aperture, repeating the process across the full width of the card


A gold star on the top, a few dots of White Enamel Accents to give the look of falling snow, and a touch of glitter along the edges for added sparkle.  And of course a festive sentiment to finish


Another fun, easy way of masking is to use a piece of copier paper cut by hand to create the look of snow covered hills.  
And Christmas cards/trees don't have to be red and green ..... how pretty do the trees look in shades of icy blues


Exactly the same process as before ...... moving the stencil along the edge of the mask, covering any inked edges that show, and varying the height.

All the cards are 7x5 inches (my favourite size), and this technique works both portrait or landscape, and just think of all the colour combinations you could try.
 

The Christmas card box is filling up ....... very slowly!
I was in town earlier with Lauren and I must confess I very nearly bought some Christmas cards (NOOOOO!!!!)  Can you imagine if I actually sent shop bought cards ....... ooohhhhh !!?!!

Thanks for popping by .... enjoy the rest of your day.

Cheerio until next time ...... 


Products used:
Stencils: Tall Triangle Aperture Stencil (Sweet Poppy)
Stamps: Big & Bold Slimline Poinsettias (Colorado Craft Company) - for the sentiments
Inks: Distress ink - Rustic Wilderness, Evergreen Bough, Barn Door, Tumbled Glass, Faded Jeans, Weathered Wood, Chipped Sapphire, Shaded Lilac; Versafine Clair - Nocturne
Other: Crystalina Glitter (Sweet Poppy); White Enamel Accents (Ranger); Die cut star from my stash

Tuesday, 24 November 2020

In the Pink for the Simply Sweet Poppy Stencils challenge ........

Happy Tuesday ........

I hope you're all well, and that your week has got off to a good start.  Can you believe this time next week it will be December ........ I really do need to get some Christmas cards done!  

Today though, I have a reminder for you for this month's Simply Sweet Poppy Stencils Facebook Challenge.  Don't worry, if you haven't got your entry in yet, you've still got a few days left.   The deadline is 5pm (GMT) on  Sunday 29th November, and the winner will be announced on the Facebook page on Monday the 30th.

The theme this month is ..... In the Pink!  Now, don't go thinking that means flowers, it can be absolutely anything, as long as it's pink.  If you read my challenge post from earlier this month I had a pink snowflake, and also the Sweet Poppy Highland Cow looked very pretty in pink.  
Have a look at your stencils, and just go for it!

How about a pink kitty cat ........


Using the Sweet Poppy stencil tape, I masked off around the edges of a piece of white card and then used a brush to apply a tiny bit of colour onto the background 


With the tape still in place, I added in the cherry blossom keeping the design to the top half and just one side edge of the inked background.


I removed the stencil tape and stenciled in the cat, taking the image over the edges of inked background 


For the cat I used a couple of shades of pink (Distress inks) and built up the colour gradually.
I then masked off the pink areas whilst I added colour onto the wall.


A little splatter of water adds a bit more interest to the brickwork, and I finished by adding a simple stamped sentiment and some glitter onto the blossom flowers.

There's a £40 voucher for the challenge winner to spend on the Sweet Poppy website (wouldn't that be a nice early Christmas present!)  Just follow the simple rules to be in with a chance of winning ......


Happy stenciling!

Thanks for popping by ..... enjoy the rest of your day.
Time for a quick coffee them I'm off to the craft room ..... wish me luck!  I'm not coming out until I've made a start on some Christmas cards ...... I could be in there a while!

It is starting to look a little more festive around the house ..... the conservatory tree has finally been decorated


And this was how I spent the weekend .......


There's still a few gaps on the tree in the lounge, a few more baubles are needed I think! 

Cheerio until next time ...... 


Products used:
Stencils: Cherry Blossom, Cat on the Wall (both by Sweet Poppy but unfortunately the cat may be retired)
Inks: Distress Inks - Broken China, Spun Sugar, Picked Raspberry, Worn Lipstick, Tea Dye, Aged Mahogany; Versafine Clair - Nocturne
Stamps: sentiment stamp from my stash
Other: Fine Crystalina glitter (Sweet Poppy)