Showing posts with label Stencil paste. Show all posts

Thursday, 24 November 2022

The final Simply Sweet Poppy Facebook Challenge ..........

Happy Thursday ..........

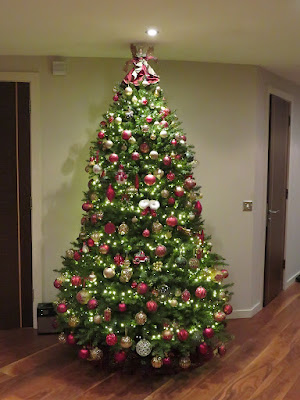
I hope you're all well. It's very wet and blowing a hoolie here, not the weather we wanted for the Christmas Lights switch on in Douglas this evening.  Think we'll give it a miss if it stays like this, and I might just switch on my own Christmas lights and decorate another tree ....... a bit early I know but there's already one up in the hall!! 

If you're a fan of the Simply Sweet Poppy Stencils Facebook Challenge then time is running out to get your entry in for this, the final challenge .......... The Magic of Christmas!.  

As always, there's a £40 voucher for the winner to spend on the Sweet Poppy website.  Just follow the simple rules .........  use only Sweet Poppy stencils, keep any stamping to a minimum, and stick to the challenge theme ...... easy!

So, what makes Christmas magic for you?  

It's got to be family and friends for me, and I love all the trees and decorations .........


For this card, I used the Sweet Poppy Snowflake Tree (at least I think that's what its called ...... I can't find it on the website so unfortunately I think it may have been retired, which is a shame as it's a lovely tree.  There are other gorgeous designs on there that you could use instead)

I used Pearlescent White Stencil Medium onto black cardstock, sitting the stencil off the edge of my card


Once the paste was dry, I used a blue Stardust gel pen to add colour to the ribbon.
I also used a glue pen to add glitter to the snowflakes ...... looks so pretty and sparkly in real life.


I finished off with white paint splatters on the background and a simple heat embossed sentiment


Next up, baubles!  You can never have enough baubles on your tree!


I'm so sorry but, I think this stencil is also retired, or it may just be out of stock, because I couldn't see this on the website either ........ maybe I should check the website first, before I make my cards!!!!!

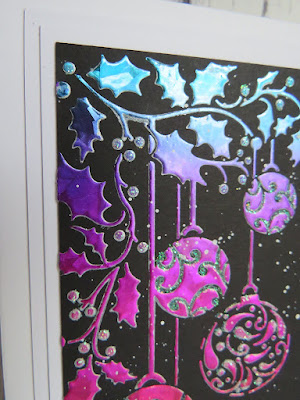
Anyway ...... I used the paste again, this time when it was dry I added some rainbow coloured foil over the stenciled design, and then ran it through my laminator


I added some crytal glitter to give sparkly highlights (and also disguise where the foil hadn't quite covered completely!) 


And I finished off with some white paint spatters and a festive sentiment 


The challenge is open until the 29th of the month so there's only a few days left to get those entries in.

Happy stenciling!

Thanks for popping by ..... enjoy the rest of your day.
We might have another tree up this evening, we'll see how things go today.
I've got my crafty bunch coming at the weekend and the deal was, I had to have a tree up as it's probably our last crafty get together before Christmas.

Well ....... I did it.  There is a tree up, only took me five and a half hours!    


It still needs a few more baubles on it though.  I'm sure it grows every year!!!  I'll have to see what I can do before weekend!

Cheerio until next time .......

Wednesday, 1 June 2022

We're back!! ..........

Happy Wednesday ......

Can you believe were in June already!!!!  How's your week going so far? 

It's all go here on the island.  What with the TT that's well underway,  and the Queen's Platinum Jubilee weekend coming up, there's loads going on.

This month also sees the return of the CAS Mix Up Challenge! ......... whooo hoo!!!  Have you missed us?
It's so nice to be back after our little break, and we've got a fun challenge for you this month.   
We're kicking things off again with a Stencil challenge.  
There's lots of ways to use stencils but for this particular challenge we'd like to see you use them with Pastes or Gels


There's lots of different pastes and gels out there ..... from simple white embossing pastes, or clear gels that dry glossy or matte, through to glitter pastes, crackle pastes, or gels with different textures in them.  And of course you can always create your own.  Check out the video links on the challenge post for some great tips and techniques.

Need some inspiration?  How about a pretty floral card using the new gorgeous Peony stencil from Sweet Poppy


I used Distress Inks first to apply the colour through my stencil


I removed the stencil and cleaned off any excess ink before placing the stencil back over the top of the colour.
I then applied Translucent Stencil Medium to the flower heads, over the top of the ink.  I carefully removed the stencil and whilst the paste was still wet I sprinkled some clear Ultra-fine Glass Microbeads over the top and left it to dry


The ultra-fine beads are tiny, and they give a lovely fine texture whilst letting the colour show through


To add a bit more interest to the background I used a piece of acetate to smoosh a little more of the Distress Ink colours on there


and then finished off with a simple sentiment.


Check out the fabulous makes from the rest of the Design Team and, to celebrate the return of the CAS Mix Up Challenge we have not one, but two amazing Guest Designers this month.  Julie (Crafted by Jules) and Darnell (Djkardkreations) are both joining in the fun, so be sure to pop by and say Hello!

I can't wait to see you all in the gallery ....... it's great to be back!!

Thanks for popping by ..... enjoy the rest of your day.

As I said it's so busy here at the moment, TT fans are arriving by the ferry load everyday and the roar of motorbikes around the island sounds amazing!
Practice week is in full swing and, we got our TT celebrations off to a good start on Sunday evening when we went to see Jessie J .........


We had a great night ...... she was amazing!!!

So, this week we have the long Bank Holiday weekend to look forward too. We've got some friends comming for a BBQ tomorrow, then it's Mad Sunday.   Hopefully we'll get up to the Grandstand at some point over the weekend, and then it's race week next week,  with the Red Arrows coming over on Tuesday, and we have another bank holiday here next Friday, for Senior Race Day ...... its all go!! 

Cheerio until next time ........


Supplies:
Stencil: Peony (Sweet Poppy Stencils)
Inks: Distress Inks - Kitsch Flamingo, Mowed Lawn; Versafine Clair - Nocturne (for the sentiment)
Stamps: better with age (Penny Black)
Others: Translucent Stencil Medium; Ultra-fine Glass Micro beads - clear (Sweet Poppy Stencils)

Thursday, 6 February 2020

More new releases ....... Sweet Poppy Stencils are back!

Happy Thursday evening .......

How's your day been ......... are you ready for the weekend? 
If you're a Sweet Poppy Stencils fan then you're in for a treat.  Book your place on the sofa, or set your box to record, because Lucy is back on our TV screens ..... yeah! 
New stencil designs, new Sweet Poppy foils (oooh!) and lots of tips and techniques.

Saturday 8th February ...... 8am and 12 noon
Hochanda ..... Sky channel 673  Freeview 85  Freesat 817

Here's a peek at some of the new stencil designs, and a look at what's come out of my craft room this week.


Fancy a closer look? ....... oh go on then!


I think this little guy is my favourite ...... I love hares!  And he's so easy to use. 


I created my backdrop for him first ....... I simply drew around the outside of the stencil with a pencil, just to give me an idea where I needed to apply the colours.  I then used Distress Oxides and a bit of masking to create the scene.
Once I was happy with it I placed the stencil over the top and used black ink to add the design


A touch of crystal glitter to some of the foliage .....


And I finished off with a sentiment on the bottom .....


Can you spot the touch of foil on the word Love ....... I used a sticky embossing powder, heated it and then laid the foil on the top ...... simple!


I know I keep saying this but .......you don't always have to use the whole of the stencil design.  Another great thing about stencils is you can turn them over ..... see how the hare is facing the other way


This little guy looks great on his own, and I thought he was perfect for one of the Sweet Poppy sentiments


I used Oxide Ink through the stencil ....... and then fussy cut around the hare.  How cute is he!


Another gorgeous new circle design is the Fairy Circle 


These designs are the perfect size to fill the whole of a card ..... all you need is a pretty background.
This was in my leftovers box, already coloured (with Distress Oxides I think)  I just added a little bit more interest with some stamping, using one of the Lavinia script stamps and an ink that was a similar shade to the background


Black ink again through the stencil, and a touch of sparkle with some crystal glitter


No sentiment this time, but I did add a few dots of Nuvo Drops around the edge


Well that's two of the new stencil designs that will be on the show, hope you like them. 
I do have two more which I'll share tomorrow.

Thanks for popping by ..... enjoy the rest of your day.

Cheerio until next time .....


Products used:
Stencils: Hare Circle, Fairy Circle (Sweet Poppy Stencils);
Stamps: A6 stamp sets - Family and Life is a Journey - for the sentiments (Sweet Poppy); Sacred Spells (Lavinia script stamp)
Inks: Distress Oxide Inks - Scattered Straw, Stormy Sky, Faded Jeans, Chipped Sapphire, Evergreen Bough; Hickory Smoke; Versafine Clair ink - Nocturne; Versamark ink;  Delicata Gold and Silver inks for the splatters
Fairy card ...... I think the colours are Mustard Seed, Dried Marigold, Worn Lipstick and I stamped with Versafine Clair - Summertime
Others: Sticky Embossing Powder (Ranger), Turquoise Metallic Foil (Sweet Poppy); Crystalina Glitter (Sweet Poppy); Nuvo Drops

Saturday, 18 May 2019

Reach for the stars ......

Happy weekend .......

I hope you're having a good one.
It's time for a quick reminder about this month's CAS Stencil Challenge.
Our host for May is the lovely Sue, and the theme is a real fun technique for you to try ....... Stenciling over a Coloured Background


There are lots of ways to try this technique ....... use your stencils over coloured cardstock or pretty patterned papers.  Create your own coloured backgrounds using inks or paints and then stencil over the top ..... it's a great way to use up all those pieces that didn't quite turn out as we had hoped!
Or stencil over one of those mop up pieces of card that we all have a stash of  The list is endless.  Just remember to keep your designs Clean And Simple as well as following the theme.

I've used a piece of black cardstock here that's been sprayed with the new Distress Oxide Sprays, and then stenciled over the top using a white paste.


I simply spritzed the black card using the Oxide sprays and left it to dry.


These sprays are fab .... and they work so well on dark cardstock.

Once the ink was dry I took the Shooting Stars stencil and used a white aste through the design.  Whilst the paste was still wet, I sprinkled the stars with a fine crystal glitter to add some sparkle


I stamped and heat embossed the word 'stars' using a silver embossing powder


and stamped the rest of my sentiment onto a snippet of white card, and attached it using foam pads.


To finish off I added a sparkly die cut star.

There's still plenty of time to enter this month's challenge.  Check out the CAS Stencil Blog for all the details, along with more fabulous inspiration from the rest of the Design Team.  We also have our lovely Guest Designer Michele with us again so be sure to pop by and say hello.

Thanks for popping by ........ enjoy the rest of your weekend.

Cheerio until next time ......


Products used:
Stamps: Reach for the Stars (Uniko)
Inks: Distress Oxide Sprays - Picked Raspberry, Mermaid Lagoon (I think!); Versafine; Versafine Clair - Nocturne 
Others: Black cardstock; Silver Embossing Powder (WOW!); Shooting Star stencil (Funky Fossil); White stencil paste; crystal glitter 

Friday, 10 May 2019

A quick reminder for the Craft Stamper challenge .......

Happy Friday .......

It's almost the weekend again.  It's a special one too ... if you're a crafter that is, and in the Port Sunlight area on the Wirral.  It's the Happy Stampers Spring Festival tomorrow and I've got my ticket!!


Yes, I'll be up at the crack of dawn to meet the girls and then we catch the early morning boat sailing across to Liverpool (fingers crossed it's not a bumpy ride!) 
It's a long day, but well worth it ..... and so much fun!
The whole day will be spent chatting, and catching up with friends.  There'll be craft shopping, and coffees.  Lunch out, followed by more shopping. Afternoon tea, no doubt with cake, and possibly a bit more shopping before heading home on the evening boat!  I'm ready to go!

Before all that though,  it's time to remind you about this month's Craft Stamper challenge
As always the theme is Anything Goes ...... as long as there's actual rubber stamping on your project somewhere.
The prize this month, for the Challenge Winner are these amazing stencils from AALL & Create ..... aren't they fab!


Don't forget we have two winners each month, the other is the Design Winner, chosen by the DT, and they get their work published in the magazine.  Find out all the details, along with the challenge guidelines over on the Craft Stamper Blog

Speaking of stencils, I've been having fun with some brand new releases from Sweet Poppy Stencils.  There's new stencil designs and ....... for all you Game of Thrones fans, a brand new Dragon clear stamp set.


I've used one of the stamps to embellish my altered notebook.

This little notebook started out with a plain and simple kraft cover. 
I added some colour to the front and back covers using Distress Oxide inks in various shades of green, and a little bit of Aged Mahogany here and there.
I then used one of the new stencil designs, and the Translucent Stencil Medium to add the texture


Whilst the paste was still wet I sprinkled over some fine crystal glitter and then left it to dry.

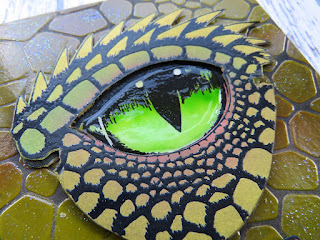
I stamped the dragon eye twice, onto white cardstock and used Distress Oxides to add some colour.


I fussy cut around both of them, and cut out the actual eye from one. Using foam pads I layered the two together and gave the green eye a coat of Crystal Glaze


Once the stencil paste was dry I sponged over the top with a black ink.  The stencil paste acts as a resist, so the black ink only settles in between the scales.  I wiped off all the excess leaving the stencil dsign to show through ....... the green showiung through the stencil paste with the black in between


I attached the eye onto the front of the notebook and added a sentiment from the Dragon stamp set underneath


The little banner that it's on is from a set of sentiment stamps by Avery Elle that has a matching die which makes it easy to cut out.

Here's a quick look at the whole finished cover ......


Are you a Game of Thrones fan? We're all GoT mad here. 
Will you be staying up until 2am on Sunday/Monday to watch the latest episode on Sky Atlantic?  We might ..... we'll see.  If not, we shall be getting up early on Monday morning so that we can watch it before hubby goes to work! 
Don't worry, if you're not a fan there's only one more episode left after this weekend!!!

Thanks for popping by ...... enjoy the rest of your day and have a lovely weekend.
And if you're off to Port Sunlight, enjoy the day ..... spend loads!  See you there.

Cheerio until next time .....


Products used:
Stamps: A5 clear stamp set - Dragon (Sweet Poppy); Banner Bits (Avery Elle)
Inks: Distress Oxide inks, Verrsafine Clair - Nocurne: Versafine
Others: Small notebook; Faux Dragon Leather Stencil, Translucent Stencil Medium, Fine Crystal Glitter (Sweet Poppy); Crystal Glaze (Nuvo); Gold embossing powder (WOW!);